USB power plug

Joined
Jun 19, 2015
Messages
84
Location
Onalaska, WI
Bike
2009 BMW R1200RT
Might need some help with installing and wiring my accessory plug. I'm looking to provide power for my IPhone and my Garmin Nuvi. Yes, both at the same time.

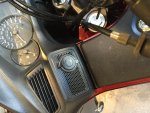
I have the left side pocket out, and the black plastic grill that sits below that out also. I'm heading into the garage to remove even more of the Tupperware. I think that I have got my hand on the connector that is allegedly in the left side, just not sure. Since I have no idea what it looks like, or what the connection entails, I think I'll remove the rest of the fairings just to be sure.

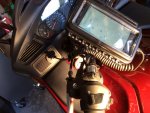
What do I need to do to connect the accessory plug assuming I live long enough to find it? Tell me it has the fittings to simply attach to the male end of the plug? Does this pre-wired connector have a fuse? Is it an always on connection? Would it actually be smarter to just wire a fuse block to the battery and use that?

Has anyone placed a plug anywhere other than in the left side pocket? Obviously, I would want the connection to be waterproof.

I'm not an electrical engineer, but from what I've seen so far from these Honda engineers, I should be proud. Do engineers have self respect like other Homo sapiens? Does this really need to be like a 2 wheeled Rubik's cube? Does anyone, anyone...think it's fun to spend 3 hours searching for the one hidden screw that's holding the plastic bits on? Does each screw, hex bolt, nut have to be different in type and size?

TX,
Pete

Plug:
http://www.amazon.com/gp/product/B00VW4HGPK?psc=1&redirect=true&ref_=oh_aui_detailpage_o05_s00
 
Joined
Dec 14, 2010
Messages
2,007
Location
Tijeras, NM
Bike
1984 Moto Guzzi T5
And, no, engineers are not sadists. They are just told to make it fit, not have any screws showing, not rattle and be cheap, as in REALLY, REALLY cheap. As in, if you can save 1 cent, then do it. So, a lot of sticky tape and hidden plastic connectors that break when you try to get them to let go.

Honda makes a little harness with a plug that fits the connector you will find taped to the frame rail under the left fairing. The only reason to get at the connector is so you do not have to cut the factory harness. IIRC it was only $10 but it was an item that had to be ordered by the dealer so just find it online and get it delivered to your house. Honda also has a cig lighter outlet that fits that harness if you want that kind of connection.

Where to put them. I put mine in the right hand pocket. I 'saved' the left side for stuff I wanted to lock up. If I had it to do over I'd put a high output 'waterproof' style USB and a Powerlet outlet on the dash somewhere. The speaker grills to me would be a good place. If you need a cig lighter outlet I'd put it there too. Find one of the marine type with a spring loaded cover.

FYI, if you put them in a pocket, make sure you can still get the pocket in and out of the space. I screwed up on mine and it was a royal PITA to get it back in.
 

DirtFlier

Site Supporter
Joined
Dec 13, 2010
Messages
3,341
Location
Troy, OH
Bike
2010 Silver NT700V/ABS
If you don't have one already, you need to buy a Honda Service Manual from Helm in Detroit. I'm assuming you don't have one because the manual shows the locations of the accessory plugs on the left side.
 
Joined
Dec 14, 2010
Messages
235
Location
On the dry side of the Cascades
Bike
2) 2010 red NT's
I have had all the panels off my NT and there is no 'plug and play' for that style of USB plug. Honda does sell one that is, though. You will have to find/fabricate a plug that slides onto the blades of your USB that will either a)match the Honda plug on the bike or b)hook to the battery. There is also an aftermarket replacement handlebar bridge that has a Powerlet plug on it.

I installed a FuzBlock on my NT. From there, I ran an ASE style plug up to the handle bars. When I have time, it will be replaced with a more permanent panel mount USB plug and a BMW style plug.

The NT's Tupperware is a nightmare to deal with. If you don't have a service manual, the best thing to do is go to Bike Bandit or such and pull up an exploded parts diagram of the section you are working on That will help with what screws need to be removed.
 
OP
OP
NooBiker
Joined
Jun 19, 2015
Messages
84
Location
Onalaska, WI
Bike
2009 BMW R1200RT
My second idea was to put the plug right in the speaker, or the vent. In theory, if it was raining cats and dogs, I could unplug the devices till it stops, and put the waterproof lid back on the connection. So far, the meatheads are winning the pulling off the gauge housing battle...

Again with the engineers...we used to use cigarette lighter plugs because they were there. Cig plugs are essentially McGyvered connections. Are we still installing new ones? Really?
 
OP
OP
NooBiker
Joined
Jun 19, 2015
Messages
84
Location
Onalaska, WI
Bike
2009 BMW R1200RT
OMG!
The parts schematic at Babbitts is a great place to look for the attachment points!!!
Thank you! Great idea!
 

Phil Tarman

Site Supporter
Moderator
Joined
Dec 12, 2010
Messages
9,370
Age
81
Location
Greeley, CO
Bike
2010 Silver NT700VA (ABS)
I had bought Motorcycle Larry's handlebar risers before I took delivery of the bike and I got his bar clamp with them. It had a powerlet outlet and three removable screws which fit RAM balls. I mounted my GPS to one of those and I finally started using the powerlet outlet with a dual USB charger I got from Pashnit. I haven't used it yet, but will use it to keep my phone charged if/when I ever start riding distances again.
 
Joined
Jan 25, 2012
Messages
709
Age
62
Location
NSW, Australia
Bike
2013 DL650/A & CX500 Euro
I used a handlebar mounted USB 2 port weatherproof outlet that I purchased from my local motorcycle shop for around $29.00

I wired up this outlet using a relay with power directly of the battery (with fuse etc).

For the relay switching source I used a wire that only had power when the ignition is on. This way the outlet only has power when the ignition is switched on.

Seagrass
 

bicyclist

Guest
Yeah, but you can get at it without taking off all the stuff the instructions call for.
 
Joined
Dec 14, 2010
Messages
2,007
Location
Tijeras, NM
Bike
1984 Moto Guzzi T5
To me it was easier taking everything off. I wanted to run the wires through places I could not get to without removing the panels as well. With the panels off I could easily tie the new wires to stable places on the frame without contortions, small hands or long tweezers. ;)
 
Joined
Jan 11, 2011
Messages
139
Location
Spokane, WA
Bike
2010 Silver NT700 ABS
When I was ready to add power for the GPS and phone, the whole tupperware and wring harness issues became more of a muddled nightmare than a help. Someone here at the forum posted something about a power tank bag option, and I have to say, I have been completely happy with how it has worked for me.
I had an ASE pigtail that I ran from the battery up between the seat and tank for the Battery Tender. So, for about the same amount of money, I bought the Powerlet tank adapter, took a fairly inexpensive tank bag and used a soldering iron to burn a hole in it to mount the Powerlet, and then I just plug the pigtail from the Battery Tender into the bag, and voila, power to run the extra electronics. It works so well on the NT, I did something similar for my 2014 RT S Spyder.

http://www.powerlet.com
 
OP
OP
NooBiker
Joined
Jun 19, 2015
Messages
84
Location
Onalaska, WI
Bike
2009 BMW R1200RT
Well, I finally beat the Japanese engineers at their own game.
Right, wrong or indifferent...the USB plug is in.

In addition, I was really put off by the Garmin GPS that I purchased, so I am going to continue to use my iPhone 6S as my GPS.
That took me to the Ram mount Aqua Box...more engineers, obviously the Ram intern who worked on the Aqua Box has never actually used one. I drilled a hole in the waterproof box to accommodate the charger plug. Now I need to find an alternative case, or figure out how to seal the box back up...it'll be dryer than nothing...

Next project is rigging a hydration system...anyone ever mount a hydration pack? Like a Geigerrig?

image.jpgimage.jpg
image.jpg
 
Top Bottom