ended up using the one tool nobody mentioned

Joined
Oct 15, 2021
Messages
117
Location
NE Ohio
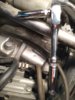
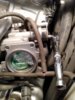
I decided that I needed to check the valves of my "new to me" 2010 NT700V. I have no idea of the maintenance history, so I just had to check them. All the information here really helped me with removing everything needed to get the job done EXCEPT HOW TO REMOVE THAT ONE SCREW on the front right of the throttle body assembly. I tried everything and couldn't reach it, then my son stopped by. He worked for about a half hour and finally yelled EURIKA! The "one special tool" he used was his much smaller hands:D I wear XXXL riding gloves and it seems that I was never going to get to that darn screw. So.....maybe have someone with some mechanical know how and small hands ready when you are ready to check your valves. Seriously, that screw is VERY difficult to reach.

Oh, at 22,000 miles, we found all 8 valves about 0.001" tighter than specs. Not bad, but we reset them all.

Overall, not a horrible job, but I think it is way more complicated than need be. Surely Honda could have made a few changes to make this easier.
 
Joined
Aug 25, 2012
Messages
445
Location
Genoa, IL, USA
Bike
2010 Red NT700V
I've taken right side crash bar cover off, and moved the coolant tank a bit, and passed a long 1/4 extension through the hole by the crash bar. It's a pretty straight shot.
 
OP
OP
cliffh
Joined
Oct 15, 2021
Messages
117
Location
NE Ohio
At least the headlight HAS to be easier than a valve adjustment, but I'll heed your advice.
I'll also make a note about using that extension and moving the coolant tank a bit. Thanks.
Cliff
 
Joined
Aug 25, 2012
Messages
445
Location
Genoa, IL, USA
Bike
2010 Red NT700V
Some points on valve adjust:

1. Now that you've checked them once, next time will go easier.

2. They stay in spec very well as the engine ages, I checked them for a 3rd time at 28k, only 1 needed a slight tweak, and won't bother checking them again until around 60k.

3. I replace the spark plugs at the same time, and with the coolant tank moved the front plug access is not too bad.
 
OP
OP
cliffh
Joined
Oct 15, 2021
Messages
117
Location
NE Ohio
I wonder why Honda didn't stay with the hydraulic lifters like they used on the PC800 which is very similar. I had a PC800 and the lack of required maintenance was a real plus.
 
Joined
Dec 20, 2018
Messages
77
Location
Merseyside, United Kingdom
Bike
Black Deauville NT700
Would approaching from a different direction with a long shafted screwdriver make a difference? Because I will be the next mechanic, I thoughtfully position the hose clamp.
 

Warren

2
Joined
Dec 13, 2010
Messages
2,334
Location
O'Fallon, MO
Bike
2019 Yamaha XMAX
I wonder why Honda didn't stay with the hydraulic lifters like they used on the PC800 which is very similar. I had a PC800 and the lack of required maintenance was a real plus.
The engine in the NT650/700V was not originally designed for it. Honda had been using this engine for the Hawk, Transalp and others that were sold in Europe like the Revere. These engine designs did not use hydraulic lifters and I assume the cost of redesigning it to include them was not worth the effort.
 
OP
OP
cliffh
Joined
Oct 15, 2021
Messages
117
Location
NE Ohio
Hi Nick. There just is no "good" direction to approach this screw. You will need a short Phillips head screw driver and patience. Once you find it and get a screw driver on it....well, the rest is easy. I even considered drilling a 1/4" hole in the frame to get a straight shot at it, but there are other things in the way. Small hands, patience, and an assortment of short phillips screwdrivers will get the job done, but it ain't easy.
 
Joined
Aug 25, 2012
Messages
445
Location
Genoa, IL, USA
Bike
2010 Red NT700V
Honda has been using this classic rocker arm design in engines for forever, it's durability is legendary. Yes, getting at that front band clamp is a PITA, but there's ways to get it done.

This lump of motorcycle powerplant is so reliable, any hassle I go though during valve adjust is forgotten tomorrow. This bike always puts a smile on my face, which is what it's all about :thumb:
 

DirtFlier

Site Supporter
Joined
Dec 13, 2010
Messages
3,341
Location
Troy, OH
Bike
2010 Silver NT700V/ABS
Although you never mentioned what the "screw" was securing, I assume you're talking about the clamp for the front cylinder's Fi body?

Long ago, I tried various methods and ended up making a spacer and used a longer screw so the screw head in question could actually be seen from the top. The long screw was made from 5 mm all-thread rod with the nut epoxy'd on the end. Now, I can loosen/tighten using a ratcheting 10 mm box wrench. :)

extended screw head for clamp.JPG

ps. both my sons are in their mid-30s and have hands much larger than mine!
 
Last edited:
Joined
Dec 20, 2018
Messages
77
Location
Merseyside, United Kingdom
Bike
Black Deauville NT700
Hi Nick. There just is no "good" direction to approach this screw. You will need a short Phillips head screw driver and patience. Once you find it and get a screw driver on it....well, the rest is easy. I even considered drilling a 1/4" hole in the frame to get a straight shot at it, but there are other things in the way. Small hands, patience, and an assortment of short phillips screwdrivers will get the job done, but it ain't easy.
It is difficult, however I have a number 2 Phillips with a very long shaft that will reach the fittings from the far side of the bike. It is possible to remove the clamps and flip them over. That may improve future access. Bear in mind that a previous mechanic may have refitted them incorrectly.
 
OP
OP
cliffh
Joined
Oct 15, 2021
Messages
117
Location
NE Ohio
I like that idea of the extended screw and actually thought about that.....after I put things back together:(
I once had a Phillips screwdriver with a flexible shaft that might have worked also if I could have found it.
My first new Honda was a 1964 and I could literally adjust the valves (both of them:biggrin:) in less than 15 minutes start to finish.
I realize that this current system works great and all, but the hydraulic lifters on my last 2 Honda's just made life a little simpler. I rode my Goldwing 114,000 miles and never had to adjust the valves, or really adjust anything on the engine. That was just nice.
Cliff
 

DirtFlier

Site Supporter
Joined
Dec 13, 2010
Messages
3,341
Location
Troy, OH
Bike
2010 Silver NT700V/ABS
Yes, it was also an afterthought for me after struggling with that clamp the first time so I concocted the modified clamp in prep for the next valve clearance adj.

And by the way, as the miles roll up you'll find the NT can go much longer than 8k miles for clearance inspection - easily double after roughly 20-30k miles.
 
Last edited:

Coyote Chris

Site Supporter
Joined
Aug 25, 2011
Messages
4,428
Location
Spokane
Bike
10 Red NT 14 FJR, 17 XT
Although you never mentioned what the "screw" was securing, I assume you're talking about the clamp for the front cylinder's Fi body?

Long ago, I tried various methods and ended up making a spacer and used a longer screw so the screw head in question could actually be seen from the top. The long screw was made from 5 mm all-thread rod with the nut epoxy'd on the end. Now, I can loosen/tighten using a ratcheting 10 mm box wrench. :)

extended screw head for clamp.JPG

ps. both my sons are in their mid-30s and have hands much larger than mine!
cliff, see my posts under valve adjustment I did roughly the same thing as DF, but I like his better. You can take a tiny socket or even a nut driver and get to it. The main magic is the spacer.
 
Joined
Jul 11, 2020
Messages
210
Location
Charlottesville, Virginia, USA
Bike
2010 Red NT700V
Is it necessary to remove the throttle body to adjust the front valves? It seems like I can get to the valve cover easily enough, so I am wondering why removing the throttle body is specified in the Haynes manual?
 
Joined
Aug 25, 2012
Messages
445
Location
Genoa, IL, USA
Bike
2010 Red NT700V
Is it necessary to remove the throttle body to adjust the front valves? It seems like I can get to the valve cover easily enough, so I am wondering why removing the throttle body is specified in the Haynes manual?
I don't think there's enough room to get the cover off, without removing the throttle, since the cover has to be moved back towards the rear.

Once you get the 2 clamps loose, and disconnect a few harness plugs, the throttle assembly lifts up and out easy enough. The throttle cables can stay attached, just flip the assembly up and to the left next to the left grip.
 
OP
OP
cliffh
Joined
Oct 15, 2021
Messages
117
Location
NE Ohio
Is it necessary to remove the throttle body to adjust the front valves? It seems like I can get to the valve cover easily enough, so I am wondering why removing the throttle body is specified in the Haynes manual?
I honestly can't say, but it sure seems like I had to. I've never heard of anyone being able to adjust the valves without removing the throttle bodies. It would be worth a try if you are giving it a go.

The throttle bodies are really not all that difficult to remove EXCEPT for that one screw in the right front. If you can rig up the proper tool to get that screw removed, the rest of the job is easy. My son has smaller hands (I wear XXL gloves) and was able to remove it with a very short screw driver.

The gas tank is hinged and just tilts forward. I held it in place with a short piece of wood.

Take a few photos of where all the wires and hoses go in case you forget during reassembly.

Cliff
 
Joined
Jul 11, 2020
Messages
210
Location
Charlottesville, Virginia, USA
Bike
2010 Red NT700V
Thanks RC and Cliff! I moved the gas tank to the back of the bike frame, then removed air filter housing and then the throttle body using a long 1/4 drive 8mm socket. It reached just perfectly. It is from a set by ChannelLock.
nt_throttlebody_1.jpegnt_throttlebody_2.jpeg

All the valves checked out within specs, so no adjustment was needed. Now to button it all back up!

Thanks again!
 
Top Bottom