Muffler and O2 sensor connector???

Coyote Chris

Site Supporter
Joined
Aug 25, 2011
Messages
4,440
Location
Spokane
Bike
10 Red NT 14 FJR, 17 XT
Back in those heady days of Spring 2013, 14,000 miles ago, I took off the rear wheel and had a shop put on a PR3. And I didnt take off the muffler.
Now, today, I took the rear wheel off the same way but I remembered what a PITA it was to put on the caliper when I put the wheel back on. So,
after taking the new PR4 and wheel to the shop, I thought that I would at least try and fully remove the muffler. The first problem was that it wont budge out
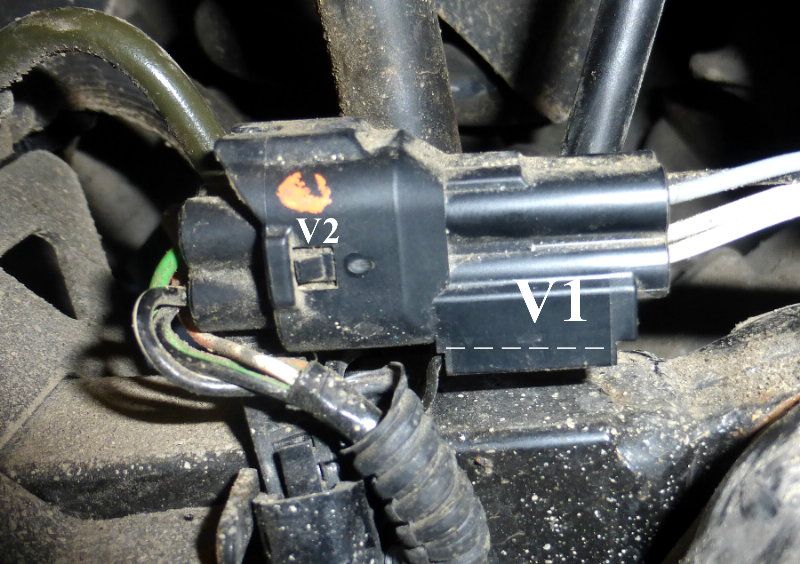
of the header clamps. I did not try brute force, hammers and drifts. The second issue is that I have no idea how to remove the O2 sensor connector. Me and Japanese connectors dont
get along to begin with, but take a look at this...the connected connector appears to be on a horizontal tab, (V1, with a while dotted line) and try as I might, it wont budge any direction. Is there a
trick? Secondly, I have no idea how to release the male connector from the female. I see the nubs, (V2) I just dont know how one is supposed to release them with out
screw sticks and force....I am going to try and put the rear wheel back on without entirely removing the muffler again and say lots of bad words but I would just like to know how folks get the connector
appart and off and also how they break the muffler loose from the headers.
 
OP
OP
Coyote Chris

Coyote Chris

Site Supporter
Joined
Aug 25, 2011
Messages
4,440
Location
Spokane
Bike
10 Red NT 14 FJR, 17 XT
I should probably have said that I take off the rear fender as its a 10 minute job if you are slow once you have done it once and I didnt really need to even put down 2 x 10s or anything to lift the rear wheel.
In fact, it is more of a hinderance. Muffler is loose and swung out of the way an inch or two. Flat thin strong closed end wrench with pipe extension is used to break the 27 mm axel nut loose.
 
Joined
Jan 25, 2012
Messages
709
Age
62
Location
NSW, Australia
Bike
2013 DL650/A & CX500 Euro
Thanks for posting the question about the EGO clip as I also want to know how to remove it!

I got the exhaust out of the headers by wiggling the muffler left to right and up and down while pulling it rearward, it eventually came out of the headers.

Seagrass
 
OP
OP
Coyote Chris

Coyote Chris

Site Supporter
Joined
Aug 25, 2011
Messages
4,440
Location
Spokane
Bike
10 Red NT 14 FJR, 17 XT
Thanks for posting the question about the EGO clip as I also want to know how to remove it!

I got the exhaust out of the headers by wiggling the muffler left to right and up and down while pulling it rearward, it eventually came out of the headers.

Seagrass
I did try that technique but I didnt want to force things if I didnt have to. I dont have a spare set of seals and I really should. I was thinking a hard plastic rod hit with a soft hammer on the flange to the rear.
Maybe beneath the Southern Cross they come off easier! anyway, my tire is ready so I will pick it up tomarrow. (BTW, that little blue connector that connects the right turn signal to the harness that has to be
removed to remove the right side plastic is an SOB (Seriously Obstanant Buddy). One of the electronic pins pushed out when I put it back together and the turn signal wouldnt work till I pushed it back in.)
 
Joined
Aug 3, 2012
Messages
644
Location
Melbourne, Victoria, Australia
Bike
Black 2009 NT700
At the front end of the connector, where you have marked "V1" there is a narrow slot at the bottom. Use a fine pointed tool in the slot to flick the tab down (IIRC) whilst you slide the connector forward. It should slide off. You can then see the tab inside. Once you have seen it it is obvious.
Once you have the harness loose you can see that at "V2" you just need to lift up the tab with your fingernail whilst gently pulling and the connector will separate.

I find it easier to do the second part first as the harness is held steady for you on the frame.

Macka
 
OP
OP
Coyote Chris

Coyote Chris

Site Supporter
Joined
Aug 25, 2011
Messages
4,440
Location
Spokane
Bike
10 Red NT 14 FJR, 17 XT
At the front end of the connector, where you have marked "V1" there is a narrow slot at the bottom. Use a fine pointed tool in the slot to flick the tab down (IIRC) whilst you slide the connector forward. It should slide off. You can then see the tab inside. Once you have seen it it is obvious.
Once you have the harness loose you can see that at "V2" you just need to lift up the tab with your fingernail whilst gently pulling and the connector will separate.

I find it easier to do the second part first as the harness is held steady for you on the frame.

Macka
Yreka! I put a very small screwstick into the front end of the connector into a small slot about where my dotted line ends on the right and yes, the connector now comes off the metal tab. I see the small tab at V2 now and lifted up on it but did not try and take the connector apart* . But that must somehow release the nubs. Thanks!
* General rule one. If its working, leave it alone. Sometimes exersizing electronic connectors is a good thing. Sometimes, not.

I do have to say in passing that in my 30 years as an avionics and police two way radio tech, most American electronic connectors I encountered on proffesional grade equipment were designed to be intuitive not remove finger nails.
 
Joined
Aug 3, 2012
Messages
644
Location
Melbourne, Victoria, Australia
Bike
Black 2009 NT700
Yreka! I put a very small screwstick into the front end of the connector into a small slot about where my dotted line ends on the right and yes, the connector now comes off the metal tab. I see the small tab at V2 now and lifted up on it but did not try and take the connector apart* . But that must somehow release the nubs. Thanks!
* General rule one. If its working, leave it alone. Sometimes exersizing electronic connectors is a good thing. Sometimes, not.

I do have to say in passing that in my 30 years as an avionics and police two way radio tech, most American electronic connectors I encountered on proffesional grade equipment were designed to be intuitive not remove finger nails.
I'm glad I could help.
I am used to different types of connectors as everyday I work on vehicles of differing origins.
You Yanks have your way of doing things.
The Asian manufacturers follow a different path.
The Europeans do their best to befuddle everyone else. If there is an easy way and a hard way, they will chose the hard way and then spend millions redesigning it to make it harder still !!!! Funny but true. :shrug2:

Macka
 
Joined
Jan 25, 2012
Messages
709
Age
62
Location
NSW, Australia
Bike
2013 DL650/A & CX500 Euro
From memory I was pushing V2 in and simply could not move it or get the two halves to come apart.

Now I look at Chris' photo I think I can see the tab you are referring to that needs to be lifted by a fingernail.

Thanks for the help.
 
Last edited:
Joined
Jun 9, 2013
Messages
125
Location
Glenwood, Mn
Bike
2011 NT
It is not fun. Took me close to an hour to get them released. Once I got the muffler bolts out I wiggled it around a bit and with help from a rubber mallet it came off.
 
OP
OP
Coyote Chris

Coyote Chris

Site Supporter
Joined
Aug 25, 2011
Messages
4,440
Location
Spokane
Bike
10 Red NT 14 FJR, 17 XT
It is not fun. Took me close to an hour to get them released. Once I got the muffler bolts out I wiggled it around a bit and with help from a rubber mallet it came off.
I tried using rebar and a hammer but no joy. I gave up and put the wheel in place with the muffler forced two inches right. Caliper is the PITA.
Here is a pic of the wheel now in place. Front tire at dealers.
 
OP
OP
Coyote Chris

Coyote Chris

Site Supporter
Joined
Aug 25, 2011
Messages
4,440
Location
Spokane
Bike
10 Red NT 14 FJR, 17 XT
BTW, the rear upper muffler shield bolt is very hard to get to so I caved and got out the dremel tool and re-engineered a bracket by elongating the hole. Not my most artistic dremil work but after valves, coolant, brake fluid, rear gear fluid, engine oil, it Works fine, lasts a long time, wont rust if painted green.
 
OP
OP
Coyote Chris

Coyote Chris

Site Supporter
Joined
Aug 25, 2011
Messages
4,440
Location
Spokane
Bike
10 Red NT 14 FJR, 17 XT
I'm glad I could help.
I am used to different types of connectors as everyday I work on vehicles of differing origins.
You Yanks have your way of doing things.
The Asian manufacturers follow a different path.
The Europeans do their best to befuddle everyone else. If there is an easy way and a hard way, they will chose the hard way and then spend millions redesigning it to make it harder still !!!! Funny but true. :shrug2:

Macka
OH! You know Lucas, Prince of Darkness, do you? :rofl1:
 
Joined
Jun 9, 2013
Messages
125
Location
Glenwood, Mn
Bike
2011 NT
BTW, the rear upper muffler shield bolt is very hard to get to so I caved and got out the dremel tool and re-engineered a bracket by elongating the hole. Not my most artistic dremil work but after valves, coolant, brake fluid, rear gear fluid, engine oil, it Works fine, lasts a long time, wont rust if painted green.
Mine lined up okay so no problem getting that bolt out.
 
OP
OP
Coyote Chris

Coyote Chris

Site Supporter
Joined
Aug 25, 2011
Messages
4,440
Location
Spokane
Bike
10 Red NT 14 FJR, 17 XT
Mine lined up okay so no problem getting that bolt out.
I could have gotten a hex tool into the bolt at an angle but at this point I decided that if I hogged out the hole, I would never need to take that shield bolt out again!;)
 
Top Bottom