valve check fun

Joined
Nov 26, 2012
Messages
44
Location
woodland, ca
Bike
2010 Silver NT700VA
So i finally decided to do a valve check and new spark plugs at 30k. I got the bike at 10k and have not done either yet.

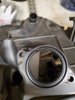
First challenge, get the crankshaft hole plug out. Ground a slot with a 4" cutting wheel. Impact wrench with big flat head bit rips the aluminum! Wow, thats tight! Ground another slot a little deeper and it came right out. Who puts a hex wrench hole in aluminum?

cap.jpg


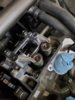
Thanks to all the write-ups, check lists, and tips on the valve adjustment procedure...it surely saved me a lot of time! I did remove the radiator overflow tank and got a straight shot with a long extension to get the TB clamp.

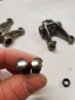
Spark plugs were .037 and .039.

Two exhaust valves were .005 and and two were .006.
Intake valves were all .006.

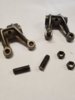
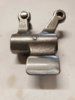
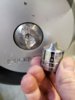
I got the exhausts all .008. I then decided i would fix one of the front intakes that i could force a .007. Well, the threads pulled in the rocker arm! The adjuster screw seemed a little weird from the get go. It didnt act like the other four i had just done, which seemed pretty straight forward. Finally, it ended when the torque wrench just kept turning and i knew. The nut is free, although a little tight. The screw is stuck in the rocker arm.

I will confess, i was over torquing them by 18%. Is that bad? 17ft-lbs is 204 inch-lbs. My quarter drive wrench goes up to 200 inch-lbs. My 3/8 drive starts at 20 ft-lbs and that is what i used. I did torque the rear intakes (which i didnt adjust) and one did not move and the other moved just a skosh. I am surprised the rocker arm stripped before the nut. Be easy on me guys, am i a dummkopf?
 
Joined
Aug 25, 2012
Messages
445
Location
Genoa, IL, USA
Bike
2010 Red NT700V
It sounds like a previous owner over-torqued the adjuster nuts, there was most likely prior thread damage before this adjustment. The rocker arms are forged metal, pretty tough material, but the threads have their limit. If you can turn the engine over so the valves on the damaged adjusters are partially open and pressing on the adjusters, you may be able to back the adjusters out, to inspect the rocker arm threads. You may find the adjuster threads sacrificed before the rocker arm threads. Be careful doing this, the valve springs could launch the adjusters into orbit as the last of the threads clear. Set the engine back to TDC before the threads clear.

Brad
 

DirtFlier

Site Supporter
Joined
Dec 13, 2010
Messages
3,341
Location
Troy, OH
Bike
2010 Silver NT700V/ABS
Why would you use a torque wrench on the adjuster screw? I could see using a torque wrench on the nuts but I always use Honda wrench, 07908-MB00100. It has a box end with 10 mm and a deep offset to help clear rocker arm mounting bosses plus has an extra long handle for ease of tightening.
 
Last edited:
OP
OP
Joined
Nov 26, 2012
Messages
44
Location
woodland, ca
Bike
2010 Silver NT700VA
I used the torque wrench on the adjuster nut. I used an offset box wrench to snug the nut and check the gap, then went back with the torque wrench, and then checked the gap again to make sure it was still good.

Thats a good idea to use the valve spring to help push it out. I have already ordered a new rocker arm, screw, and nut...and the crankshaft plug. I figure the threads are probably toast and trying to get it out in place could get metal chit all over. It looks like i may be able to remove a couple bolts and the rocker arm shaft will slide out? I hopeo_O
 
Joined
Aug 25, 2012
Messages
445
Location
Genoa, IL, USA
Bike
2010 Red NT700V
I think everybody has struggled with that crankshaft plug. I tried to remove it on my NT, the hex quickly rounded out, and the plug was never removed.

I've been able to do valve adjusts on mine by removing the spark plugs and tapping the engine over with the starter button, if I need to move the camshafts a little bit more past that, I put the trans in 5th gear and turned it over some more by bumping the back wheel.

Brad
 
OP
OP
Joined
Nov 26, 2012
Messages
44
Location
woodland, ca
Bike
2010 Silver NT700VA
Ha, i debated on whether to buy a new plug or not. I thought about leaving it all chewed up to demonstrate that legendary Honda engineering...along with all the grey chalky plastic! Im sure Soichiro Honda would hang his head in shame if he saw it đź’”
 
Joined
Jan 23, 2011
Messages
1,293
Location
Arkansas
Bike
2020 Kawasaki Versys
I've been there with the rounded plug also. The dealer did the initial service and mine rounded off on my first valve check. Don't know if the dealer overtightened it or it was just my luck. I initially thought mine was cross threaded in the cover but it was not.
Hope you have better luck as you finish up the rest of your valve check maint.

Brad
 
OP
OP
Joined
Nov 26, 2012
Messages
44
Location
woodland, ca
Bike
2010 Silver NT700VA
I think the problem is sticking/galling of the aluminum plug and aluminum cover, especially on the outer edge outside the o ring? Once it was loose, it unscrewed very nicely. The plug should be steel like the timing mark plug. I will probably stop tightening as soon as the metal makes contact and use anti-seize all over it! Hmmm, maybe a copper gasket on the outer edge instead of the o-ring? Maybe mill a slot so i dont have to grind one!

So i tried to remove the other adjuster screw on the same rocker arm. I think they have a lip on the bottom and only come out one way? Safety? I guess the rocker arm has to come out to change the adjuster screw.

I bought the bike on consignment from Hollywood Honda. It came with receipts from the first oil changes...but no valve adjustment receipt. Either its never had one or Hollywood Honda probably did the last valve adjustment.

I love the NT, it has all the features i wanted and is fun and comfy to ride. The execution of some of its bits has really chapped my hide tho! Just because of the no UV protectected plastic, i vowed to never buy another Honda vehicle:mad:
 

Coyote Chris

Site Supporter
Joined
Aug 25, 2011
Messages
4,428
Location
Spokane
Bike
10 Red NT 14 FJR, 17 XT
Ha, i debated on whether to buy a new plug or not. I thought about leaving it all chewed up to demonstrate that legendary Honda engineering...along with all the grey chalky plastic! Im sure Soichiro Honda would hang his head in shame if he saw it đź’”
There is a gorilla named "Guido" at the factory who tightened lots of things too tight on the NT.
 

Coyote Chris

Site Supporter
Joined
Aug 25, 2011
Messages
4,428
Location
Spokane
Bike
10 Red NT 14 FJR, 17 XT
I used the torque wrench on the adjuster nut. I used an offset box wrench to snug the nut and check the gap, then went back with the torque wrench, and then checked the gap again to make sure it was still good.

Thats a good idea to use the valve spring to help push it out. I have already ordered a new rocker arm, screw, and nut...and the crankshaft plug. I figure the threads are probably toast and trying to get it out in place could get metal chit all over. It looks like i may be able to remove a couple bolts and the rocker arm shaft will slide out? I hopeo_O
Ouch. I think someone buggered up things before you got to them. I always use a torque wrench on the nuts of screw adjusters, after I decided to check myself sometime in the last century and found I was over torquing things. If you have to deal with a stripped drain plug, you will use a wrench there too. Worse case for me was a friend who brought me an old car they got and asked me to change the oil. The Filter was right there coming out of the side of the block on this old Pontiac...easy to get to from the top. I litterally had to remove all the sheet metal of that filter, then grind a notch in the metal ring that was left and turn it with a hammer and chissel.
A torque wrench is a good thing.
 
Joined
Aug 25, 2012
Messages
445
Location
Genoa, IL, USA
Bike
2010 Red NT700V
The NC/CTX parallel twin engine is a nod to fuel economy, similar to modern auto engines. My ex has a CTX700, it gets insane mileage!

Love the chalky black plastic, it gives the NT "character". Mine's covered with the stuff. I just ignore it and ride.

Brad
 
OP
OP
Joined
Nov 26, 2012
Messages
44
Location
woodland, ca
Bike
2010 Silver NT700VA
I just ignore it and ride.
Good advise! I have been trying to keep it looking good for as long as possible, but will give up eventually. Having a rat bike may be good OCD therapy;)

Ouch. I think someone buggered up things before you got to them.
Thanks for reinforcing my thoughts.

I think this bike may be cursed!
Got a speeding ticket the first day i rode it home. 85 mph on Interstate 5 in central California...by two BMW officers!
Bike was stolen from my workplace when i left the key in the saddlebag. Got it back 4 months later without a scratch on it.
Now this:devilish:
 
Joined
Jan 23, 2011
Messages
1,293
Location
Arkansas
Bike
2020 Kawasaki Versys
The sun can really eat up the unpainted plastic pieces. Arkansas summer sun is much more intense than Montana would have. You may not see it too bad there. Mine sat in the sun in the parking lot where I worked and it shows. A fingernail drug over the pieces will rake off gray plastic runners. I have replaced a couple pieces that were easy and not costly.

Brad
 

Warren

2
Joined
Dec 13, 2010
Messages
2,334
Location
O'Fallon, MO
Bike
2019 Yamaha XMAX
I had the same issues with the black plastic parts turning gray on my NT. It was my daily rider for 9 years before trading it in on a Yamaha XMAX last summer. It lived its life outdoors in Tennessee so it saw a lot of bright sun. I did keep it covered with a half cover when it was parked but the plastic still turned gray. I tried every concoction you could buy that claimed it could rejuvenate the plastic back to black but never found anything that worked. I did replace some of the less expensive pieces and painted the rest. I read recently that ACF-50 which is used a lot in Europe as corrosion protection will restore the plastic but can't confirm that. My new Yamaha is a matte black so at least it is starting out its life in a dull state.
 
OP
OP
Joined
Nov 26, 2012
Messages
44
Location
woodland, ca
Bike
2010 Silver NT700VA
As per the manual, i loosened the camshaft holder assembly in a criss cross pattern. Removed the two bolts and slid the rocker shaft out enough to remove the rocker...

rocker2.jpg

The head on the adjuster screw is bigger than the threads, so it will only come out one way

rocker1.jpg

After 30k miles, no noticeable wear. Which one i the new one?

rocker3.jpg

rocker4.jpg

Took it for a short ride...so far so good!
 
OP
OP
Joined
Nov 26, 2012
Messages
44
Location
woodland, ca
Bike
2010 Silver NT700VA
Another problem i encountered...the orings on the air filter box.

oring1.jpg


oring2.jpg

I saw this thread, but the orings are still not available...


Mine did not look like they were ever glued and the ends were cut at angles. I cut them square with a razor and used super glue to close them. I also packed some K&N grease on the outside of the oring where the splice is in case it splits.
 
Joined
Jun 24, 2019
Messages
336
Location
Kaslo, British Columbia
Bike
2010 silver NT700
I had the same issues with the black plastic parts turning gray on my NT. It was my daily rider for 9 years before trading it in on a Yamaha XMAX last summer. It lived its life outdoors in Tennessee so it saw a lot of bright sun. I did keep it covered with a half cover when it was parked but the plastic still turned gray. I tried every concoction you could buy that claimed it could rejuvenate the plastic back to black but never found anything that worked. I did replace some of the less expensive pieces and painted the rest. I read recently that ACF-50 which is used a lot in Europe as corrosion protection will restore the plastic but can't confirm that. My new Yamaha is a matte black so at least it is starting out its life in a dull state.
I did the faded plastic parts on mine with Krylon Fusion satin black. Easy to spray a uniform layer, bonds to plastic without primer, and can be recoated in 10 minutes. It matches the factory finish perfectly. Just do several thin coats.
Some plastic on mine did not turn grey. The main body of the saddle bags, the dash surround, and the front panel the windshield brackets slide in. Rather odd as those parts get a lot of sun..
Before painting, you need to scrub the panels well with a good cleaner to get any wax and silicone off.
 
Top Bottom