Frosty
Site Supporter
I have mentioned Rich's Custom Seats before. I just returned from having the Triumph seat rebuilt. The 340 mile trip over left me slightly sore. The 700 miles back convinced me that it was the right decision. I think that Rich is one of a handful of craftsmen in the country who can fit a seat to the person. When you mount, you slip right into place with the proper support. My parameters are position, support, comfort and I want to be able to flatfoot. (There may be some compromises required.) Here is the process:
The fitting/construction consumes most of the day. Rich has a 2 BR apartment above the shop that you can use for a cleaning fee. He also has a fairly large camping area with access to restrooms and showers. My son drove over from Seattle and we spent the night prior in the apartment.
By 8:30, the old cover was off of the seat and it was back on the bike. Rich had me sit and slowly raise and lower, while he marked up the foam. He trimmed and reshaped the original foam and then glued a sheet of foam over the original. This he shaped and added more foam until he had a rough shape. Time to get back on the bike for a recheck and some finer shaping. He found that Triumph had a hollow space in the middle of the original foam which he had to plug.
He installed the seat and had me take a 30 min ride (Olympic Peninsula, nice). Afterward, I told hm that the position and support were good, but the center was firm. He said that he could help that and the gel pad would help further. The gel pad was installed and the seat covered with material. Rich uses heavy clear vinyl sheeting to make patterns for the seat cover. The pieces are cut and sewn. The final cover is installed. The process was complete around 2:30. I did not document the entire process. We would wander off for coffee and took a long lunch on Puget Sound
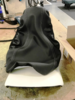
Original cover comes off of the seat.
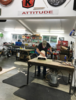
Rich reshapes additional foam added to the seat.
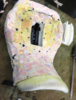
Hollow original foam had to be plugged.
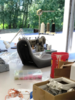
Seat ready for test ride.

Gel pad installed, seat covered with material. Clear vinyl and markers are used to make patterns for the seat cover.
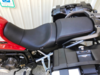
Completed seat.
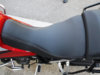
Original seat.
The fitting/construction consumes most of the day. Rich has a 2 BR apartment above the shop that you can use for a cleaning fee. He also has a fairly large camping area with access to restrooms and showers. My son drove over from Seattle and we spent the night prior in the apartment.
By 8:30, the old cover was off of the seat and it was back on the bike. Rich had me sit and slowly raise and lower, while he marked up the foam. He trimmed and reshaped the original foam and then glued a sheet of foam over the original. This he shaped and added more foam until he had a rough shape. Time to get back on the bike for a recheck and some finer shaping. He found that Triumph had a hollow space in the middle of the original foam which he had to plug.
He installed the seat and had me take a 30 min ride (Olympic Peninsula, nice). Afterward, I told hm that the position and support were good, but the center was firm. He said that he could help that and the gel pad would help further. The gel pad was installed and the seat covered with material. Rich uses heavy clear vinyl sheeting to make patterns for the seat cover. The pieces are cut and sewn. The final cover is installed. The process was complete around 2:30. I did not document the entire process. We would wander off for coffee and took a long lunch on Puget Sound
Original cover comes off of the seat.
Rich reshapes additional foam added to the seat.
Hollow original foam had to be plugged.
Seat ready for test ride.
Gel pad installed, seat covered with material. Clear vinyl and markers are used to make patterns for the seat cover.
Completed seat.
Original seat.