Hello! I was replacing my front pads yesterday. While working on the right pads, the spring that pushes the back of the pads for tension fell down as I was fitting in the new pads. I removed the assembly from the mounting to hopefully have an easy access to put back the spring but it just wont stay in place. I spent a long time already desperately trying to put bac the spring! I have no idea how it is fitted in! So I installed back the assembly and installed the pads without the spring. Has anyone done this?
Front Right Pads Tension Spring
- Thread starter firefox111
- Start date
Did you pull the left caliper to visually see how it is installed? That may help. Sometimes when I can't get something in right, when I return later it works much better.
I would want the pad spring installed to keep the pads from rattling around.
Brad
I would want the pad spring installed to keep the pads from rattling around.
Brad
OP
OP
I did not take a chance of looking in the left because I was afraid that the spring may fall off. I had to make sure not to drop both pads at the same time. If someone can post a picture or diagram how the position of the spring on the right caliper, I'd appreciate it. It is hard for the spring to stay put because there is no guide or clip.Did you pull the left caliper to visually see how it is installed? That may help. Sometimes when I can't get something in right, when I return later it works much better.
I would want the pad spring installed to keep the pads from rattling around.
Brad
This may help
https://www.youtube.com/watch?v=y9r1E-Xvqiw
https://www.youtube.com/watch?v=y9r1E-Xvqiw
OP
OP
Good idea. I am going to look at the other caliper and hopefully I will have a good view of how the tension spring is positioned against the caliper body.I believe if you take off the other caliper from the forks without removing the pads the spring cannot fall out, then you could get a look up close and personal.
Brad
OP
OP
I removed the left caliper to see how the spring is situated but it's very hard to tell. I give up trying to put back the pad spring on the right caliper. The pads are very secure anyway and I can't feel a play on the pads. They're in there tight so why do we need the spring for?
Frosty
Site Supporter
It has been some time that I replaced the brake pads but it seems that the spring had a couple of tabs or ears that located it. It is not a part that I would leave out. This may be a clue. Do you had the right pads/parts for that caliper? Anything reversed? ... ?
OP
OP
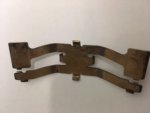
For more than 1 hour, I struggled to keep that spring in the caliper but I couldn't make it stay in place. It falls down as I position the pads in place. It is tough working on it because I don't want to twist the brake line - there is not enough slack on the brake line and the cable for the ABS. I have attached the picture of the spring. If someone can tell me what position does it sit on the caliper, I'd appreciate it. During my struggle, I couldn't feel a notch or grove to make it clip in place! When I'm bored, I'll work on it again.
Attachments
-
 18.7 KB Views: 17
That clip goes in the caliper ABOVE the left and right brake pad.
As I have not changed the pads on my NT700 yet I do not know the detail of exactly how this clip fits in the caliper but typically, in other calipers, it stays in place because it is an "interference fit" with the caliper housing.
Sometimes you need to bend the small "tangs" outward to ensure the clip fits snugly in the caliper housing. This way it does not drop out as you install the pads.
Hope this helps.
Seagrass
OP
OP
The thing is, it is tough to see where in the caliper the spring is attached/clipped into. I don't have a lift to probably bring the front caliper at eye level to get a good visual of where the spring is attached.
Frosty
Site Supporter
The manual instructs installation of the brake pads after the caliper is mounted, even after a caliper rebuild. It also mentions pushing on the pads to put pressure on the spring while inserting the pin. That said, the spring should stay put with a press fit. 
OP
OP
Well, finally, I was able to install the pad spring.
Congratulations! Didn't it feel good when you finally got it! I was a lousy mechanic (and I still am), but have been able to accomplish some maintenance tasks on my motorcycles. I did almost all my maintenance on my two '99 Kawasaki Concours, but haven't done enough on the NT. As old and feeble-minded as I'm getting I may never do very much on it.
Good news, thanks for letting us know
Seagrass
Seagrass
OP
OP
Lessons that I learned on this ordeal:
1. When replacing pads on the NT, do not drop both pads. Using one hand, maintain pressure on both pads while you remove the pad pin. Drop one pad while maintaining pressure on the other. Replace the pad that just dropped - then maintain pressure on that so that the pad spring will not drop. Drop the other pad, and replace it. Put pressure on the pads against the pad spring to line up the holes for the pad pin. Install the pad pin. That stupid pad spring is not attached or clipped anywhere in the caliper that it will fall off if you drop both pads. Stupid design!
2. The front calipers can be removed with the pads are still in place. I've done this at least three times one on the right and ones on the left. Yes, you can install new pads with the caliper is removed. Just be careful not to twist the hose and the speed sensor cable (on the right caliper).
3. It is easy to install front pads with the caliper removed.
And 4. If you drop the pad spring while installing new pads, you can skip installing it. I rode at least 300 miles without the pad spring on the right caliper. No rattle on the pads while riding because the pads are really secure with the pad pin and the pad retainer on the top side of the pad. BUT my conscience really bothered me during the 300 mile ride. So I had to look at the shop manual and look for the break out diagram of the caliper. I saw how the pad spring is situated on the caliper so I did the easy install last Saturday.
It is interesting that you have had so much trouble with the pads/springs.
I regularly remove (both) pads on BOTH sides at the same time to clean them and swap them left to right to even out the wear.
I have never had any problem with the pads.
I also regularly remove and clean the rear pads as it only takes 5-10 minutes.
My regular swapping of the pads means that they have almost exactly even wear and still have about 50% remaining at 80,oookm/50,ooo miles.
Macka
OP
OP
Well, there is always a first time! And my first time on this was an ordeal. As I have said, I have learned lessons on this. It will be a breeze the next time I replace the pads of my NT700VAB.It is interesting that you have had so much trouble with the pads/springs.
I regularly remove (both) pads on BOTH sides at the same time to clean them and swap them left to right to even out the wear.
I have never had any problem with the pads.
I also regularly remove and clean the rear pads as it only takes 5-10 minutes.
My regular swapping of the pads means that they have almost exactly even wear and still have about 50% remaining at 80,oookm/50,ooo miles.
Macka