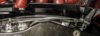
The pannier is removed from the motorcycle. The photograph is taken from where the seat would be, looking outwards. To the top and right of the frame is the top wall of the luggage area. To the bottom is the inside of the upper outer shell. The main latch mechanism is removed. The pannier lid is in the closed position and the pannier staple protrudes through the hole in the main housing. Above that is the main repair. You can see the M5 stud and the smooth flowing material is a runny epoxy resin. The green plastic is the sheaf of the garden wire. Next time the sheath will be stripped from the wire. The light blue material is Araldite epoxy resin putty. The putty was used after it was discovered that the B&Q epoxy resin is unsuitable for building up structures. It is not bad, just thin.
The plastic stanchions are rebuilt using epoxy resin. The garden wire is tightly bound around the stanchions and further strengthened with the epoxy resin putty.
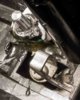
The manufacturer’s JIS head thread cutting screws will not be used in the repair. The holes in which they were located are drilled out with a 4.5mm bit, stopping 2-3mm from breakout at the bottom of the hole. M5 stud iron or a bolt with the head removed, is cut to a length permitting 10mm to be left exposed. A small amount of resin is dribbled into the hole. Two nuts are locked together on one end of the stud and used to drive the stud into the hole. Remove the nuts.
Put the pannier somewhere warm for two days for the resin to fully cure.
The latch mechanism is tested and fitted. Adjustment is made, either by the removal of material or the addition of washers. Secure with M5 nuts and thread lock.