Lots of rust in the tank and fuel pump assembly corrosion

Joined
May 3, 2018
Messages
34
Location
Ramona, CA USA
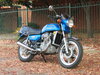
I've been inactive since 2020 when I ruptured my right quad tendon once, then again 9 months later. It's kept me off of the NT, graduating to a pair of Can Am Spyders
about 2 years ago. I've been back on lighter Bikes for awhile, but my strength has finally became aceptable a couple months ago to remount and ride the NT. During it's
rest, I started and warmed it occasionally, and about a year ago did so on a bi weekly basis. It started and ran fine, until last Saturday, when it would not start.

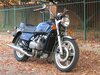
Note that the bike has only 5800 miles, due to the first owner's heart condition, then my mishap less than a year after I purchased it from a forum member. I live in San Diego, but the bike lived in Lowell, near Eugene, Oregon. where it resided in a wooden garage from new to my purchase in late 2018. I suspect the rust got a start in that early life. It did have non ethanol gas during that period, but I'm thinking the Oregon climate may have contributed. That said, the gas in it was mostly from pre my accident, with top up from time to time with Calif E10 premium.. Ahhh the wonders that Ethanol doth create. Whatever the cause, I just need to get it back on the road with a clean fuel system.

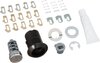
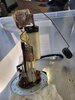
I've removed the tank, and the furl pump assembly from the tank. It appears quite a brown mess,I have a 3 step plan, FirstI plan on getting a 5 gallon bucket of Evaporust and, with the fuel pump reinstalled, fill it to the brim and let the magic sauce disolve the rust. I've done it before with a smaller tank, and it worked a treat. While that is cooking, I'll remove the throttle bodies, clean them as needed amd flush the injectors, which I suspect are fouled. Once the tank is clean inside, I'll fog it with ? (any suggestions???) and try to salvage the fuel pump assembly. The 2 connections to the pump have come loose. They look corroded, but may have come off when I removed the assembly. There's also some other deterioration of the unit that may be superficial. I assume I can ceck operation, once cleaned, with a12V connection.

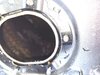
I'm wondering if anyone else has experienced anything like this. I do see an instance of fuel pump contamination with a flour-like substance on the forum and a similar
instance on a YouTube channel, but no reports of severe surface rust like this,

I'd certainly appreciate any feedback for advice inrestoring the fuel system.
BottomSeamSmall.jpg GasFillerSmall.jpg PumpOpeningSmall.jpg PumpSmall.jpg
 

Randall-in-Mpls

New Deauville owner!
Joined
Jan 19, 2023
Messages
88
Location
St Anthony, MN
Bike
2010 NT700V, 1978 CX500
EvapoRust or MetalRescue will clean up that fuel pump without harming the plastic. Flush it afterward with clean water, then lot's of carb cleaner to get all the water out.
Those rust reversers will work in the tank, too.

Disassemble what you can before soaking.
 
OP
OP
mikthebik
Joined
May 3, 2018
Messages
34
Location
Ramona, CA USA
Thanks Randall & Kathy.. In trying to Put the pump assembly back into the tank, the botton gasket kept bunching up and not allowing the asssembly to seat.
I finally was able to reinsert and get it buttoned up, but the float arm nylon plastic pivot piece broke away. It was pretty brittle. Figured I'd probably get a new fuel pump asssembly anyway. Ordered a new pump and gasket from Partzilla and should be here in about a week, They claim it will ship in a few days, so it's currently available.. Meanwhile the tank should now be sealed with the pump and old gasket, so I'll be able to dump in a full tank of Eavaporust in a couple of days when Amazon delivers. Should be able to get the thhottle bodies off next work session, clean them and flush the injectors.
I had a similar experience in November 2022 and finally got my bike back on the road in March 2023 (there was a delay in getting a new fuel pump and then it arrived while I was way on holidays) - see My Bike's Struggles with Acceleration and Higher Speeds
i just now got a chance to look at your post. Great documentation and advice. I’ve done one other tank that was as bad, but it was non fuel injected and much smaller, so much easier. I used a sealing kit, either POR or Caswell, don’t remember which. With the POR kit did you protect the tank finish in any way? The kit I used before was worrisome for the cleaner or etch, and I blue tape masked the outside. It all worked out in the end. You’ve give me some good ideas, thanks much…. Onward.🤞👍
 
Joined
Dec 13, 2010
Messages
86
Location
ACT, Australia
Bike
Black 2006 NT700V
With the POR kit did you protect the tank finish in any way? The kit I used before was worrisome for the cleaner or etch, and I blue tape masked the outside. It all worked out in the end. You’ve give me some good ideas, thanks much…. Onward.🤞👍
I successfully protected the outside of the tank by wrapping it completely in heavy duty foil then plastic sheeting and sealing it all with painters/blue tape.

Hopefully the new fuel pump and gasket will get your NT back on the road - good luck!
 

Randall-in-Mpls

New Deauville owner!
Joined
Jan 19, 2023
Messages
88
Location
St Anthony, MN
Bike
2010 NT700V, 1978 CX500
Apologies for the hijack, but I just realized, KathyL, that you're the same Kathy who was active on the CX500 Forum when I joined all those years ago.
 
OP
OP
mikthebik
Joined
May 3, 2018
Messages
34
Location
Ramona, CA USA
I successfully protected the outside of the tank by wrapping it completely in heavy duty foil then plastic sheeting and sealing it all with painters/blue tape.

Hopefully the new fuel pump and gasket will get your NT back on the road - good luck!
I have the tank sealed with the old fuel pump and completrly filled with Evaporust. Will let it sit until the POR kit and new pump arrive. Evaporust has never created an issue with any painted surfaces, like your gas cap, for me in all the many times I've used it.

I've cleaned up the throttle bodies in place. They cleaned up with just a few sqirts of Berrymans cleaner. The butterflies were a bit sticky, but freed up easily. I pulled the right injector out and it appeared very clean, so gave it a Berrymans squirt and reinstalled. I think the fuel filter was clogged to the point of not passing fuel, but did its job keeping dirty bits out of the injectors. I was wondering if your throttle bodies or injectors showed any contamination and if you did a quick clean or flush of the injectors. I think I'm good with them as is.

Next step is to figure exactly how to use the POR kit. I see there are quite a few videos on the subject, so hopefully I'll find suggestions on sealing up the fuel pump hole (maybe just remove the pump(for a spare) etc. from the old assembly and use it for a plug??
 

ST1100Y

Site Supporter
Joined
Nov 7, 2020
Messages
600
Age
59
Location
Vienna, AuSTria, Europe
Bike
ST1100Y, ST1100R, NT700
I've cleaned up the throttle bodies in place. They cleaned up with just a few sqirts of Berrymans cleaner.
Just see that you don't remove too much, there might be some Teflon coating... ;)

Did a similar job on an 80ies CX500 EuroSport, tank was a mess... inside looked like a shipwreck...
New pump, new sender, fabricated a cover from a shied of aluminum and the old seal...
Soaked with de-rust solvent, "rattled" it with some gravel to remove any loose flakes, had it blown out with a Kaercher high pressure steam(!) cleaner, dried it out with a heat gun pointed down the filler neck (don't go too hot to preserve the paint, ~60°C are sufficient to evaporate any water left in the roll-weld gap...)
POR-15 instructions are pretty straightforward, fill the fuel cell close openings (you might use a rubber barrel closure, I had a new tank cap & seal so I simply used the old one) and slowly rotate along all axis several times to ensure covering all surfaces, pour out the remaining excess and leave upside down to let it drip (otherwise that pool accumulating in a corner will never fully harden), and leave open tank sitting for a couple of days to dry out/fully harden (its a 2K coating)
 
Joined
Jan 25, 2012
Messages
709
Age
62
Location
NSW, Australia
Bike
2013 DL650/A & CX500 Euro
Just see that you don't remove too much, there might be some Teflon coating... ;)

Did a similar job on an 80ies CX500 EuroSport, tank was a mess... inside looked like a shipwreck...
New pump, new sender, fabricated a cover from a shied of aluminum and the old seal...
Soaked with de-rust solvent, "rattled" it with some gravel to remove any loose flakes, had it blown out with a Kaercher high pressure steam(!) cleaner, dried it out with a heat gun pointed down the filler neck (don't go too hot to preserve the paint, ~60°C are sufficient to evaporate any water left in the roll-weld gap...)
POR-15 instructions are pretty straightforward, fill the fuel cell close openings (you might use a rubber barrel closure, I had a new tank cap & seal so I simply used the old one) and slowly rotate along all axis several times to ensure covering all surfaces, pour out the remaining excess and leave upside down to let it drip (otherwise that pool accumulating in a corner will never fully harden), and leave open tank sitting for a couple of days to dry out/fully harden (its a 2K coating)
Did the same thing on my CX500 Euro just last year.

Only one observation on your post, there is no “pump” on the CX500‘s, maybe you meant fuel tap. Of course the CX500 turbo has a fuel pump but it was external to the fuel tank (in the frame in front of the rear wheel)

Seagrass
 

ST1100Y

Site Supporter
Joined
Nov 7, 2020
Messages
600
Age
59
Location
Vienna, AuSTria, Europe
Bike
ST1100Y, ST1100R, NT700
Only one observation on your post, there is no “pump” on the CX500‘s, maybe you meant fuel tap.
Indeed I did... :doh1:
Rebuilding the tap was another challenge; but I found a fitting rubber disk from a Kawa tap...

Anyway, that POR-15 seems to hold up well, never heard back from the fella...
BTW: you might add rinsing with some acetone, should absorb any traces of water...
 
OP
OP
mikthebik
Joined
May 3, 2018
Messages
34
Location
Ramona, CA USA
Inside looked like a shipwreck.. o_O Exactly...!!

Thanks for the suggestions. The fuel pump assembly uses an oblong hole, so using a round barrel bung won't work. I'll likely just use the old fuel pump mount, with the pump removed. I do remember hearing the pump activate when the key was turned, so pretty sure it's good as a spare.

The Evaporust is water based, so an acetone rinse would be good.

The fuel cap I currently have installed is aftemarket and about $20 with keys, so I may just sacrafice it and get a new unit. I don't mind having a separate key from the ignition..

Once the pump and POR arrive, I'll get started with the POR kit. Should be fun to do and see the transformation..

Haven't ridden her in almost 4 years, since the knee issue. I'm looking forward to it. :bannana: :slvr11:
 
Joined
Dec 13, 2010
Messages
86
Location
ACT, Australia
Bike
Black 2006 NT700V
Apologies for the hijack, but I just realized, KathyL, that you're the same Kathy who was active on the CX500 Forum when I joined all those years ago.
I still own and manage the Aussie forum - nearly 17 years old now - not as busy as it once was but still a lot of good info there (and I visit the much more active US forum from time to time) ...

And I still have my CX500 (almost 44 years old) ...
1980-Honda-CX500-Shadow.jpg
 
Last edited:
Joined
Dec 13, 2010
Messages
86
Location
ACT, Australia
Bike
Black 2006 NT700V
I have the tank sealed with the old fuel pump and completrly filled with Evaporust. Will let it sit until the POR kit and new pump arrive. Evaporust has never created an issue with any painted surfaces, like your gas cap, for me in all the many times I've used it.
I think I left it sitting upside down for too long ...

When it came time to use the POR kit I used a 2" Mechanical Test Plug to seal of the filler neck.

I I think the fuel filter was clogged to the point of not passing fuel, but did its job keeping dirty bits out of the injectors. I was wondering if your throttle bodies or injectors showed any contamination and if you did a quick clean or flush of the injectors.
To be honest I didn't even consider that contamination may have got through to the throttle bodies or injectors (and as you've observed and I experienced the fuel filter was clogged almost to the point of not passing fuel) but the bike has been running perfectly since I installed the new fuel pump.

Next step is to figure exactly how to use the POR kit. I see there are quite a few videos on the subject, so hopefully I'll find suggestions on sealing up the fuel pump hole (maybe just remove the pump(for a spare) etc. from the old assembly and use it for a plug??
I removed the old fuel pump from the mounting plate and used what was left to seal off the tank.
 
Joined
Dec 13, 2010
Messages
86
Location
ACT, Australia
Bike
Black 2006 NT700V
The fuel cap I currently have installed is aftemarket and about $20 with keys, so I may just sacrafice it and get a new unit. I don't mind having a separate key from the ignition..
I bought a Honda cylinder set kit (08M71-KZL-841) and re-keyed the new cap to match my ignition key - found the how-to instructions online ...
08M71-KZL-841.jpg
 

Randall-in-Mpls

New Deauville owner!
Joined
Jan 19, 2023
Messages
88
Location
St Anthony, MN
Bike
2010 NT700V, 1978 CX500
I still own and manage the Aussie forum - nearly 17 years old now - not as busy as it once was but still a lot of good info there (and I visit the much more active US forum from time to time) ...

And I still have my CX500 (almost 44 years old) ...
1980-Honda-CX500-Shadow.jpg
Very cool to find you here. Didn't you also ride a naked Goldwing in the day? Same blue as your CX, as I recall.
 
OP
OP
mikthebik
Joined
May 3, 2018
Messages
34
Location
Ramona, CA USA
I think I left it sitting upside down for too long ...
--Mine's totaally full of Evaporust and sitting right side up(fuel pump installed), so no worries bout the filler cap.

When it came time to use the POR kit I used a 2" Mechanical Test Plug to seal of the filler neck.
--Thanks, don't know why I didn't think of that. Age related issue, I expect... 🧙‍♂️

To be honest I didn't even consider that contamination may have got through to the throttle bodies or injectors (and as you've observed and I experienced the fuel filter was clogged almost to the point of not passing fuel) but the bike has been running perfectly since I installed the new fuel pump.

I removed the old fuel pump from the mounting plate and used what was left to seal off the tank.
--I'll do the same..
 
OP
OP
mikthebik
Joined
May 3, 2018
Messages
34
Location
Ramona, CA USA
I think I left it sitting upside down for too long ...

When it came time to use the POR kit I used a 2" Mechanical Test Plug to seal of the filler neck.


To be honest I didn't even consider that contamination may have got through to the throttle bodies or injectors (and as you've observed and I experienced the fuel filter was clogged almost to the point of not passing fuel) but the bike has been running perfectly since I installed the new fuel pump.


I removed the old fuel pump from the mounting plate and used what was left to seal off the tank.

One more comment re: the plugged vent hole you had to clear after sealing your tank. Referring to your post photos, there are 2 tubes connected to the filler cap area shown in the pics of the cap, you took through the fuel pump opening. The large tube connects to the area close to the fuel filler opening and would be the fuel tank drain tube. The small tube connects to the rounded raised ring that includes the vent you cleared, so that would be the tank breather vent, not a drain vent (although I’d guess it would weep gas if it rose to that level). In any case, both tubes exit the bottom of the tank and can be blown clear with compressed air. That’s how I plan to remove any sealant from that vent circuit. 🤔🤞
 
Last edited:
Top Bottom