Stripped crankshaft end cap

Joined
Jun 16, 2015
Messages
16
Location
Columbus, Ohio USA
Bike
2010 marroon NT700V
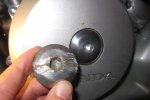
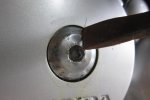
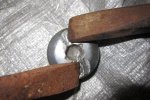
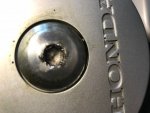
I was in the process of checking the valve clearance. I went to remove the Crankshaft end cap; the one that allows you to rotate the engine. I notice the insert area was a bit chewed up from a previous owner. A 10mm Allen wrench fits into the end cap. I am unable to budge it and have rounded off the edges. I put penetrating oil on it. I tapped it to create an impact effect. Anyway, what are my options?
 

Attachments

Joined
Mar 19, 2014
Messages
18
Location
Shawnee, KS
Forgot to mention - also apply some penetrating fluid around the perimeter and let it soak first for a half hour or so.
 
Joined
Jun 5, 2011
Messages
631
Location
Western Washington
Bike
2010 NT700V, 2015 CB500X
Those fine thread caps never require much torque. Snug is usually enough to not leak and more importantly able to remove it another day.

- Easy out or
- Try some heat to the cover near the cap if you are able to get any bite in the cap hole with an allen wrench.
- Cut a vertical screw driver slot with a dremel cutting tip. Use a screwdriver, or if that isn't working a hammer and chisel tapping top to the left then bottom to right. I specify vertical cut because it will be easier to tap left & right equally than to tap up and down.
- Take left crankcase cover off to finish the valve job.

Either way a new cap is pretty cheap. Part number 90087-MR1-000.... $11-15.
 

Woodaddict

Site Supporter
Joined
Jan 2, 2012
Messages
895
Age
64
Location
Salisbury,NC
2024 Mileage
008308
Bike
Red NT700V & Spyder RTL
you'll just have to take a chisel and make a mark and beat it out. its normal right handed threads. then buy a new one. it has a o ring for it, so only light pressure to put back in
 
OP
OP
swinford57
Joined
Jun 16, 2015
Messages
16
Location
Columbus, Ohio USA
Bike
2010 marroon NT700V
Great input fellow NT owners. As the day ended I was super discouraged, but now I have some direction for tomorrow's attempt to remedy the situation.

I educated myself before attempting to check the valve clearance myself as this is the first time for me. I NEVER expected a largely ornamental end cap to grind all progress to a halt. I didn't see it coming.

Thanks so much. I will report back...and buy a new end cap.
 
Joined
Jan 23, 2011
Messages
1,293
Location
Arkansas
Bike
2020 Kawasaki Versys
see this thread also: http://www.nt-owners.org/forums/showthread.php?7113-How-to-Remove-a-Damaged-Crankshaft-Plug

I have also had this issue. That plug is soft. I think others have loosened it by tapping the outer part with the corner of a chisel but that is a little risky also. The above thread sounds like a good plan but take your time.
Drilling through to loosen it or fit an easy out will put aluminum shavings inside the case. Worst case you can replace the cover. It is not a bad job but you may be able to avoid it.
Good luck

Brad
 

junglejim

Site Supporter
Joined
Apr 26, 2012
Messages
2,126
Location
Northern WI
Bike
Tiger 800, NT sold
The suggestions above are good, but I used a different approach.

I used a small die grinder to cut a slot in the damaged plug as large as I could cut without contacting the cover. Then I used a washer of the same diameter as the grinding wheel to make a wrench to remove the plug without damaging the cover case.

Use the torque specs when installing the new one and maybe a little grease on the o-ring.
 
Joined
Jun 14, 2015
Messages
159
Location
Michigan
Bike
2010 Silver NT700VA
If it were me, I'd be taking my dremel with a cut-off wheel and make a slot as suggested. Then either use a big screwdriver or washer as a driver, or worst case use a punch or chisel to work it. As noted, it's in there with an O-ring. It's stuck, but not ridiculously tight.

On the bright side, you'll be proud of your skillz when you get over this hurdle. :)
 

mikesim

Site Supporter
Joined
Jun 7, 2011
Messages
3,363
Age
74
Location
Union, MO
Bike
NT700, Red, #989,
One other suggestion which will help in avoiding future frustration is to get a small tube of "anti-seize" compound and put this on the threads of the new one and don't over torque. There are another two areas which can bite you. The upper cap over the crankshaft cap can also be problematic as well as the inspection cap on the final drive. Use anti seize on these as well.

Mike
 
Joined
May 20, 2015
Messages
115
Location
Michigan
Bike
2013 Harley Police bike
All good suggestions. I would not use heat. It is not needed and if that O ring should melt, then you do have a problem.
 
Joined
Jan 23, 2011
Messages
1,293
Location
Arkansas
Bike
2020 Kawasaki Versys
Another thought on adding heat.
Heat would not be my 1st choice. It would have to be controlled pretty well. Also the stator coils are bolted to the inside of the cover and you don't need to overheat them. There is also some oil (small amount in bottom) of the case.

I'm not sure this would help much but the cover gets hot during use (from oil and coils). You could take the bike out for a ride to get it good and warm, then try to remove the cap. The thing is you are heating both the case and the cap to the same temperature so I don't know if it would help release it much but it wouldn't hurt much either.

Brad
 
Joined
Nov 7, 2017
Messages
1,300
Age
50
Location
Sun Valley, CA
Bike
NT700V, NC700X, XL600R
I would refrain from using a bolt extractor as cheap ones are prone to break at the worst possible times. If you want to go this route, I would recommend one at least a 1/2" diameter.

Any drilling into this cap will deposit unwanted metal filings into the stator cavity. The rotor will get littered with these metal filing and could cause harm to the stator itself.

These caps typically require an impact driver to get them out usually. Since this one has been rounded out, your best option is to create a slot using a die grinder or Dremel and then use a cold chisel to attempt to back it out.
 
Joined
Nov 7, 2017
Messages
1,300
Age
50
Location
Sun Valley, CA
Bike
NT700V, NC700X, XL600R
If it were me, I'd be taking my dremel with a cut-off wheel and make a slot as suggested. Then either use a big screwdriver or washer as a driver, or worst case use a punch or chisel to work it. As noted, it's in there with an O-ring. It's stuck, but not ridiculously tight.

On the bright side, you'll be proud of your skillz when you get over this hurdle. :)
LOL!!! I didn't read your post before posting my solution. Seems that we are on the same page on this issue. Great minds do think alike... :biggrin:

 
Last edited:
OP
OP
swinford57
Joined
Jun 16, 2015
Messages
16
Location
Columbus, Ohio USA
Bike
2010 marroon NT700V
The crankshaft end cap is removed and replaced. What a hassle. Here's what I did

1. Buy new end cap and o-ring
1a. cover outside of crankcase with duct tape to cover the surface in case you miss hit.
2. Chiseled TWO grooves 180 degree apart on the end cap. One groove on one side does not provide enough force.
3. Two people tap on the endcap counter clockwise; one on one groove and one on the other (see photos).
4. beat on it till it comes loose. You will mangle the old one. It's soft metal. Try not to hit crankcase.

That's what worked for me.IMG_4056.jpgIMG_4047.jpgIMG_4053.jpgIMG_4056.jpgIMG_4060.jpg
 
Joined
Mar 28, 2016
Messages
86
Location
Camp Springs, KY
Problem solved......but I just feel the need to comment.

So many people over tighten these access plugs.....I am a moderator on the www.suzukisavage.com forum and we have the same kind of "stuck" issues with the access plugs. We also have drain plugs that are so tight you need to use 2 hands and a breaker bar to get them loose.

These access plugs and drain screws are not used to hold the engine in the frame....and they really just need to be snug and not gorilla tight! Please people - be gentle and don't overtighten these bolts!
 
Top Bottom