Stripped crankshaft end cap

Warren

2
Joined
Dec 13, 2010
Messages
2,334
Location
O'Fallon, MO
Bike
2019 Yamaha XMAX
I wonder what the dealer uses? I tried to get mine out a couple of times but could tell it would not budge without causing it harm so I left it alone. I have had my NT to the dealer at least three times for valve checks and they did not seem to have any problems removing it from what I can tell. It never looked like they put a new one in.
 

DirtFlier

Site Supporter
Joined
Dec 13, 2010
Messages
3,341
Location
Troy, OH
Bike
2010 Silver NT700V/ABS
An EZ-Out won't work because the cap is made of very soft material and it's very thin. Use Woodaddict's advice and tap around the edges with a small chisel.
 

Fieroguy

Site Supporter
Joined
May 9, 2012
Messages
154
Location
Milford, PA
Bike
2010 Silver NT700
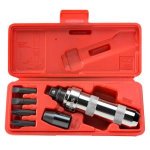
Is there a reason why an impact driver wouldn't work?
tekton-screwdriver-sets-2910-64_300.jpg
Seems it just needs to be jarred loose and then all's well. No harm to the side cover as force is applied directly to the bolt.
 
Joined
Jan 23, 2011
Messages
1,293
Location
Arkansas
Bike
2020 Kawasaki Versys
Glad you got it out without anything major, just a pain for you.
I tried and failed with the impact driver on mine, but I had already damaged it somewhat by then.
People here are correct that it doesn't need to be overtightened. But it is human nature to tighten enough so it doesn't leak or vibrate out.
I may use a torque wrench on mine next time. The metal is so soft it gives and the "feel" method doesn't work all that well.

Brad
 
OP
OP
swinford57
Joined
Jun 16, 2015
Messages
16
Location
Columbus, Ohio USA
Bike
2010 marroon NT700V
The metal on the end cap is SOOOO soft. I think an impact hammer would tear up the 10mm allen wrench hole. Also, there is a 1/2 inch of threads which has lots of area and requires so much torque to break loose. I was not aware of anti-seize, but will get some for that end cap. I put lithium grease on the threads but I'm having second thought about it.

Thanks Forum folks for your feedback.
 
Joined
Jan 25, 2012
Messages
709
Age
62
Location
NSW, Australia
Bike
2013 DL650/A & CX500 Euro
I believe this cap is “locked on” by the “O” ring, not the threads. The friction force of the rubber of the “O” ring prevents the cap from moving easily.

Applying a small amount of rubber grease or oil to the “O” ring should make removal easier.

Seagrass
 
OP
OP
swinford57
Joined
Jun 16, 2015
Messages
16
Location
Columbus, Ohio USA
Bike
2010 marroon NT700V
Perhaps the dealer put the bike in 5th gear and rotating the rear tire to get the valves were positioned properly for the valve check. That is what I did when the bike was all apart and the end cap was stuck.

I rode my NT from Ohio to Knoxville in July. Ambled back home on the Blue Ridge Parkway for part of the way. Great riding in TN.
 
Joined
Jan 23, 2011
Messages
1,293
Location
Arkansas
Bike
2020 Kawasaki Versys
I believe this cap is “locked on” by the “O” ring, not the threads. The friction force of the rubber of the “O” ring prevents the cap from moving easily.
Probably is the O-ring. When the cap is tightened down the O-ring compresses and flattens, creating more surface area. Add many heat/cool cycles and the problems may start to show up. I do wish the cap was a little harder or a different design so this would be less likely to occur.

Brad
 

ST1100Y

Site Supporter
Joined
Nov 7, 2020
Messages
600
Age
59
Location
Vienna, AuSTria, Europe
Bike
ST1100Y, ST1100R, NT700
Yeah... went to the same process with the '07 NT...
With 36Kkm/22.5Kmiles on the clock I figured a valve check would be due...
Seems the thing had never been opened...
Tried an Allen-wrench by hand... heat-gun, tapping it with a plastic mallet, impact driver... no avail...
Ended up removing the cover, removing the stator from it, drilling the cap out (that thing is very, very soft aluminum alloy...), cleaning everything, installing stator, glue the cover back onto the case... only to do the valve clearance check... :cautious:

Treated the new cover with some silicone grease on the O-ring and anti-seize on the threads, hope it'll come out easier the next time...
 
Last edited:

Phil Tarman

Site Supporter
Moderator
Joined
Dec 12, 2010
Messages
9,369
Age
81
Location
Greeley, CO
Bike
2010 Silver NT700VA (ABS)
Back when I owned my '99 Concourses, I did my own valve adjustments. Another Concours Owners Group member pointed out that orientation of the cam lobes wasn't extremely critical. He said that as long as the cam was orientated so that the the low part of the cam was under the rockers, you could adjust the valves. The Concours cam had at least 180 degrees that was perfectly circular. He said that I could just bump the engine with the starter until the valves I was checking had the high point of the lobe pointed away from the rocker. I checked that statement against the book by rotating the engine until the timing marks on the cam were "properly" located and then by rotating it about 20 degrees in either direction. Sure enough, there was no change.

I have not done any of my valve adjustments on the NT, but I'd bet you can use that same technique. If the dealer hasn't had the end camp out, they may have just "bumped" it with the starter, or simply have moved the bike while it's in 5th gear to get the cam aligned right.
 

ST1100Y

Site Supporter
Joined
Nov 7, 2020
Messages
600
Age
59
Location
Vienna, AuSTria, Europe
Bike
ST1100Y, ST1100R, NT700
I have not done any of my valve adjustments on the NT, but I'd bet you can use that same technique. If the dealer hasn't had the end camp out, they may have just "bumped" it with the starter, or simply have moved the bike while it's in 5th gear to get the cam aligned right.
Judging by the overall conditions (two of the "headlight nuts" holding the carrier stay missing, dry drive splines with O-rings milled to dust, hub dampers + bushings gone, fork oil a gross sludge, front wheel bearings shot (waterdrops on axle and bearings! Damn pressure washer users...), aftermarket brake pads (and those installed wrong), inner weight on handlebar broken, etc...) there was not much done (properly) at all...
I don't think that the tank nor the valve covers had ever been removed... or that the coolant had been changed...
The brake fluid in the reservoirs looked nice, but the soup I'd drawn out the lines with the pneumatic vacuum bleeder was pretty brownish... drew one liter of new BelRay DOT4 through the system to ensure proper flushing... don't want to have the ABS pump/modulator seizing up one day...
 
Top Bottom