Hi All, Well I did my winter maintenance to the 700 and wrapped a new set of tires on the rims. Instead of removing the exhaust and all the related stuff that goes along with it, I figured why not just get the final drive out of the way and grease everything back up and call it good all at the same time. Well, Its not going so good. The driveshaft WILL NOT re-seat back into the u joint. I've fought and fought and fought with this thing for the past three nights with ZERO success. Any tips before I take the swingarm off and pull the u joint and see if there is or isn't a problem on the internal splines? I don't think there is and it doesn't look like anything is wrong after getting my camera up in there but I just don't know at this point. I'll take the 7 lashes for posting this here instead of the tech section. I'll delete and repost there if advised to do so. Any suggestions would be welcome! Thanks much much much!
Tire change grief (cant get driveshaft back into u joint)
- Thread starter 97af
- Start date
Remove the driveshaft from the final drive, and then install the driveshaft into the u-joint, letting it lay in the swingarm. Then, bring the final drive up and join it to the driveshaft. The problem you're dealing with is this: trying to get the splines engaged up front while fighting the weight of the final drive. Keep an eye on the spring at the back end of the driveshaft, as long as it stays in place you're doing Ok.
By the way, I usually replace the seal at the rear of the driveshaft, it just presses into place.
Brad
By the way, I usually replace the seal at the rear of the driveshaft, it just presses into place.
Brad
Woodaddict
Site Supporter
- Joined
- Jan 2, 2012
- Messages
- 895
- Age
- 64
- Location
- Salisbury,NC
- 2024 Mileage
- 008308
- Bike
- Red NT700V & Spyder RTL
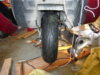
ITS NOT fun!! I made a wire "U" shape from a clothes hanger to lay on bottom of rubber boot to keep the universal more in line of splines. or it laid inside just of casting of engine, can't remember. i couldn't be at both front and back side at same time. the "U" shape hanger helps hold more in line, then from back able to push final drive up.
also, don't tighten up 4 final drive bolts BEFORE inserting and lightly tighten axle bolt to tweak final drive in line
also, don't tighten up 4 final drive bolts BEFORE inserting and lightly tighten axle bolt to tweak final drive in line
OP
OP
Hi Brad. Thanks for the reply. Tried it that way too last night. New seal and o'rings also by the way. This ordeal is really making me feel like an amateur....
Woodaddict
Site Supporter
- Joined
- Jan 2, 2012
- Messages
- 895
- Age
- 64
- Location
- Salisbury,NC
- 2024 Mileage
- 008308
- Bike
- Red NT700V & Spyder RTL
don't know if OFF from engine or just the shaft, but try something like this. you WILL have to take off that boot from engine to swingarm. NOt fun getting that back on either
OP
OP
Wood, I can barely get the driveshaft in far enough into the u joint to put the nuts on backwards just to hold it. I didnt want to tighten too much with it not seating. Cracking the FD case would just be icing on this cake...
OP
OP
I've slid the boot back. Getting that back on is the least of my worries... On top of it all, I'm doing this in my wifes spot in the garage for her car... Dealing with that is worse, well just about as the problem at hand")
Woodaddict
Site Supporter
- Joined
- Jan 2, 2012
- Messages
- 895
- Age
- 64
- Location
- Salisbury,NC
- 2024 Mileage
- 008308
- Bike
- Red NT700V & Spyder RTL
Now i remember, universal on engine, the wire hanger i placed in bottom of swingarm to hold it better, more in line with the shaft from final drive. it HAS to be really close to correct angle or it will not engage
The clearance on the splines is very tight, almost non-existent. As others have mentioned here, you have to pull the boot back. I've removed the left foot peg bracket to make room to work with the boot. The u-joint has to point straight down the hollow swingarm to get it to engage. Usually there's enough drag on the u-joint bearings where it will stay in position once aimed. Last time I checked alignment by looking down the swingarm with a flashlight. I will admit it really tests your patience.
I have never done this on my NT700 but I have done it many times on my CX500.
The CX500 is very easy as the driveshaft is connected to a spline on either end and the universal joint is along the driveshaft. The final drive end has a female fitting and the engine end has a male.
When you remove the driveshaft from the engine you can just push the driveshaft towards the final drive about 1” to give you room to slide the driveshaft off the spline at the engine.
Seagrass
OP
OP
Well guys, I think I got it. With the tolerance being just about nothing, I think the problem was the dry moly that was mashed into the inner splines of the u joint. After removing everything to get to it and check for any damage, which there was none, I still could not insert the drive shaft into the u joint with them both being in my hands. I then sanitized the inner splines of the u joint to covid spec and the drive shaft went right in. Man I gotta tell you this was alot of work for just intending to do a tire swap, front rotors and brakes....Dunlop Q3+'s by the way, EBC rotors with a matching set of HH pads. Well while I'm at it, swing arm bushings get the treatment too. Moral of this story and for anyone else that is for sure going to have the same problem. If that drive shaft comes out and doesn't go back in, Its going to be a total dissasemble to get to the u joint to unpack the crap in the splines. Good times I tell ya, good times.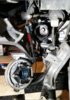
, EBC rotors with a matching set of HH pads. Well while I'm at it, swing arm bushings get the treatment too. Moral of this story and for anyone else that is for sure going to have the same problem. If that drive shaft comes out and doesn't go back in, Its going to be a total dissasemble to get to the u joint to unpack the crap in the splines. Good times I tell ya, good times.
Last edited:
Woodaddict
Site Supporter
- Joined
- Jan 2, 2012
- Messages
- 895
- Age
- 64
- Location
- Salisbury,NC
- 2024 Mileage
- 008308
- Bike
- Red NT700V & Spyder RTL
wow! swing arm bushings??? i had 201,111 miles on my first NT before i sold it, no swingarm bushings for me or even a hint of play. moral to the story, don't take off final drive again for tire change. don't even have to take off muffler. just loosen bolt at passenger foot peg, that will give you enough movement in pipe to take out brake pin and wedge it against muffler to make caliper housing moveable. check out some old posts, or search old posts for whatever you need to do but need some help. just about everything has been covered in 11 yrs now!!
OP
OP
Sorry......needle bearings. Had to sneak this sweetness in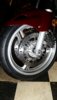
Last edited:
Woodaddict
Site Supporter
- Joined
- Jan 2, 2012
- Messages
- 895
- Age
- 64
- Location
- Salisbury,NC
- 2024 Mileage
- 008308
- Bike
- Red NT700V & Spyder RTL
BTW, i'm old NE ohio person too, 34 yrs removed to NC in 1987. ashtabula county, jefferson
OP
OP
Lived in NC for quite a while late 90's early 2000's. Morehead City. My beach faced south Was in Ashtabula yesterday at a customer of mine. Molded fiberglass Co.
Was in Ashtabula yesterday at a customer of mine. Molded fiberglass Co.Coyote Chris
Site Supporter
ITA. After taking off the muffler once and having the devil's own time getting it back on, I just just loosened it and moved it to Starboard to remove the wheel. Took off the plastic rear fender also.wow! swing arm bushings??? i had 201,111 miles on my first NT before i sold it, no swingarm bushings for me or even a hint of play. moral to the story, don't take off final drive again for tire change. don't even have to take off muffler. just loosen bolt at passenger foot peg, that will give you enough movement in pipe to take out brake pin and wedge it against muffler to make caliper housing moveable. check out some old posts, or search old posts for whatever you need to do but need some help. just about everything has been covered in 11 yrs now!!
Piece of cake
ST1100Y
Site Supporter
- Joined
- Nov 7, 2020
- Messages
- 600
- Age
- 59
- Location
- Vienna, AuSTria, Europe
- Bike
- ST1100Y, ST1100R, NT700
The very first time (following the workshop manual) I also took the can off, but working on a lift/platform I don't even loosen it anymore... take rear fender off, loosen axle nut and clamp, loosen & pull back caliper stop-bolt, pull axle, take spacers out, lift caliper over rotor, remove wheel, pretty easy...... just loosened it and moved it to Starboard to remove the wheel. Took off the plastic rear fender also.
Wouldn't like to do that on the floor though...

OP
OP
Hi All, Just wanted to shoot a thanks off to all that replied to the dilemma that I was having. All is well now, bike is back together and in its own spot and ready to go. Wife now has her spot back too and the evil eye look has dissipated.... some what. Again, thanks. You're the best!
Again, thanks. You're the best!DirtFlier
Site Supporter
Now that it's reassembled correctly, why did you feel a need to remove the driveshaft?
I've had three or four Honda motorcycles, all with shaft drive, and have never had the need to remove the driveshaft.
I've had three or four Honda motorcycles, all with shaft drive, and have never had the need to remove the driveshaft.
OP
OP
I removed it because I dont have a service history on the bike and wanted to make sure the splines had grease. All my shaft bikes get a spline re-grease every other tire change and in this case there was no time like the present to take care of it. Just did my Concourse 1000 and VTX18 with absolutely zero issues. Took them apart, did what needed to be done and back together. Easy Peasy, nothing like this thing. I'm glad I did it in the end. The splines were totally dry and the with having to remove the swingarm to pull the u joint out to clean and inspect, the swing arm pivot bearings got some much needed love too. Took care of the shock mounts too. I cant imagine what Woodaddict's looked like at 200k without being touched! All's well that ends well.Now that it's reassembled correctly, why did you feel a need to remove the driveshaft?
I've had three or four Honda motorcycles, all with shaft drive, and have never had the need to remove the driveshaft.