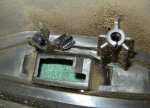
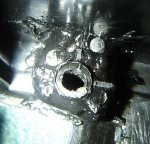
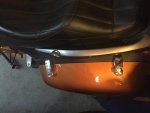
After redesigning the failed latch posts on my left saddlebag, (pictures to follow), I thought to take the right bag off and take a look, even though the latch wasn't misbehaving. The moral of the story is, just because one's latch isn't acting up, doesn't mean it isn't hanging on by a gnat's-***. These posts basically disintegrated by the mere act of disassembly.
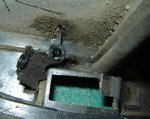
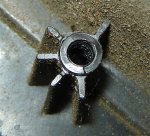
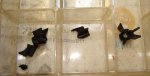
Assuming you have all the broken pieces of each post, they can be rebuilt, stronger. Those seemingly worthless pieces of fractured plastic in the pictures above, are actually invaluable, as you need them to maintain the correct distance between the latch mechanism and saddlebag body. Job #1 is to use a plastic epoxy (I used JB Weld Plastic Bonder) and glue back together each plastic piece of broken post as best you can. Not the portion of post which is in the saddlebag body, but the pieces which the screws go into, and break off at the end of the too-short screws. Toss the Honda thread-forming screws into your coffee can of fasteners, because you won't be using them again for this job. Be very careful to keep epoxy off of the bottom of the fractured pieces where they will mate with the remnants of the posts remaining in the saddlebag bodies. You don't want stray epoxy to upset the height of the post, or cause it to deviate from vertical.
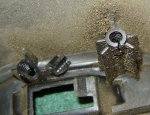
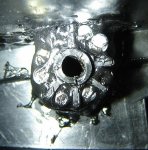
Once that's done, I used a Dremel tool and various bits to rough up the surfaces of the posts and the fins, so the epoxy would adhere well. Do this also on the posts which are remaining in the saddlebag body. It's not easy to get to all the surfaces, and required manual scraping in a few areas with a dental pick. I took the time because, as they say, if you think you don't have the time to do the job right, you certainly don't have the time to do it over. Once the shiny plastic is dull from grinding/scraping/sanding, it's time to epoxy each upper portion of reconstructed post to it's lower mate in the saddlebag. Be careful with the alignment. This is your last chance to maintain correct geometry and post height. A little epoxy weep into the bore is OK, as it will be drilled out later for tapping.
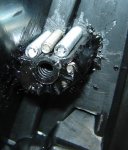
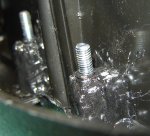
Next, I measured bits of threaded rod to fit between each fin, later to be epoxied in place. keep the length of rod a millimeter shorter than the height of the lands on each post. It is time consuming and tedious.
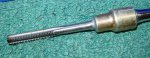
After that, I used a M5 x 0.8 tap. You need at least 6 inches of reach, so I drilled a 5 mm socket out to accept the tap (after I cut off the square tap end) and epoxied it in. Then just used a 1/4" extension on a T-handle.
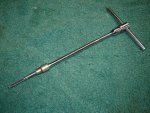
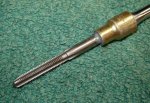
I ground away more of the tap shank so it could thread all the way into the deeper bores, then ground the tip of the tap down to make it more of a bottoming tap.
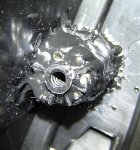
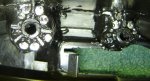
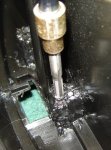
Before tapping, the bore needs to be drilled to the correct diameter, which in the case of this tap, is 11/64". I had to order a long 12" drill. Measure the depth of each bore and affix a piece of tape a couple millimeters shy of the that length onto the drill as a bore gauge so you don't drill right out the other side of the saddlebag body. After drilling, proceed with tapping.
Measure again, the length of 5 mm threaded rod you will need to thread into each bore, adding appropriate additional length to accomodate the latch plate and lock nuts and washers. The rod gets threaded into the bores by using two nuts at the top jammed together, upon which you can use a socket. Un-jam them after insertion with an open end and box end wrench. Use epoxy in the bore and on the threads sparingly. Almost none, or you will hydraulic excess down into the bore and crack the saddlebag body a tiny bit. Don't ask how I know.
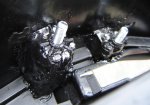
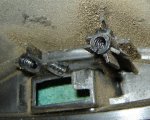
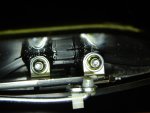
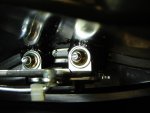
Finally, the latch mechanism attached to the new threaded rod, instead of the original screws in plastic:
Assuming you have all the broken pieces of each post, they can be rebuilt, stronger. Those seemingly worthless pieces of fractured plastic in the pictures above, are actually invaluable, as you need them to maintain the correct distance between the latch mechanism and saddlebag body. Job #1 is to use a plastic epoxy (I used JB Weld Plastic Bonder) and glue back together each plastic piece of broken post as best you can. Not the portion of post which is in the saddlebag body, but the pieces which the screws go into, and break off at the end of the too-short screws. Toss the Honda thread-forming screws into your coffee can of fasteners, because you won't be using them again for this job. Be very careful to keep epoxy off of the bottom of the fractured pieces where they will mate with the remnants of the posts remaining in the saddlebag bodies. You don't want stray epoxy to upset the height of the post, or cause it to deviate from vertical.
Once that's done, I used a Dremel tool and various bits to rough up the surfaces of the posts and the fins, so the epoxy would adhere well. Do this also on the posts which are remaining in the saddlebag body. It's not easy to get to all the surfaces, and required manual scraping in a few areas with a dental pick. I took the time because, as they say, if you think you don't have the time to do the job right, you certainly don't have the time to do it over. Once the shiny plastic is dull from grinding/scraping/sanding, it's time to epoxy each upper portion of reconstructed post to it's lower mate in the saddlebag. Be careful with the alignment. This is your last chance to maintain correct geometry and post height. A little epoxy weep into the bore is OK, as it will be drilled out later for tapping.
Next, I measured bits of threaded rod to fit between each fin, later to be epoxied in place. keep the length of rod a millimeter shorter than the height of the lands on each post. It is time consuming and tedious.
After that, I used a M5 x 0.8 tap. You need at least 6 inches of reach, so I drilled a 5 mm socket out to accept the tap (after I cut off the square tap end) and epoxied it in. Then just used a 1/4" extension on a T-handle.
I ground away more of the tap shank so it could thread all the way into the deeper bores, then ground the tip of the tap down to make it more of a bottoming tap.
Before tapping, the bore needs to be drilled to the correct diameter, which in the case of this tap, is 11/64". I had to order a long 12" drill. Measure the depth of each bore and affix a piece of tape a couple millimeters shy of the that length onto the drill as a bore gauge so you don't drill right out the other side of the saddlebag body. After drilling, proceed with tapping.
Measure again, the length of 5 mm threaded rod you will need to thread into each bore, adding appropriate additional length to accomodate the latch plate and lock nuts and washers. The rod gets threaded into the bores by using two nuts at the top jammed together, upon which you can use a socket. Un-jam them after insertion with an open end and box end wrench. Use epoxy in the bore and on the threads sparingly. Almost none, or you will hydraulic excess down into the bore and crack the saddlebag body a tiny bit. Don't ask how I know.
Finally, the latch mechanism attached to the new threaded rod, instead of the original screws in plastic:
Last edited:
")