Wednesday Phil is riding over to my place to get a rear tire changed. I am going to give him a lesson on how to remove the rear wheel and change the tire and then install the wheel. Along with that lesson we will be going over what to look for and inspect in the final drive while the wheel is off. Also how to check the rubber wheel cushions. If any one wants to join us you are welcome. Come by and learn some stuff about your NT700, or just come by to supervise. If you are interested send me a PM and I will give you directions to my place.
You are using an out of date browser. It may not display this or other websites correctly.
You should upgrade or use an alternative browser.
You should upgrade or use an alternative browser.
Rear Wheel and Tire R&R Class
- Thread starter Chucksklrst
- Start date
Chuck,
Why not have Phil take pics and post the sequence in here? Would be useful for those who have not done it.
Why not have Phil take pics and post the sequence in here? Would be useful for those who have not done it.
OP
OP
Chuck,
Why not have Phil take pics and post the sequence in here? Would be useful for those who have not done it.
Going to be hard for Phil to turn a wrench/operate tools and manipulate a camera/take pictures, at the same time.
 I am going to supervise and instruct from my garage chair. My hand will have a coffee cup in it. Maybe I can take some pictures with the other hand.
") .
.bicyclist
Guest
For me, the biggest PITA is getting the brake caliper reinstalled. I'd be interested in seeing how others do it.
Good idea Chuck!! Don't dribble coffee on your shirt when taking pictures
The rear brake thing on abs bikes is like anything else. You have to hold your tongue just right or it doesn't fit The regular videos I have seen are for non-abs bikes and that extra bit of wire/hose makes a huge difference.
I can't remember the exact place you have to place the brake, but, that placing is critical, both location and how it is rotated. Most of the time I just moved and wiggled things until I got the wheel in or out. Only bit my tongue once
The rear brake thing on abs bikes is like anything else. You have to hold your tongue just right or it doesn't fit
The regular videos I have seen are for non-abs bikes and that extra bit of wire/hose makes a huge difference.I can't remember the exact place you have to place the brake, but, that placing is critical, both location and how it is rotated. Most of the time I just moved and wiggled things until I got the wheel in or out. Only bit my tongue once
ken
0
I'm curious about the different approaches: remove the muffler/tailpipe, remove the pannier/saddlebag, or just use a box end and remove the tire. I'm curious about why someone would choose not to follow the shop manual, other than the possible hassle. Is it easier to remove the saddle bag? I'm not sure about this. Isn't it a pain to try and remove the wheel with out getting things out of the way?
This is not an academic question, as I'm going to remove the rear wheel for the first time this week. Should my plan to remove/replace the brake fluid make a difference which approach I take. Any advice would be appreciated.
Ken
This is not an academic question, as I'm going to remove the rear wheel for the first time this week. Should my plan to remove/replace the brake fluid make a difference which approach I take. Any advice would be appreciated.
Ken
I'm curious about why someone would choose not to follow the shop manual, other than the possible hassle.
Because shop manuals are co-authored by liability lawyers and also designed to maximize "book rate" billing a dealer can charge for a service or repair. Almost every vehicle is a lot easier to maintain than the shop manuals imply... Depending upon your skill level and available tools there are often easier ways to do a task. But in defense of shop manuals they will rarely steer you wrong...:wink:
I'm curious about the different approaches: remove the muffler/tailpipe, remove the pannier/saddlebag, or just use a box end and remove the tire. I'm curious about why someone would choose not to follow the shop manual, other than the possible hassle. Is it easier to remove the saddle bag? I'm not sure about this. Isn't it a pain to try and remove the wheel with out getting things out of the way?
This is not an academic question, as I'm going to remove the rear wheel for the first time this week. Should my plan to remove/replace the brake fluid make a difference which approach I take. Any advice would be appreciated.
Ken
It depends on what you have to work with. If you have an elevated table and can drop the wheel down, then there isn't really a reason to remove the fender or cases. I did not so I always removed the fender.
I did remove the muffler just because it was easier for me to get to things.
Herb
0
I've done it both ways but now do what's easiest. Loosen the muffler but not remove and use the box wrench on the axle and caliper stopper bolt.I'm curious about the different approaches: remove the muffler/tailpipe, remove the pannier/saddlebag, or just use a box end and remove the tire. I'm curious about why someone would choose not to follow the shop manual, other than the possible hassle. Is it easier to remove the saddle bag? I'm not sure about this. Isn't it a pain to try and remove the wheel with out getting things out of the way?
This is not an academic question, as I'm going to remove the rear wheel for the first time this week. Should my plan to remove/replace the brake fluid make a difference which approach I take. Any advice would be appreciated.
Ken
OP
OP
I've done it both ways but now do what's easiest. Loosen the muffler but not remove and use the box wrench on the axle and caliper stopper bolt.
Can you get a torque wrench on those with the muffler just loosened for installation?
Attachments
Last edited:
I never used a torque wrench. Not really a reason to.
I pulled the muffler cause I like using ratchets
I pulled the muffler cause I like using ratchets
coaster
0
Can you get a torque wrench on those with the muffler just loosened for installation?
I used a torque wrench with a crow foot wrench and left the muffler in place.
Herb
0
Can you get a torque wrench on those with the muffler just loosened for installation?
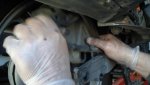
I don't use a torque wrench when replacing the axle nut and the brake caliper stopper bolt. Not sure what nut you're referencing in your photos, Chuck. Whatever bolt it is, I don't mess with it when removing my rear tire. Just axle nut and stopper bolt which are well to the left of the circled bolt.
OP
OP
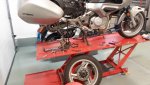
So Phil arrived about 0930 and we got started right away. We decide to remove the exhaust system but not the rear fender as I put his bike on my lift. The Exhaust came off with out too much grief and only had a little issue with the top rear exhaust shield bolt. The key to that is remove the middle mounting bolt and then the rear exhaust mounting bolt so as to be able to let the exhaust hang down from the foot peg stay. This gives you room to remove the rear top exhaust shield bolt with out too much trouble. Remove the shield then loosen the two front exhaust clamps. Make sure you coat the exhaust mounting and clamp bolts with the anti-seize compound. Don't forget to undo the O2 senor plug under the right side cover, the cable is held in place by a small plastic clip. You can see it by looking through the bike frame from the left side of the bike.(thank goodness for the lift)Pull the exhaust system off and set aside.
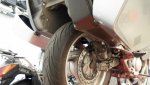
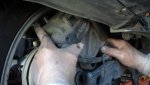
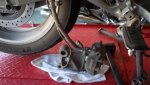
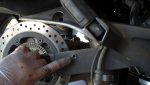
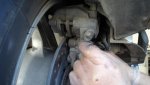
Some one was asking about how to get the brake caliper off. Remove the rear most brake hose bracket bolt, remove the brake stopper bolt. Loosen axle pinch bolt. Remove the axle nut. Pull axle out until the caliper bracket is clear of the axle. Pivot caliber bracket counter clockwise and lift caliber off of the disk. Very small clearance but it is there. Then gently work it out and let it hang down. The Caliber will set upside down on the lift table with no undue stress on the hose. If one so desires, one can tie it up off the table top. See pictures. To re-install, put axle back into the rear drive to where it is just poking thru. Mate wheel back into the splines. It will hold it self in. Push axle to where it will just come through the wheel. Gently spread the break pads apart with a flat blade screw driver, then work the caliber bracket between wheel and swing-arm, sliding the caliber down onto the disk. Do not for get the small wheel spacer, if it came off the wheel. A-line the bracket hole with axle and then push axle through to the other side of the swing arm. Now install the stopper bolt. Do not tighten stopper bolt until axle nut is torque properly (66 ft lbs.) then torque stopper bolt. (66 ft lbs) Then tighten axle pinch bolt (24 ft lbs) install the exhaust system in reverse order as uninstalling it, being careful not to damage the exhaust gaskets where the system attach to the header pipes. You might have to tap on the end of the exhaust system with a piece of wood and a rubber mallet, plus do some wiggling of the system to persuade it to slide on the header pipes.
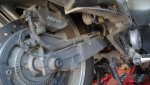
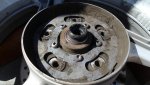
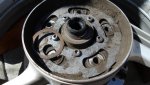
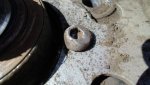
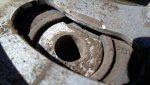
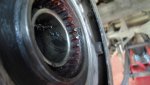
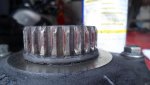
If you remember I did a write up about inspecting / replacing the three O-rings in the final drive system ( http://www.nt-owners.org/forums/showthread.php?5320-3-O-rings&highlight= )I also just finished a write up about inspecting the rubber cushion drive bumpers and aluminum inserts. ( http://www.nt-owners.org/forums/showthread.php?8124-Time-to-fully-inspect-your-rear-end&highlight=) These should be inspected each and every time the rear tire is changed. Also clean and inspect the drive flange spider as it has a thrust washer that needs to be lubed with Honda Molly 60. You will need to pull it out of the rubber cushion drive. Phil's final drive showed a lot of wear because some dealer did not take the time to inspect and lube the final drive system properly during tire changes. Fortunately for Phil, he has an extended warranty. Hope they cover the wear. The bike has 80k miles but should not, with proper maint have this kind of wear. My ST1300 has over 123000 miles and looks brand new in the final drive components. Here are the pictures we took today. Hope they help with my explanation. Remember to follow the Honda manual for proper lube points and proper Lube (Honda Molly 60)
Removing and remounting the tire was easy and had no issues. Liberal use of Lube is the Key. We did have to take the wheel and tire over to an auto tire shop as my compressor did not have to volume to seat the bead on Phil's PR4. The tire had been stored a while with the shipping straps squeezing the tire bead together, Thus making it difficult to get the bead to seal.
Some one was asking about how to get the brake caliper off. Remove the rear most brake hose bracket bolt, remove the brake stopper bolt. Loosen axle pinch bolt. Remove the axle nut. Pull axle out until the caliper bracket is clear of the axle. Pivot caliber bracket counter clockwise and lift caliber off of the disk. Very small clearance but it is there. Then gently work it out and let it hang down. The Caliber will set upside down on the lift table with no undue stress on the hose. If one so desires, one can tie it up off the table top. See pictures. To re-install, put axle back into the rear drive to where it is just poking thru. Mate wheel back into the splines. It will hold it self in. Push axle to where it will just come through the wheel. Gently spread the break pads apart with a flat blade screw driver, then work the caliber bracket between wheel and swing-arm, sliding the caliber down onto the disk. Do not for get the small wheel spacer, if it came off the wheel. A-line the bracket hole with axle and then push axle through to the other side of the swing arm. Now install the stopper bolt. Do not tighten stopper bolt until axle nut is torque properly (66 ft lbs.) then torque stopper bolt. (66 ft lbs) Then tighten axle pinch bolt (24 ft lbs) install the exhaust system in reverse order as uninstalling it, being careful not to damage the exhaust gaskets where the system attach to the header pipes. You might have to tap on the end of the exhaust system with a piece of wood and a rubber mallet, plus do some wiggling of the system to persuade it to slide on the header pipes.
If you remember I did a write up about inspecting / replacing the three O-rings in the final drive system ( http://www.nt-owners.org/forums/showthread.php?5320-3-O-rings&highlight= )I also just finished a write up about inspecting the rubber cushion drive bumpers and aluminum inserts. ( http://www.nt-owners.org/forums/showthread.php?8124-Time-to-fully-inspect-your-rear-end&highlight=) These should be inspected each and every time the rear tire is changed. Also clean and inspect the drive flange spider as it has a thrust washer that needs to be lubed with Honda Molly 60. You will need to pull it out of the rubber cushion drive. Phil's final drive showed a lot of wear because some dealer did not take the time to inspect and lube the final drive system properly during tire changes. Fortunately for Phil, he has an extended warranty. Hope they cover the wear. The bike has 80k miles but should not, with proper maint have this kind of wear. My ST1300 has over 123000 miles and looks brand new in the final drive components. Here are the pictures we took today. Hope they help with my explanation. Remember to follow the Honda manual for proper lube points and proper Lube (Honda Molly 60)
Removing and remounting the tire was easy and had no issues. Liberal use of Lube is the Key. We did have to take the wheel and tire over to an auto tire shop as my compressor did not have to volume to seat the bead on Phil's PR4. The tire had been stored a while with the shipping straps squeezing the tire bead together, Thus making it difficult to get the bead to seal.
Attachments
-
 SAM_2879.jpg93.6 KB · Views: 103
 -
 SAM_2880.jpg88 KB · Views: 94
 -
 SAM_2881.jpg92.5 KB · Views: 85
 -
 SAM_2882.jpg86.3 KB · Views: 85
 -
 SAM_2883.jpg81.3 KB · Views: 74
 -
 SAM_2887.jpg96.4 KB · Views: 139
 -
 SAM_2888.jpg97.5 KB · Views: 76
 -
 SAM_2886.jpg90.2 KB · Views: 77
 -
 SAM_2885.jpg82.4 KB · Views: 68
 -
 SAM_2884.jpg84.1 KB · Views: 77
 -
 SAM_2889.jpg94.5 KB · Views: 76
 -
 SAM_2890.jpg95.2 KB · Views: 83
 -
 SAM_2893.jpg87.4 KB · Views: 80
 -
 SAM_2894.jpg96 KB · Views: 80
 -
 SAM_2895.jpg88.2 KB · Views: 86
 -
 SAM_2897.jpg85.7 KB · Views: 94
 -
 SAM_2898.jpg92.6 KB · Views: 83
 -
 SAM_2633.jpg93.7 KB · Views: 91
Last edited:
Wow! Looking at that mess me really happy to have a belt drive....:wink: :smile: That is pretty nasty wear for only 80K and less than four years...
bicyclist
Guest
Those are some ugly splines. When you see rust on them, ya know ya got trouble.
One of those pictures gave me a hint as to why I have difficulty with reinstalling the caliper. I don't believe that I've ever disconnected the hose clip. I'll have to look into that.
One of those pictures gave me a hint as to why I have difficulty with reinstalling the caliper. I don't believe that I've ever disconnected the hose clip. I'll have to look into that.
It was a good day (except for the damage and wear found in the splines and the thrust washer) and I learned a lot! Chuck is a careful, meticulous mechanic and a good teacher. He doesn't just tell you what do, but he tells you why, and clearly describes the process and the flow of the work. I would feel quite comfortable removing and replacing the rear wheel now...especially if I had a lift table and I tire mounting tool. But I don't really need either one. After all, I know a guy who's got'em both.
I had a good ride home on the new tire and hit light rain about 30 miles from home. It got harder just as I got home. We need the rain and I enjoyed riding in it.
Oh, BTW, the picture I took of the tire doesn't look quite as dramatic as the tire itself did. The softer rubber on the sides was worn quite a bit, but the sides of the hard compound center strip weren't worn much at all. The center of the center strip was worn almost perfectly flat and square.
But I don't really need either one. After all, I know a guy who's got'em both.
just like a pickup truck, you only need to know someone who has one....:smile:
Share: