[How To] Checking the valves

Joined
Dec 12, 2010
Messages
407
Age
74
Location
Huntington NY
Bike
2010 Red NT 700
Just finished value check(the front for the first time thanks to the new picts and instructions). The 8mm deep socket for the front throttle body band screw was a huge gift. As was only having to disconnect the two pin connector on the R/R of the throttle body and pushing an intact throttle body out of the way. Removing cables scared me to death.


Got some minor editing suggestions for Redbirds addition to Katherine's post on these two critical items. I had to go to Chuck's clinic description to find out that the deep socket was an 8mm(had to buy one).

I also thought Chuck's clinic description of removing the throttle body 2 pin connector was clearer and more helpful.

Redbird, it's up to you but you might consider replacing these two items in your write up with Chuck's from his clinic. Here's what he wrote.

Only one ,two pin connector, needs to be undone to R/R of the throttle body.
We were able to move the throttle body out of the way without removing the cables away. Do Not twist the cables, gently turn the T-body out of the way.

A ? inch 8mm deep well socket and ratchet has enough room to get in and loosen the front T-Body boot clamp. My socket was 2in long. Would have been a better fit to cut a ? to 1/2inch off the socket. Will make me that tool for next time.

With Katherine's and Redbird's pictures and descriptions we have a very helpful. And of course, Chucks clinic work. Thanks to all.
 

RedBird

Site Supporter
Joined
Apr 14, 2011
Messages
320
Location
Colorado
Bike
2009 F800ST, 1973 R75/5
Ok, I've edited the write up per Herb's suggestion. Check it out, let me know if I need to change/add anything.
 
Joined
Jan 23, 2011
Messages
1,293
Location
Arkansas
Bike
2020 Kawasaki Versys
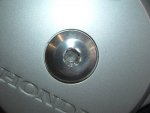
Rounded Crank Cap

Did my first valve check today. It was certainly easier for me because of reading other's expieriences on this forum. Thank you all.
I found it a little challenging to get to the throttle body clamps and to be able to verify they were seated while putting back together. Also verifying clearance on front exhaust valves hard. I have fairly small hands but it is difficult to get feeler gauge in and straight to get an accurate reading. Just need to take time and be careful.
All valves found in spec. The dealer did the 600 mile service so this is the second check at 9175 miles.

I did have one issue. The cap on the end of the crank that should be removed to rotate the engine would not come out. I started out with normal tools. It was stuck. I soaked with penetrating oil. No help. Went to hammer driven impact driver. Didn't budge. Ended up trying pneumatic impact wrench. Cap did not budge, but I did manage to round out the allen head on the cap. By the way the metal the cap is made of is pretty good stuff.
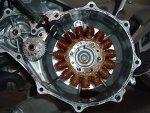
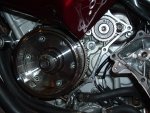
I ended up taking off the left side (starter/alternator) cover to gain access to the crank end. I plan on ordering a new cap and the next valve check I'll try to carefully remove the old one. Probably have to cut it out and save the threads for the new cap. I kind of wonder if it got messed up at 600 mile service.
Here are a couple pictures inside the left side of the engine. By the way the manual warns that the alternator magnet is strong and they are correct. Pretty good pull putting the cover on and off.

Brad
 

Attachments

Joined
Jan 6, 2011
Messages
1,956
Location
Aurora, Colorado
Bike
19 Versys 1K SE, 14 FJR
Probably cross threaded at the 600 mile adjust. When I went to replace mine it wanted to cross thread. had to fool with that cap for a bit to get it to thread on correctly.
 

hondaaddict

Guest
Hi, I just got the valve cover off. Which direction does the crank turn?
 

hondaaddict

Guest
I mean, we're on the subject of checking valves, and to put the piston at TDC, I need to turn the crank bolt on the left side of the engine. Which direction do I turn this crank bolt is what I was asking? Counter-clockwise?

Sorry I don't have a manual handy. Any tips on finding TDC is also appreciated.
 

Phil Tarman

Site Supporter
Moderator
Joined
Dec 12, 2010
Messages
9,369
Age
81
Location
Greeley, CO
Bike
2010 Silver NT700VA (ABS)
I mean, we're on the subject of checking valves, and to put the piston at TDC, I need to turn the crank bolt on the left side of the engine
Oh. You can tell I've never adjusted my own valves (on the NT). On the Concours, I did and I'll make a confession:

If you ever look carefully at a camshaft lobe, you'll notice that for something more than 180 degrees, they are circular (at least on every engine I've ever checked). I "bumped" the engine with the starter and just got the lobe pointing away from the rocker. Did it that way for 165K on Connies, and never had any trouble.

Not sayin' you could do that with the NT without catastrophic results, but you could with the Connie.
 

johnha

Guest
You could always try Phil's method and then check that you have play in all the rocker arms to see if you're at TDC. I used to do this on other bikes to avoid buying an alternator cover gasket.

BUT, the NT has that nifty little hole in the middle of the left cover which allows you to rotate the engine without having to pull any covers like the Concours or any bike I've owned.
 
Joined
Jan 6, 2011
Messages
1,956
Location
Aurora, Colorado
Bike
19 Versys 1K SE, 14 FJR
I HIGHLY RECOMEND that unless you have done this procedure before and are fully familiar with the setting of the valves on the NT, that you do not attempt to do this WITH OUT the manual. I have been Checking valves on my ST for over 8.5 years and I STILL have the manual next to me for reference. I would never try to do this with out the Manual on my NT. I did my Valve Check on the NT after fully studying the Manual and reading all there was on this forum and I still had the manual next to me, and referred to it, during the procedure. There is too much that can go wrong. GO and order the manual and do the job as per the book, then there is no doubt. If you already have the Service Manual, please have it next to you and refer to it frequently. JMHO.
 
Joined
Jan 6, 2011
Messages
1,956
Location
Aurora, Colorado
Bike
19 Versys 1K SE, 14 FJR
Unscrew the timing cover and use a flashlight and you will see the timing marks as you turn the crank. There are two marks that correspond to each cylinder The marks are FT for the front and RT for the rear. Also the Front Cylinder is #2 cylinder.
 
OP
OP

elizilla

Guest
The crank will require varying amounts of force as you turn it, and the marks are at a point in the circle that is hard to stop at. If you pass them, just go around again.
 

hondaaddict

Guest
Can I have the spec clearance for the valves?

Nevermind. Found it: .006 and .008
 
Last edited by a moderator:

hondaaddict

Guest
Just finished checking the valves. Mine are all in perfect spec. Odo reading is about 1000.
 

davep1963

Guest
I bought an extra clamp for the front cylinder throttle body and plan to make an extension for its screw so it can be seen from above and I don't have to force a tool against the coolant hoses. It's one of my winter projects. The friction of my 1/4" drive rachet against those hoses makes for a vague feeling in regards to understanding what's happening at the screw. Loosening and tightening that screw is the most difficult part of his task! I've checked the valves twice in 17k miles (800 mi & 12k mi) so I'd get a feel for how much the clearances change and in what direction.
as for that throttle body clip, remove it and turn it around 180 degrees (so the screw faces the other way and you will find that you can easilly access it with a long shank n02 philips screwdriver, no need to mdify it :)

Cheers DaveP
 
Joined
Sep 20, 2011
Messages
239
Age
66
Location
Ruedi Reservoir, Basalt, Colorado
Bike
2010 red NT 700, 1985 Kaw
Yesterday I did my valve check with my son helping me and it all went pretty well thanks to the info on this forum and my Honda Service Manuel. Got it done in about 5 hours with the biggest hold ups being the front throttle body clamp and front spark plug access. Dave1963, turning the clip over 180 degrees on front TB was the key to reassembling, I thought I would share that info with the forum but you already did! All valves were in clearence and no adjustment was needed.
 
Top Bottom