This is probably rank heresy, but when we adjusted valves on the Concours, some of us noticed that the cam profile follows a perfect circle during a bit more than 180 degrees of their revolution. We started using the starter to "bump" the crank, and when the lobe was pointing only approximately away from the cam follower, we felt pretty confident in doing the adjustment there. I probably have done 18 or 19 valve adjustments on the 1000cc Concours and that technique worked with no problems every time.
[How To] Checking the valves
- Thread starter elizilla
- Start date
-
- Tags
- valves
OP
OP
elizilla
Guest
We did it that way on the V65 Sabre too. And another way to turn them is to put it in 6th and turn the rear wheel.
bicyclist
Guest
Sorry, I'm not following you. What "front mounting band" do you mean?I have a question about flipping the front mounting band. If you have flipped it to enhance access, did you leave it on the front side of the intake so that it is now accessed from the left side of the bike, or did you flip it and rotate it 180 degrees so that it is accessed from the right side?
Thanks!
bicyclist
Guest
OK, thanks, Bob. You had me scratching my head, there.
chillman
Guest
Well I can't thank all of you enough for the information on how to check the valves. Margaret has 21,000 miles on her and I figured it was time to get her 600 mile valve clearance check done. ") Thanks to the information here I can say it was only going to be a 2.5 hour job--if I weren't an idiot! You see every one of the connections involved in the valve check goes wire to device--except one which the parts fiche labels as the Camshaft Pulser Assembly. That attaches from one wire to another. And lucky for me one half of the wire conveniently hides behind the rear cylinder and the other half drops under the coolant hoses if you drop them. Sigh, 2.5 hours turns into about 8 and I disassemble again, fit everything back together, rinse repeat. . . Funny once you plug them together the bike starts quite nicely.
Thanks to the information here I can say it was only going to be a 2.5 hour job--if I weren't an idiot! You see every one of the connections involved in the valve check goes wire to device--except one which the parts fiche labels as the Camshaft Pulser Assembly. That attaches from one wire to another. And lucky for me one half of the wire conveniently hides behind the rear cylinder and the other half drops under the coolant hoses if you drop them. Sigh, 2.5 hours turns into about 8 and I disassemble again, fit everything back together, rinse repeat. . . Funny once you plug them together the bike starts quite nicely.
For those keeping track: all of the valves were in spec. The .009 gauge wouldn't fit in any of them, and it was pretty consistent that the exhaust valves were at .008 and the intakes were at .006 so I didn't change a thing. I am VERY impressed with how clean the engine is inside--thank you Amsoil and Mobil 1. However I was disappointed with how gunky the intakes were. I only buy gas from two places and regularly run Lucas Oil injector cleaner about every 3 months. Injectors were pristine, but the tops of the intake valves have a ton of deposits on them. I am still getting 64 MPG indicated--60 calculated, but I have a feeling that if this keeps up it will require the heads to be removed and valves cleaned or the mileage will plummet. Plugs look great but it is time for the OEM air filter to go, so I'll do all of them next month when I change the oil.
Thanks again for all of the great tutorials, hints, videos and stories!
Thanks to the information here I can say it was only going to be a 2.5 hour job--if I weren't an idiot! You see every one of the connections involved in the valve check goes wire to device--except one which the parts fiche labels as the Camshaft Pulser Assembly. That attaches from one wire to another. And lucky for me one half of the wire conveniently hides behind the rear cylinder and the other half drops under the coolant hoses if you drop them. Sigh, 2.5 hours turns into about 8 and I disassemble again, fit everything back together, rinse repeat. . . Funny once you plug them together the bike starts quite nicely. For those keeping track: all of the valves were in spec. The .009 gauge wouldn't fit in any of them, and it was pretty consistent that the exhaust valves were at .008 and the intakes were at .006 so I didn't change a thing. I am VERY impressed with how clean the engine is inside--thank you Amsoil and Mobil 1. However I was disappointed with how gunky the intakes were. I only buy gas from two places and regularly run Lucas Oil injector cleaner about every 3 months. Injectors were pristine, but the tops of the intake valves have a ton of deposits on them. I am still getting 64 MPG indicated--60 calculated, but I have a feeling that if this keeps up it will require the heads to be removed and valves cleaned or the mileage will plummet. Plugs look great but it is time for the OEM air filter to go, so I'll do all of them next month when I change the oil.
Thanks again for all of the great tutorials, hints, videos and stories!
Why don't you run some Techron through it? It keeps things clean from what I can tell.
skiper
Guest
Thank You George, ... you are a gentleman and a scholar. any questions you ever have about acupuncture and what it can do - just ask. ralph
skiper
Guest
Thanks Ken, same for you and anyone i forget - if q's come regarding acupuncture ask me... ralph
Since my new to me NT already had all the plastic removed (its Prof's deer catcher bike), I thought I'd do the valve check on it. Too lazy to hook up the internet down in the shop, so all I had was the service manual. I had to walk away a couple of times...... lol
It took almost forever to loosen the screw on the right side throttle body. I managed to get an 8mm open end on it, and patiently undid it that way. When I put it back together, I twisted the compression ring a bit so I can now access it with a long screwdriver from the right side. I did unhook the top radiator hose, and that helped as well. Lost about 1/2 cup of radiator fluid, but that's easily replaced
I seemed to have lost a screw from the air cleaner cover. I was pulling out the recessed one and it fell off the screwdriver and I wasn't quick enough to catch it. I heard it land....somewhere.... I have looked everywhere.....its gone. Pretty sure its at that place where socks go when they disappear from the dryer.
Now that I know what I'm doing, the valve check on Pete's NT should be a piece of cake.
I will be searching for the screw. With my luck, it fell on the carpet under the bike and I just haven't seen it there. I don't have any of the Tupperware for the bike, so I have a month or so to find the screw before I get all the new plastic ordered and it gets put back together.Not that it matters, but I wouldn't button the bike up without finding that screw. Too much trouble that it can get into there. There aren't a lot of hiding spots..
Back when I learned to adjust the valves on my '99 Concours, my instructor pointed out that the cam lobes were circular for about 180-degrees of their circumference. So, he said, if the lobes of the cams were pointing away from the rocker arms, there was no pressure on the valves except for the spring pressure. We would just "bump" the starter until the cam lobes were pointing away from the rockers. It worked just as well as lining up the markings on the flywheel because you had visual confirmation of the cam/rocker orientation.
Just had mine in to the dealer for it's 600mi service last month. I talked to the tech who did the work, he said a couple of the valves were out of spec. The techs at the shop where I purchased the bike are great, they know me by name and they know I'm an experienced auto technician so I have no reason to doubt them.
FWIW, the valve train/rocker arm setup on the NT700 is very similar to the older Accord/Civic engines that had SOHC and 16 valves. Honda goes with what it knows, I guess.
I've always had to adjust one or more valves on those car engines too. Typically it's done during a timing belt R&R.
Brad
FWIW, the valve train/rocker arm setup on the NT700 is very similar to the older Accord/Civic engines that had SOHC and 16 valves. Honda goes with what it knows, I guess.
I've always had to adjust one or more valves on those car engines too. Typically it's done during a timing belt R&R.
Brad
Does one NEED the Honda Tappet wrench to access the valve locking nut?
From the pictures posted It looks like most are accessible, but I don't know about the ones in the very front.
The Honda tappet wrench is quite expensive, around $40 for just one wrench. I found these at Sears, would they work:
http://www.sears.com/craftsman-professional-5-pc-metric-full-polish-12/p-00944350000P?sLevel=0&redirectType=SKIP_LEVEL
Also, does anyone know what size wrench is needed? I can't find it listed anywhere, not even in the service manual.
DirtFlier
Site Supporter
The Honda special wrench has a 10 mm hex and the offset from the handle is 7/8" which is huge. This allows the wrench to easily clear rocker arm stand and rocker arm bolts on other models. The handle is extra-long at 9-3/4," measured from the center of the hex to the end of the handle.
I've run into that same visual problem with LED worklights that have multiple bulbs as they would cast strange shadows on the shiny, oiled surface of the flywheel. I now use a small flashlight with a single LED bulb.
I've run into that same visual problem with LED worklights that have multiple bulbs as they would cast strange shadows on the shiny, oiled surface of the flywheel. I now use a small flashlight with a single LED bulb.
That is the same set I own, and works fine for the NT. KenI found these at Sears,
skiper
Guest
Response to Dee G's problem of dropping something when fiddling with the clamps of throttle bodies. Well it won't help you now Dee but maybe someone else. I lost a phillips tip when tightening throttle clamp right side. Heard it bounce and rattle. It turned up after removing the cover of water pump on left side of bike. The cover that has three rubber drainage hoses. Tip fell out when removing cover. Also warning to " be careful loosening the clamp for throttle body cause the nut is not attached to clamp and if you loosen way too far it will drop and fall away either into the valley or the top of head and you will need a magnet."
Re: Observations from my second Valve Check
Bob- after reading your post I was nervous about nicking the gaskets. The front cover was especially tight to R & R without scraping it against stuff.
I found it so much easier to remove the front Throttle Body insulator manifold first. (The part w/the throttle body clamp around it). It's only two bolts and only took a minute. Don't forget to plug the hole.
The front valve cover came out and went back much, much easier and safer with that removed.
Coyote Chris
Site Supporter
Re: Observations from my second Valve Check
This probably got mentioned somewhere but I will put it here again. Remove the rear valve cover and set those valves before removing the throttle bodys. Then, reinstall the cover and just remove the bodies and put them on the rear cover.
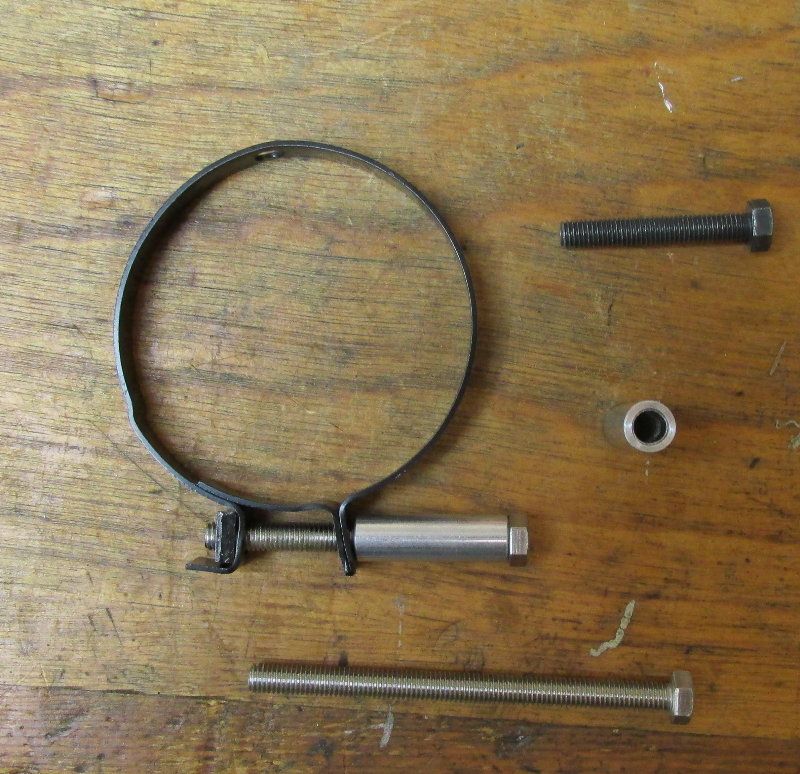
Also, for very little money, you can put a screw head extension on the forward throttle body clamp. And you can make it as long as you want. I picked up a couple of sleeves and of course you can use one, one and a half, etc. Screws are M5x50mm and M 5x70 mm 18-8s.
It is then a simple matter to put a mini socket set on the hex bolt head, which is now where you can see it. If you like, you can put a washer under the head of the new bolt so that it rests against the sleeve. Makes centering the socket head easier.
Here is my album of pics I took.
http://s1217.photobucket.com/user/CoyoteChris303/library/NT valves?sort=3&page=1

This probably got mentioned somewhere but I will put it here again. Remove the rear valve cover and set those valves before removing the throttle bodys. Then, reinstall the cover and just remove the bodies and put them on the rear cover.
Also, for very little money, you can put a screw head extension on the forward throttle body clamp. And you can make it as long as you want. I picked up a couple of sleeves and of course you can use one, one and a half, etc. Screws are M5x50mm and M 5x70 mm 18-8s.
It is then a simple matter to put a mini socket set on the hex bolt head, which is now where you can see it. If you like, you can put a washer under the head of the new bolt so that it rests against the sleeve. Makes centering the socket head easier.
Here is my album of pics I took.
http://s1217.photobucket.com/user/CoyoteChris303/library/NT valves?sort=3&page=1


Bob- after reading your post I was nervous about nicking the gaskets. The front cover was especially tight to R & R without scraping it against stuff.
I found it so much easier to remove the front Throttle Body insulator manifold first. (The part w/the throttle body clamp around it). It's only two bolts and only took a minute. Don't forget to plug the hole.
The front valve cover came out and went back much, much easier and safer with that removed.
Last edited:
WVRider
Site Supporter
Could not agree more ! You can skip others as most of us have figured out but I wouldn't that one.Stex,
I think that the 600 mi check could be the most crucial. the 600 mile check gives you an important baseline.
Coyote Chris
Site Supporter
That reminds me...the dealer did check at 600, and I did the next one....I think I had to touch 2 valves...the third check is coming up and I am going to elongate the period and see what happens to the readings. If nothing has changed very much, I will keep the longer period.....
Could not agree more ! You can skip others as most of us have figured out but I wouldn't that one.