Damn the bad luck!

mikesim

Site Supporter
Joined
Jun 7, 2011
Messages
3,363
Age
74
Location
Union, MO
Bike
NT700, Red, #989,
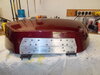
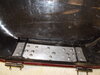
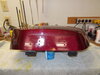
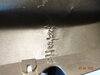
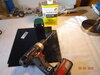
Yesterday, I was relocating the attachment points for the pannier lid tethers on Traveller. The mounting bosses molded into the pannier lid had cracked apart from the self tapping screws. I initially tried to rebuild the bosses using JB Weld but gave up after several attempts to rebuild them in a manner that would last. I then got some stainless hardware #10 machine screws, finish washers and nylock nuts and drilled holes in the pannier sides and attached the tethers in that manner. The screw heads and finish washers are visible but are very unobtrusive and really don't hurt the appearance. The right lid has always been somewhat mor difficult to latch closed and I am just days away from tearing into the latch mechanism and removing it and installing by exterior combination latches. However, when I tried closing the right lid I put pressure on the upper portion of the lid as I always have done and the lid cracked. Damn! The crack is about six inches long from the top of the pannier at an angle downward. Radiating from that crack is another horizontal crack about four inches long. The crack bisects exactly where I was going to locate the combination latch I was going to use. A cursory search of Ebay and OE Honda parts sources revealed that a new lid was unobtanium. I put a search request into a motorcycle salvage yard search tool but I am now looking into plastic welding. It won't look perfect but at 137K miles Traveller has his share of combat wounds so one more won't make any difference.

Mike
 
OP
OP
mikesim

mikesim

Site Supporter
Joined
Jun 7, 2011
Messages
3,363
Age
74
Location
Union, MO
Bike
NT700, Red, #989,
All of the plastic on our 2010-11 NTs is growing old and brittle!
Indeed! I figured that since I would have the bike down a few days for the rear caliper and master cylinder replacement, I would also take the time for a valve adjustment. As you know, a fair amount of tupperware has to be removed for access. I'm especially concerned about the integrity of the meter cover as it always has been a dickens to get off. Grasping and pulling with trim tools always felt like I was pulling to the breaking point before popping free. I recall that one of the attachment tabs broke off the last time I had the meter cover off for service. I will have to put on my kid gloves for future service.

Mike
 
Joined
Jan 23, 2011
Messages
1,293
Location
Arkansas
Bike
2020 Kawasaki Versys
You might try adding some light aluminum behind the crack and bolting or pop riveting to add strength to the patch. I had the bottom of the right pannier crack and put aluminum inside and outside, epoxied and bolted. Yours sounds more difficult. Mine was the bottom where it is flat and not exposed.

Arknt

DSCN0577.JPG DSCN0579.JPG DSCN0594.JPG
 

DirtFlier

Site Supporter
Joined
Dec 13, 2010
Messages
3,341
Location
Troy, OH
Bike
2010 Silver NT700V/ABS
I've never had to remove the meter cover to do a valve clearance check.
 

Coyote Chris

Site Supporter
Joined
Aug 25, 2011
Messages
4,428
Location
Spokane
Bike
10 Red NT 14 FJR, 17 XT
Isn't there a plastic repair kit on the market for fairing type plastic? Seems I used it to good effect on my C10 fairing.
 

Coyote Chris

Site Supporter
Joined
Aug 25, 2011
Messages
4,428
Location
Spokane
Bike
10 Red NT 14 FJR, 17 XT

 
OP
OP
mikesim

mikesim

Site Supporter
Joined
Jun 7, 2011
Messages
3,363
Age
74
Location
Union, MO
Bike
NT700, Red, #989,
I've never had to remove the meter cover to do a valve clearance check.
I will check my shop manual once again, but I am almost certain that I had to remove the meter cover.....

Mike
 
OP
OP
mikesim

mikesim

Site Supporter
Joined
Jun 7, 2011
Messages
3,363
Age
74
Location
Union, MO
Bike
NT700, Red, #989,

Since I wrote my first post, I recalled that there was some stuff that works like a miracle in fixing broken plastic. Mr Google led me to Plastex. I ordered a repair kit and will give it a try.

Mike
 
Joined
May 21, 2022
Messages
9
Location
Indianapolis
Bike
2012 NC700x
I had cracked the tail cowl on my '94 CB1000 when it tipped over into one of its stablemates. I stitched up the crack with a plastic welder:

DSC07757.JPG

I did it from the backside and the hard part is pushing it in hard enough to melt into the abs without causing a ridge on the outside:

DSC07758.JPG

In this case there had been some distortion in the plastic so I made a paste of ABS by drilling holes in a sheet and melting the ribbons in MEK:

DSC07759.JPG

I used the paste like bondo and then sanded and primed that spot and repainted the entire cowl:

DSC07766.JPG
 
Joined
Dec 15, 2010
Messages
34
Location
NSW AUSTRALIA
Try David Silver Spares in U K (google for details) I purchased a Right Side Lid approx sis months ago from them.
Cost me an arm and a leg, However beggars can’t be Choosers !
 
OP
OP
mikesim

mikesim

Site Supporter
Joined
Jun 7, 2011
Messages
3,363
Age
74
Location
Union, MO
Bike
NT700, Red, #989,
I've never had to remove the meter cover to do a valve clearance check.
I will check my shop manual once again, but I am almost certain that I had to remove the meter cover.....

Mike
As always, my remembery was faulty. You are correct, Tosh! The manual doesn't indicate that the meter cover need be removed. I must have removed it for another service that I performed at the same time, perhaps servicing the cooling system. Since the tupperware removal is such a PITA I try to consolidate at my major stuff at the same time.

Mike
 
OP
OP
mikesim

mikesim

Site Supporter
Joined
Jun 7, 2011
Messages
3,363
Age
74
Location
Union, MO
Bike
NT700, Red, #989,
My line of attack this weekend on the broken pannier lid will be to stitch up the crack on the inside with a hot welder. Then, I will apply the plastex along the length of the crack on the inside. Finally, the combination latch that I am installing will straddle the crack on the upper lid. It will be reinforced on the underside with an aluminum plate. The latch assembly will be pop riveted in place. If all goes well, only a hairline crack will be visible on the exterior of the pannier.

Mike
 

Coyote Chris

Site Supporter
Joined
Aug 25, 2011
Messages
4,428
Location
Spokane
Bike
10 Red NT 14 FJR, 17 XT
My line of attack this weekend on the broken pannier lid will be to stitch up the crack on the inside with a hot welder. Then, I will apply the plastex along the length of the crack on the inside. Finally, the combination latch that I am installing will straddle the crack on the upper lid. It will be reinforced on the underside with an aluminum plate. The latch assembly will be pop riveted in place. If all goes well, only a hairline crack will be visible on the exterior of the pannier.

Mike
Go for it!
I feel brittler by the day <sigh>...
Mike
IMG_20230517_203017496_MF_PORTRAIT_copy_600x800.jpg
 
Top Bottom