Fork Seals and 300 Bucks

Joined
Jan 6, 2011
Messages
1,956
Location
Aurora, Colorado
Bike
19 Versys 1K SE, 14 FJR
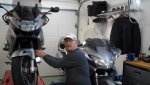
Got a call the other day from my Local Honda dealer that my Fork Seals were in for my ST700. Went down and picked them up and had a chat with Tim, Manager, Son of the owner (Family Run Business). He told me that it cost about 150 dollars a fork to replace the seal. Most of that price is labor. So if you are going to replace seals on both Forks , as you should, the coast is close to 300 bucks + parts. I am doing the job myself as Fork seals are not that technical. More messy and time consuming than anything else. Also I can inspect the bushings in the forks myself. How ever Three Hundred Bucks is enough motivation for me to do them myself anyway. I don't have an extended warranty. By the way Tim told me that the Honda Warranty and Extended Warranty does cover Fork Seals. So here are a few pictures of my work so far. I am not in a hurry as there is still snow and muck on the roads around here and it is still a bit chilly. If I want to go for a ride I have the Wee, as it just came off the lift yesterday and needs a good test ride. Not to mention my lonely ST1300 sitting in the corner of the garage.

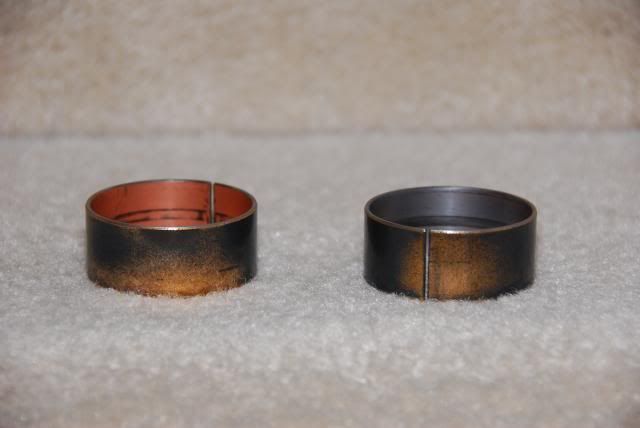
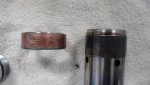
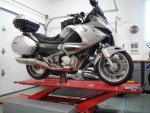
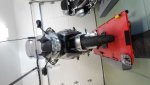
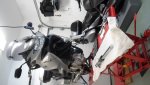
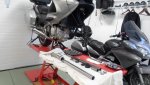
The pictures are of the bike before, during and of the disassembly. Tomorrow is the clean up of parts and then next will be re assembly. One fork is disassembled on the lift , the other is draining in the garage sink. If you decide you want to do this type of job yourself then the best investment is a Honda Service Manual. Do not attempt this procedure with out the Honda Service Manual. P.S. It is a messy Job, make sure you have lots of rags.


Attachments

Last edited:
OP
OP
Chucksklrst
Joined
Jan 6, 2011
Messages
1,956
Location
Aurora, Colorado
Bike
19 Versys 1K SE, 14 FJR
So I got the Parts from the right Fork leg cleaned up and inspected the bushings and piston ring. They are on the edge of needed replacing, so I called the dealer and ordered them. Won't get them in until about a week. Soooo The bike is down until I get those parts. :( I hate it when I have a bike down waiting on parts.:mad1: P.S. In case you are wondering, I ordered all the parts for the left Fork Leg also.
 
Last edited:

tawilke46

Moderator
Moderator
Joined
Nov 26, 2011
Messages
1,252
Location
Baton Rouge, La
I guess if you are going to go to this level of disassembly and effort:p, may as well do a complete rebuild from all new parts. Whether the parts need replacement or not. At least that is what I would do.
 

bicyclist

Guest
Hey Chuck, while you have the thing apart, you might consider slipping on some fork gaiters.

I changed my fork oil last Winter. That stuff was sorta nasty with some sludge in the bottom of the sliders. The bushings and stuff looked fine, so the forks went back together with new oil and seals. The job is a bit messy, but not difficult.
 
OP
OP
Chucksklrst
Joined
Jan 6, 2011
Messages
1,956
Location
Aurora, Colorado
Bike
19 Versys 1K SE, 14 FJR
Interesting, The leaky right fork was very nasty and black oil. In the left fork the oil was still a Honda red and smelled as it should. I wonder why the difference
 

skiper

Guest
Thanks for the inspiring pictures - i will attempt this job soon, do i need any specialty tools ? i have the manual..
 
OP
OP
Chucksklrst
Joined
Jan 6, 2011
Messages
1,956
Location
Aurora, Colorado
Bike
19 Versys 1K SE, 14 FJR
Thanks for the inspiring pictures - i will attempt this job soon, do i need any specialty tools ? i have the manual..
You will need a 5 inch long 6 mm hex wrench. Preferably one that has a Tee handle. You can see mine on the lift between the fork leg and the internal parts. You will also need a 24 mm socket the remove the fork cap. Also a 22 mm socket to remove the front wheel axle. O.... and a lot of rags.
 

skiper

Guest
OK - i watched a vid that warned about not holding end cap near face when unscrewing. i'll watch more vids before doing it..
 
Joined
Jan 14, 2012
Messages
464
Location
Leesburg, Virginia
Bike
2010 Silver NT700
What is the mileage on the bike? The bushings in my wing are typically ready for replacement by 25k miles so I do a complete rebuild just about every year. I don't think the NT is quite so abusive but was curious. Below are the lower bushings after about 35k miles. You can see the areas where the Teflon coating has been completely worn off.


So I got the Parts from the right Fork leg cleaned up and inspected the bushings and piston ring. They are on the edge of needed replacing, so I called the dealer and ordered them. Won't get them in until about a week. Soooo The bike is down until I get those parts. :( I hate it when I have a bike down waiting on parts.:mad1: P.S. In case you are wondering, I ordered all the parts for the left Fork Leg also.
 
OP
OP
Chucksklrst
Joined
Jan 6, 2011
Messages
1,956
Location
Aurora, Colorado
Bike
19 Versys 1K SE, 14 FJR
Bike has just over 25k miles. Here is a picture of the the Slider Bushing and the lower bushing (Bush, Guide) They are only 5 bucks a piece, so for that price it is time to change them since I have the forks broke down for a seal change anyway. I went 100,000 miles on my ST1300 before I needed to change out the seals. (longest lasting fork seals I have had) When I rebuilt the forks the bushings needed to be replaced but were no worse than your wing bushings,


Attachments

Last edited:
Joined
Jan 14, 2012
Messages
464
Location
Leesburg, Virginia
Bike
2010 Silver NT700
Excellent! Thanks for the pictures.
Bike has just over 25k miles. Here is a picture of the the Slider Bushing and the lower bushing (Bush, Guide) They are only 5 bucks a piece, so for that price it is time to change them since I have the forks broke down for a seal change anyway. I went 100,000 miles on my ST1300 before I needed to change out the seals. (longest lasting fork seals I have had) When I rebuilt the forks the bushings needed to be replaced but were no worse than your wing bushings,


bicyclist

Guest
What color should I get?
Well, you have silver and black predominating, but the orange reflector is there, too. You need to watch a few designer shows and consult a color wheel so that you don't have a clash.
 

bicyclist

Guest
i watched a vid that warned about not holding end cap near face when unscrewing
I unscrew the cap while it's still in the triple clamp after I loosen the bottom screw. Let the triple clamp do the job of holding the fork tube until things are loosened up. It's easier than having to fab up some holding mechanism. Push down against the spring while you turn.
 

skiper

Guest
OK - just one more thing - is removing both forks simultaneously for experienced people only ? wondering about alignment issues if any ?
 
OP
OP
Chucksklrst
Joined
Jan 6, 2011
Messages
1,956
Location
Aurora, Colorado
Bike
19 Versys 1K SE, 14 FJR
OK - just one more thing - is removing both forks simultaneously for experienced people only ? wondering about alignment issues if any ?
Not going to bother it, as long as the triple clamps are not loosened. Just follow the procedure in the book when reinstalling forks and front wheel.
 

bicyclist

Guest
wondering about alignment issues if any ?
As with anything else you work on, it depends on the amount of care you take doing the job. If you take a good look at top of the tubes in relation to the upper triple clamp or a measurement (it's in the book) or a picture before disassembly, you should be able to slide the fork tubes back into place with no problem. That's really the only alignment to worry about. The axle takes care of the bottom of the fork, so you need to do the routine of tightening the axle clamp on only one side and bouncing the fork before you tighten the other side, but you should do that whenever you remove the wheel anyway. The book takes you through everything. The only thing that might worry you is that it takes a few good yanks to get the sliders off the tubes, but they'll come. And keep each fork assembly separate from the other so parts don't get mixed up. And keep everything meticulously clean. I think I spent more time cleaning than anything else. It took some time to get the sludge out of the bottom of the sliders.

When I put the fork back together, I put the bottom screw in and then stuck the assembly back in the triple clamp, installed the spring and spacer and put the cap back on. Then I tightened the bottom screw to spec, letting the spring pressure keep the damping rod from turning. Then the spring came back out and I slightly overfilled the forks with oil. You need to squish the forks up and down until the bottom of the slider is full. To set the level, I put a piece of tubing in the fork to the correct depth and used it to suck out the overfill.

HTH
 
OP
OP
Chucksklrst
Joined
Jan 6, 2011
Messages
1,956
Location
Aurora, Colorado
Bike
19 Versys 1K SE, 14 FJR
I am going to go down to Performance Cycle tomorrow and look for Gaiters. What color should I get? I am thinking of purple.
PS anybody know what size, which kind etc. I need to get. Performance Cycle did not have any the right size and I could not tell them for ordering purposes
 
OP
OP
Chucksklrst
Joined
Jan 6, 2011
Messages
1,956
Location
Aurora, Colorado
Bike
19 Versys 1K SE, 14 FJR
As with anything else you work on, it depends on the amount of care you take doing the job. If you take a good look at top of the tubes in relation to the upper triple clamp or a measurement (it's in the book) or a picture before disassembly, you should be able to slide the fork tubes back into place with no problem. That's really the only alignment to worry about. The axle takes care of the bottom of the fork, so you need to do the routine of tightening the axle clamp on only one side and bouncing the fork before you tighten the other side, but you should do that whenever you remove the wheel anyway. The book takes you through everything. The only thing that might worry you is that it takes a few good yanks to get the sliders off the tubes, but they'll come. And keep each fork assembly separate from the other so parts don't get mixed up. And keep everything meticulously clean. I think I spent more time cleaning than anything else. It took some time to get the sludge out of the bottom of the sliders.

When I put the fork back together, I put the bottom screw in and then stuck the assembly back in the triple clamp, installed the spring and spacer and put the cap back on. Then I tightened the bottom screw to spec, letting the spring pressure keep the damping rod from turning. Then the spring came back out and I slightly overfilled the forks with oil. You need to squish the forks up and down until the bottom of the slider is full. To set the level, I put a piece of tubing in the fork to the correct depth and used it to suck out the overfill.

HTH
Good points listed here. Also as Fork oil is a bit expensive, use auto transmission fluid to flush out the tubes. Back in the Day auto transmission fluid is what was used in the forks, so it makes a good cleaner.
 
Top Bottom