Improved Pannier Latches
- Thread starter Brillot2000
- Start date
OP
OP
As the saying goes, "There's more than to skin a cat." I am just saying—no offense to any cat lovers out there.True, Nylocks even better.

- Joined
- Jun 16, 2019
- Messages
- 545
- Bike
- 2010 NT700V
I ordered some stainless steel rivets for a muffler repack. My standard Arrow rivet tool couldn't fully break them. I ended up just cutting the stems. I'll be getting a more robust riveter for next time.I would venture a guess that over 90% of the pop rivets available at hardware & big box stores are the aluminum type. The steel type are often rare and I've only seen them in the 1/8" size.
I can tell right away when using steel rivets because the squeezing force required to break the center pin is much, much greater.
Hi All, I have been meaning to stop by the forum and provide my fix to the external catches. Following the threads on this forum I installed catches using some supplied from the US - why we can't get good versions here in Aus. for less than the cost of a house is beyond me. But good old amazon to the rescue again.
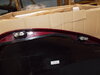
After installation I developed cracks on the bike side of both panniers at the rear catch and the left one broke entirely. My analysis of the situation was because I installed the rear catches too far into the curve of the fairing and then used a hard flat backing plate on the inside of the curve. Possibly also the force of the rivets didn't help the situation either.
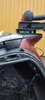
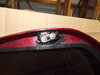
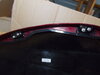
To fix it I first plastic welded the cracked pieces together - not a pretty first attempt at plastic welding but I was okay with it as I knew it was to be covered in the next step. Then using some carbon fibre weave I already had I applied patches to both the inside and outside of the fairing, initially following youtube fairing repair guidance of good quality CA glue to wet down the weave but then reinforcing and finishing with West Systems Epoxy with slow hardener. Once cured I then bent the backing plate to match the inside curve of the fairing and made a rubber grommet from some waste fuel hose. Finally I used nylock nuts and bolts instead of rivets this time.
Of course I used coarse sandpaper first to key the surface. The repair seems to be holding up just nice but I am yet to load of the panniers and go for a long - but I am confident that these two patches are now the strongest parts of the fairing on the bike. If the front ones crack as well I will do the same treatment and should be a bit neater and efficient with it, but so far so good they are holding.
The last photo is just for giggles to prove I do ride the bike outside of commuting to work - there is "big" everything in Aust - almost like a competition between towns to see who can have the "biggest" whether it is sheep, bananas, cows, - you get the drift...
Mark
After installation I developed cracks on the bike side of both panniers at the rear catch and the left one broke entirely. My analysis of the situation was because I installed the rear catches too far into the curve of the fairing and then used a hard flat backing plate on the inside of the curve. Possibly also the force of the rivets didn't help the situation either.
To fix it I first plastic welded the cracked pieces together - not a pretty first attempt at plastic welding but I was okay with it as I knew it was to be covered in the next step. Then using some carbon fibre weave I already had I applied patches to both the inside and outside of the fairing, initially following youtube fairing repair guidance of good quality CA glue to wet down the weave but then reinforcing and finishing with West Systems Epoxy with slow hardener. Once cured I then bent the backing plate to match the inside curve of the fairing and made a rubber grommet from some waste fuel hose. Finally I used nylock nuts and bolts instead of rivets this time.
Of course I used coarse sandpaper first to key the surface. The repair seems to be holding up just nice but I am yet to load of the panniers and go for a long - but I am confident that these two patches are now the strongest parts of the fairing on the bike. If the front ones crack as well I will do the same treatment and should be a bit neater and efficient with it, but so far so good they are holding.
The last photo is just for giggles to prove I do ride the bike outside of commuting to work - there is "big" everything in Aust - almost like a competition between towns to see who can have the "biggest" whether it is sheep, bananas, cows, - you get the drift...
Mark
Attachments
-
 211 KB Views: 71
 -
 160.2 KB Views: 69
 -
 205.3 KB Views: 65
 -
 186.3 KB Views: 63
Hello Mwethers,Hi All, I have been meaning to stop by the forum and provide my fix to the external catches. Following the threads on this forum I installed catches using some supplied from the US - why we can't get good versions here in Aus. for less than the cost of a house is beyond me. But good old amazon to the rescue again.
After installation I developed cracks on the bike side of both panniers at the rear catch and the left one broke entirely. My analysis of the situation was because I installed the rear catches too far into the curve of the fairing and then used a hard flat backing plate on the inside of the curve. Possibly also the force of the rivets didn't help the situation either.
To fix it I first plastic welded the cracked pieces together - not a pretty first attempt at plastic welding but I was okay with it as I knew it was to be covered in the next step. Then using some carbon fibre weave I already had I applied patches to both the inside and outside of the fairing, initially following youtube fairing repair guidance of good quality CA glue to wet down the weave but then reinforcing and finishing with West Systems Epoxy with slow hardener. Once cured I then bent the backing plate to match the inside curve of the fairing and made a rubber grommet from some waste fuel hose. Finally I used nylock nuts and bolts instead of rivets this time.
Of course I used coarse sandpaper first to key the surface. The repair seems to be holding up just nice but I am yet to load of the panniers and go for a long - but I am confident that these two patches are now the strongest parts of the fairing on the bike. If the front ones crack as well I will do the same treatment and should be a bit neater and efficient with it, but so far so good they are holding.
The last photo is just for giggles to prove I do ride the bike outside of commuting to work - there is "big" everything in Aust - almost like a competition between towns to see who can have the "biggest" whether it is sheep, bananas, cows, - you get the drift...
Mark
Nice clean repair and position of the latches (catches).
I managed to break the original latches on my motorcycle end of last last season and have been looking for an alternate solution.
I am also not able to source these from Norway or UK, the only option seems to order these from US. It will cost me about 100 USD

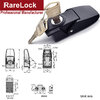
However, I found something similar from aliexpress (https://www.aliexpress.com/item/32616694470.html?spm=a2g0o.cart.0.0.65a638daP0A9Z1&mp=1).

Did you or anyone else had any experience with these?
Bit concern about the quality rest seems close enough.
Kind Regards
Peer
Peer, those look like they would be a good latch to use. I like that the key seems like it would be better than most. I have had two Kawasaki Concours (you call them GTRs) and they had great panniers, but the keys were all either "A" or "B" so they weren't too hard to get into.
Hi Peer, I have bought from China before, mainly for woodworking tools and some hard to get VW parts and for the most part I am more than happy with the quality that comes out of there. In this global economy I think the Chinese companies know they had to up their game when it comes to quality. What I do dislike is the blatant copying of successful brands but I won't get into geopolitical debates here.
If I had seen these ones before I bought from the US for my catches I would have done so even to check the quality before installation. The cost of four is pittance compared to one from the US so what have you got to loose. The only pause for thought I would have is perhaps that the add does not say outdoor application whereas the US ones I bought were marketed specifically for panniers and outdoors applications. But for the price it is certainly worth investigating.
Mine are all keyed alike which is gold so that's probably the most important after the price and durability.
I am loading up my repairs more and more and so far my solution is holding firm. Very happy.
Mark
mikesim
Site Supporter
Peer
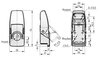
The latches I purchased were the Franzen compact latch 1470. These are made in Germany so I would imagine that they would be readily available in the UK. Nice quality, no key, uses a user settable 3 digit combination lock.
Mike
The latches I purchased were the Franzen compact latch 1470. These are made in Germany so I would imagine that they would be readily available in the UK. Nice quality, no key, uses a user settable 3 digit combination lock.
Mike
Thanks Mikesim, Mwethers and Phil,
I am very pleased to see see all your comments in such a short time All very usefull, my spirits are up
@Mwethers, I agree, I will order these from China to evaluate the quality. I also plan to use flat head screws with with nylon lock nuts, ofcourse with some alimunium back plating.
@mikesim, I like the low profile and compactness of the Franzen compact latch 1470. where did you buy it from, online? and have you manage to fix these, any pictures ?
Kind Regards
Peer
I am very pleased to see see all your comments in such a short time
All very usefull, my spirits are up @Mwethers, I agree, I will order these from China to evaluate the quality. I also plan to use flat head screws with with nylon lock nuts, ofcourse with some alimunium back plating.
@mikesim, I like the low profile and compactness of the Franzen compact latch 1470. where did you buy it from, online? and have you manage to fix these, any pictures ?
Kind Regards
Peer
ST1100Y
Site Supporter
- Joined
- Nov 7, 2020
- Messages
- 600
- Age
- 59
- Location
- Vienna, AuSTria, Europe
- Bike
- ST1100Y, ST1100R, NT700
I'd add a dab of RTV sealant to prevent seepage...I also plan to use flat head screws with with nylon lock nuts, ofcourse with some alimunium back plating.
(the buckles of my ST1100 panniers are backed with rubber plates...)
mikesim
Site Supporter
Peer, I bought those several years ago when I first discovered my OE latches failing. I still haven't installed them but I will do so this spring. Sadly, I can't recall where I purchased them.... sorry.Thanks Mikesim, Mwethers and Phil,
@mikesim, I like the low profile and compactness of the Franzen compact latch 1470. where did you buy it from, online? and have you manage to fix these, any pictures ?
Kind Regards
Peer
Mike
PS Another forum member purchased and installed them on his NT. That's where I found out about them. You may try to do a search for "Franzen" or "1470" on the forum.
Hi All,
Just a quick update, got my latches from china (https://www.aliexpress.com/item/32616694470.html?spm=a2g0o.cart.0.0.65a638daP0A9Z1&mp=1)and following templates.
Latches seems to be of good quality with almost same specs as owatch / Southco V7-20- 101-50 latches. The price was also decent, however, delivery took 25 days.
I will use following provided templates and will report back
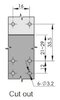
Attachments
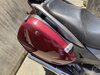
Some more pictures, two more to go.
used 4mm long screws, i used some existing door handle screws
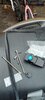
used the provided template in above post. Also made sure that pannier lid was firmly pushed in so latch close tight.
also used some double sides tape to provide a gasket for the latches and better water tightness
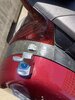
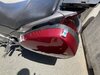
I used the back light as reference point to place the latches so they can be on the same position on the both side

used 4mm long screws, i used some existing door handle screws
used the provided template in above post. Also made sure that pannier lid was firmly pushed in so latch close tight.
also used some double sides tape to provide a gasket for the latches and better water tightness
I used the back light as reference point to place the latches so they can be on the same position on the both side
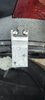
So where do those long screws go on the inside?
Hi Phil,So where do those long screws go on the inside?
Yes, on the fairing side (in the saddlebag) and secured with the washer and locking nut.

mikesim
Site Supporter
So, you are drilling thru both the outer pannier housing and the inner pannier wall, correct? Does that method seem secure? Does the inner pannier flex a great deal when the screws are tightened? Your method of attachment obviates the need for disassembly of the outer pannier housing or attempting to place a reinforcement washer/plate on the underside of the housing. This would make the job about a half hour vs several hours. Worth thinking about.Hi Phil,
Yes, on the fairing side (in the saddlebag) and secured with the washer and locking nut.
Mike
I haven't been on in quite a while, and thought I'd drop back in......
My project for this spring is to actually attempt to UNDO my exterior latches. On my bike it was the screw bosses on the black plastic inner saddlebags that failed -- the bosses that the latch mechanisms mount to. The plastic seemed brittle. Due to others' experiences, I added exterior latches. I sort of regret just jumping straight to that solution. So I have just purchased new inner saddlebag panels and am going to attempt to restore the bike back to the original latches. The side panels were ~$250 each, and the molding codes show they were made in 2016. The only thing I can't undo will be the small screw holes I drilled in the saddlebag lids for the latches. New covers are expensive, and one is no longer available from Honda. But my bike is silver, and I have some heavy-duty sparkly silver stickers from work that are a great match and will cover them up for the near term. As for the lids, I only have 1 screw boss holding one of the metal catch loops that's cracked with a small chunk missing, and I think I will be able to fix that just fine with epoxy. I will keep my eyes open for clean used lids.
Speaking of epoxy, I am thinking about adding some around the screw bosses that hold the latch mechanisms, just to reinforce things, before reassembly.
Will show pictures if all goes well. If all doesn't, I may not.
The only thing I did to my NT latches was reinforce the bosses in the lids. The plastic can seem brittle there. I epoxied a stud in place with a nut to hold the loops.
On my spare lids I epoxied a threaded brass sleeve in place so I wouldn't crack the plastic by overtightening on those.
Arknt
On my spare lids I epoxied a threaded brass sleeve in place so I wouldn't crack the plastic by overtightening on those.
Arknt
mikesim
Site Supporter
Reinforce all of the plastic bosses with epoxy even if they still look good.I haven't been on in quite a while, and thought I'd drop back in......
My project for this spring is to actually attempt to UNDO my exterior latches. On my bike it was the screw bosses on the black plastic inner saddlebags that failed -- the bosses that the latch mechanisms mount to. The plastic seemed brittle. Due to others' experiences, I added exterior latches. I sort of regret just jumping straight to that solution. So I have just purchased new inner saddlebag panels and am going to attempt to restore the bike back to the original latches. The side panels were ~$250 each, and the molding codes show they were made in 2016. The only thing I can't undo will be the small screw holes I drilled in the saddlebag lids for the latches. New covers are expensive, and one is no longer available from Honda. But my bike is silver, and I have some heavy-duty sparkly silver stickers from work that are a great match and will cover them up for the near term. As for the lids, I only have 1 screw boss holding one of the metal catch loops that's cracked with a small chunk missing, and I think I will be able to fix that just fine with epoxy. I will keep my eyes open for clean used lids.
Speaking of epoxy, I am thinking about adding some around the screw bosses that hold the latch mechanisms, just to reinforce things, before reassembly.
Will show pictures if all goes well. If all doesn't, I may not.
Mike