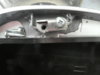
Yeah it finally happened, right side plastic post latch in lid failed, one of the two is broken out. Leaving on a trip in two weeks have little time to get ready, also have to work on the bike outside and the weather is not really on my side this time of year here. I going to just try a temporary fix it with some Gorilla glue I have its the brownish looking stuff and is activated with water, I've read some good post here on repairs for this I will try later. Also the left side lid was repaired by Thumpn sometime before I bought it off him that repair looks good.
Plastic post latch failed...
- Thread starter DarylCincy
- Start date
I'd really encourage you to use Quick Set JB Weld. It won't take any longer than the Gorilla glue and will last your trip and longer.
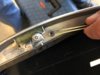
If you can remove the lid and take it inside for repair, it will make the repair process much easier, although the hinge bracket
reassembly can be a bit fiddly with the tiny domed nuts. The bracket screws are not that difficult to strip, at least they weren't for the P.O...
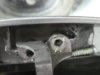
For the repair, use longer screws as shown in the pics to give additional purchase below the break in the towers. First assemble what you can, including
the broken pieces if possible, onto the plastic towers and assemble with the longer screws. Remove the screws, lube them with grease
and assemble again. The grease will allow you to remove and replace the screws once the epoxy hardens. Place the lid so the towers
and posts are vertical. Mix up the quick set epoxy and and coat liberally around the tower and posts where they attach. You may
need to add more epoxy while it's hardening, as it will flow down to the base of the towers, but the quick set epoxy will set quick
enough to allow a good coat around the vertical surfaces..
Good luck with whichever choice you make. Hope the weather will allow you to choose the epoxy.
If you can remove the lid and take it inside for repair, it will make the repair process much easier, although the hinge bracket
reassembly can be a bit fiddly with the tiny domed nuts. The bracket screws are not that difficult to strip, at least they weren't for the P.O...
For the repair, use longer screws as shown in the pics to give additional purchase below the break in the towers. First assemble what you can, including
the broken pieces if possible, onto the plastic towers and assemble with the longer screws. Remove the screws, lube them with grease
and assemble again. The grease will allow you to remove and replace the screws once the epoxy hardens. Place the lid so the towers
and posts are vertical. Mix up the quick set epoxy and and coat liberally around the tower and posts where they attach. You may
need to add more epoxy while it's hardening, as it will flow down to the base of the towers, but the quick set epoxy will set quick
enough to allow a good coat around the vertical surfaces..
Good luck with whichever choice you make. Hope the weather will allow you to choose the epoxy.
I would expect better results with JB Weld or other hard set epoxy also. It fills and reinforces well.
Hopefully the tower is mostly intact as that will help to get the height and alignment correct easily.
Good luck.
Brad
Hopefully the tower is mostly intact as that will help to get the height and alignment correct easily.
Good luck.
Brad
mikesim
Site Supporter
Amen, amen, amen to the JB Weld suggestion. The Gorilla Glue while a good product won't have near the strength of the JB Weld repair.
Mike
PS If you have already used the GG, you can now reinforce the repair with JB Weld. Don't rely only on the GG repair.
Mike
PS If you have already used the GG, you can now reinforce the repair with JB Weld. Don't rely only on the GG repair.
OP
OP
Yeah I used the Gorilla Glue because that's all I had and don't really have enough time and money to do a permanent repair, I will find out tomorrow if this repair will be good enough to get by for the trip? I do know JB Weld would be the best way to go,.When I get back I'll fill it up with JB Weld and tap some 5 mm holes use studs instead of screws and tighten the latches down will nuts. Thank's for all the reply's
OP
OP
Thank's I Plan on it+1 on your idea of using 5 mm studs at a later time. Are you going to be at breakfast this Saturday?
Good luck on your trip to TX and have fun!")
You will not be able to use studs and nuts as the nuts will not fit through the hole in the inner panel where the catch goes through. DAMHIK.Yeah I used the Gorilla Glue because that's all I had and don't really have enough time and money to do a permanent repair, I will find out tomorrow if this repair will be good enough to get by for the trip? I do know JB Weld would be the best way to go,.When I get back I'll fill it up with JB Weld and tap some 5 mm holes use studs instead of screws and tighten the latches down will nuts. Thank's for all the reply's
Even using larger screws can cause clearance problems. You need a larger screw but with a small head or it will not fit.
I had to gently enlarge the ends of the tapered holes where the catch goes through to get my repair to work.
Macka
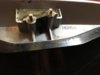
The only real permanent fix is the addition of external latches.
I did the catch repair to make it all work perfectly again in standard form AND fitted the external catches to take the load off the mechanism.The only real permanent fix is the addition of external latches.
Macka
My left pannier catch failed on the weekend after I returned from a long weekend of riding.
I purchased this 2009 bike from the original owner around 6 or 7 years ago when it had only travelled 5,000 Km’s (now has only 16,000 Km’s)
While I have owned the bike I would have opened and very gently closed the panniers less than 50 times.
Looks like I will be inserting threaded rod and converting to nuts instead of screws.
Seagrass
I'd have to agree with this statement. Many others have gone with external latches without any further reoccurrences. Glues and epoxies are just delaying the inevitable. The surrounding plastic of the mounting points has been stressed and eventually will fail.The only real permanent fix is the addition of external latches.
I agree, I installed my latches three years ago. The other thing I did was use half inch wide Arno straps inside the hard case to keep your load from pushing against the lids. I bent S hooks and attached them to two case mounting screws and threaded the straps through the hooks. After you fill a case with gear, snug up the strap to keep the load from pushing against the lid. BBThe only real permanent fix is the addition of external latches.
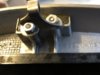
I’m not sure whether you’re still following this thread, but I like the idea of the studs. I’ve test fit both 8/32 & 6/32 threaded stock and prefer 6/32 because it allows for some epoxy down in the towers. The key as you pointed out is the issue of clearance. We know that the existing pan heads fit, thus the ideal fit would be a nut that essentially mirrors that profile. As I see it the problem with the stock screws is that they exert internal outward expansion forces even as they are tightened on minimal material.You will not be able to use studs and nuts as the nuts will not fit through the hole in the inner panel where the catch goes through. DAMHIK.
Even using larger screws can cause clearance problems. You need a larger screw but with a small head or it will not fit.
I had to gently enlarge the ends of the tapered holes where the catch goes through to get my repair to work.
Macka
adding interior straps to keep contents from pressing against the lids is a great idea.
I took heed to your message and went with the 6/32 threaded stock as the associated nuts were similarly sized to the factory screws (see photo). Naturally I tried first w/o epoxy by wrapping the stud with 1/2” masking tape and temporarily securing the latches with nuts. I cut the stock to approx 1” with less than 1/4” exposed to accommodate the bracket & nut leaving a thread or so exposed. I’ve attached photos for those interested. From here I may wrap the perimeter with fiberglass mat and will certainly something to support loads internally.You will not be able to use studs and nuts as the nuts will not fit through the hole in the inner panel where the catch goes through. DAMHIK.
Even using larger screws can cause clearance problems. You need a larger screw but with a small head or it will not fit.
I had to gently enlarge the ends of the tapered holes where the catch goes through to get my repair to work.
Macka
Attachments
-
 80.5 KB Views: 37
 -
 91.5 KB Views: 38
 -
 91.5 KB Views: 37
Another option here is to epoxy in a piece of say brass tube that is drilled and tapped internally. That way you can use a pan head screw and won't have the clearance issue the hex nut requires.
Of course external latches are an option also.
Brad
Of course external latches are an option also.
Brad
That looks good, Orangebob.
Macka
Macka
Eh . . . maybe not so good. I took it on a 90 mile ride and by the time I got there the bust had started to back off . . . vibration. Tightened them with a needle nose and headed home. Again by the time I got there they’d loosened again. Thought I’d add some locktite, but when I attempted to remove the nuts on the front latch I found that the studs were unscrewing from the epoxy in the towers. Also noticed a new crack on the rear tower of the front latch. Conclusions (other than design issues) while the studs don’t apply internal pressure on the towers, any misalignment of the bracket itself on the towers may apply lateral stress to the tower. Perhaps allowing the brackets to float slightly on the towers might relieve stress from closure and flexing while riding. Next step will be to remove the studs on the front latch, drill out and reset the studs. Someone on another post suggested inserting threaded brass tubing into the plastic towers and resorting to pan head machine screws. Comments always welcome. BTW, any thoughts of JB Weld vs epoxy?That looks good, Orangebob.
Macka