Repairing the left side (forward) catch, request a pic if anyone would be so kind?!

Joined
Jun 13, 2020
Messages
14
Location
Maryland
Bike
2010 Met Red NT700V
So have our new-to-us red 2010 partly taken apart for some repairs, repainting most of the black tupperware and routine maintenance.

One of the issues is the left-side pannier won't close properly with the forward latch being broken off. Simple fix? Yup- have the epoxy in hand and will be setting it up tomorrow!

While removing the cover and trying to reset The (root) problem is is seems the forward catch is missing a spring to reset the actual latch. I have to believe the spring broke at some point (or somebody broke it monkeying around in there) and the catch was already in the closed position then they tried to close the bag and it wouldn't work. Then they tried to slam it which I suspect is how the latch was broken...

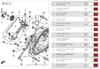
From parts diagrams, that (the missing spring) looks to be the only missing/failed part. My question is would anyone out there either have a pic of the left-front mechanism in it's proper configuration or willing to pull their seat and left grab-handle to snap a pic??

Here is a pic of mine taken from the right side looking back toward the mechanism with every thing in the locked position. Yes, I know it's filthy but working on that too!
IMG_20200616_170313.jpg


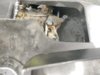
Well, I "think" it's in the right positions since the spring is missing and taking a guess at what it's supposed to be, hence the request for a pic to make sure I set it up properly once I get the replacement spring.

Thanks in advance!!!


Allen
 
Joined
Nov 7, 2017
Messages
1,300
Age
50
Location
Sun Valley, CA
Bike
NT700V, NC700X, XL600R
I poked my head in that area with a bright flashlight. Based on your image as a comparison, you are missing both the return springs on the two moving plates. Honda does sell the springs separately, see the screenshots below.

1592699125059.png


1592699094820.png
 
Joined
Jun 16, 2019
Messages
545
Bike
2010 NT700V
I wrote up a detailed overview of the latch mechanism starting here

This photo shows the spring on the forward left latch:

 
OP
OP
Allen_B
Joined
Jun 13, 2020
Messages
14
Location
Maryland
Bike
2010 Met Red NT700V
I poked my head in that area with a bright flashlight. Based on your image as a comparison, you are missing both the return springs on the two moving plates. Honda does sell the springs separately, see the screenshots below.
The exploded diagram is the same I used to try and figure it out (Partzilla?) and have already ordered the springs, but I only ordered a pair of the 77266 that show on the forward (lower) latch. Got 2 just in case (figure it's a weak point) but I didn't see another spring on the lower assembly...
Now just waiting for them to arrive and figure out how to install!


Allen
 
Last edited:
Joined
Jun 16, 2019
Messages
545
Bike
2010 NT700V
It would be easiest just to pull the inner saddle bag, black half. That latch assembly comes out with it. I recently had to replace this hunk of plastic due to an accident and it wasn't that bad to get out. Maybe 15 mins worth of work.

-Pull the seat
-Remove the left side middle plastic piece. the one that covers the regulator/rectifier
-Remove the black tail cap. piece directly behind the seat.
-Remove the left side lid, loosen straps and unbolt hinges.
-unbolt the left grab rail, flip it over and remove the pull cable from the lock
-take note of following cable routing before removing them...
-unhook the pull cable end from the seat latch (the mechanism where the seat actually clips, not the cable end disappearing into the latch assembly you're working to get to)
-unhook the pull cable from the left side latch sliding bracket.
-go around to the right side and open the lid, remove the 1 phillips screw at the bottom of the luggage pass-thru that pulls the left/right saddle bag pieces together
-go back to the left side and remove all of the Allen head bolts inside the black saddle bag half. I arranged them when pulled in the outline shape of their installed location, so I could easily put them back. Don't forget the little screw, item 16 on the above diagram as well.
-pull out the whole plastic piece, make sure cable ends aren't snagging as you do so.
-once out, remove the latch assembly. It is held in place with phillips screws to plastic posts.

Assembly is reverse of removal. Just be sure the seat release lever is flipped to go through the opening in the saddlebag plastic before you screw it down. Also watch the rear fender seam is engaging with the saddlebag plastic properly.

There are some spacers that live between the plastic and the subframe, like that item 17. They may be annoying to put back. I wound up taping one (it was either 17 or 20) in location onto the back of the plastic, not obscuring bolt hole. So I could get the hex bolt through the plastic/spacer/ to subframe all in one motion.
 

Phil Tarman

Site Supporter
Moderator
Joined
Dec 12, 2010
Messages
9,369
Age
81
Location
Greeley, CO
Bike
2010 Silver NT700VA (ABS)
Thank you for this write-up! I'm sure that after 80K miles and many trips, my external latches are going to be replaced before long and I've been dreading getting the whole thing apart.
 

mikesim

Site Supporter
Joined
Jun 7, 2011
Messages
3,363
Age
74
Location
Union, MO
Bike
NT700, Red, #989,
Thank you for this write-up! I'm sure that after 80K miles and many trips, my external latches are going to be replaced before long and I've been dreading getting the whole thing apart.
Yup! Me too! Removing the pannier housings is what's kept me from doing the job so far. I guess it's like anything else, dread of the project is usually worse than the actual job itself. Now that I'm retired I don't have the "time crunch" of getting the bike back together so I can ride it to work the next day.

Mike
 

Phil Tarman

Site Supporter
Moderator
Joined
Dec 12, 2010
Messages
9,369
Age
81
Location
Greeley, CO
Bike
2010 Silver NT700VA (ABS)
My biggest problem will be the lack of dexterity I've got since I broke my left hand when the deer tried to kill me in '16. Naturally, I'm left-handed. I can't write worth a flip (and never was very good) or do anything else without issues. I did manage to get my Zumo XT wired into the bike, though.
 
Joined
Jun 16, 2019
Messages
545
Bike
2010 NT700V
It was more annoying taking my Givi trunk plate off than the rest of the job. To speed things along I used a little 12V 1/4 bit drive electric screw driver (NOT an impact) fit with the right size Allen bit. I think it's a 5mm, maybe 6mm.
 
Last edited:
Joined
Nov 7, 2017
Messages
1,300
Age
50
Location
Sun Valley, CA
Bike
NT700V, NC700X, XL600R
Once you have gone through this all and it breaks again. I hope you would be more open to considering the external latches at that time.

Good luck on your adventure.
 
OP
OP
Allen_B
Joined
Jun 13, 2020
Messages
14
Location
Maryland
Bike
2010 Met Red NT700V
Was very fortunate in that the only item broken/mission was the one return spring on the lower catch. 20 minutes to tear-down, replace, test and button back up!

Since repairing the one lid latch (which was broken off) and re-enforcing the other 3 with epoxy, we now have fully functional panniers!

Thanks again to all- It is greatly appreciated!


Allen
 
Joined
May 1, 2017
Messages
21
Location
SE Michigan
Bike
Silver NT700VA
It would be easiest just to pull the inner saddle bag, black half. That latch assembly comes out with it. I recently had to replace this hunk of plastic due to an accident and it wasn't that bad to get out. Maybe 15 mins worth of work.

-Pull the seat
-Remove the left side middle plastic piece. the one that covers the regulator/rectifier
-Remove the black tail cap. piece directly behind the seat.
-Remove the left side lid, loosen straps and unbolt hinges.
-unbolt the left grab rail, flip it over and remove the pull cable from the lock
-take note of following cable routing before removing them...
-unhook the pull cable end from the seat latch (the mechanism where the seat actually clips, not the cable end disappearing into the latch assembly you're working to get to)
-unhook the pull cable from the left side latch sliding bracket.
-go around to the right side and open the lid, remove the 1 phillips screw at the bottom of the luggage pass-thru that pulls the left/right saddle bag pieces together
-go back to the left side and remove all of the Allen head bolts inside the black saddle bag half. I arranged them when pulled in the outline shape of their installed location, so I could easily put them back. Don't forget the little screw, item 16 on the above diagram as well.
-pull out the whole plastic piece, make sure cable ends aren't snagging as you do so.
-once out, remove the latch assembly. It is held in place with phillips screws to plastic posts.

Assembly is reverse of removal. Just be sure the seat release lever is flipped to go through the opening in the saddlebag plastic before you screw it down. Also watch the rear fender seam is engaging with the saddlebag plastic properly.

There are some spacers that live between the plastic and the subframe, like that item 17. They may be annoying to put back. I wound up taping one (it was either 17 or 20) in location onto the back of the plastic, not obscuring bolt hole. So I could get the hex bolt through the plastic/spacer/ to subframe all in one motion.
I have a question about the 4th step. I tried to unbolt the left lid hinges to effect a repair and found there was quite a bit of resistance when I tried to withdraw the studs after removing the acorn nuts. There are 2 small metal plates that sandwich the lid at that point to reinforce the plastic which are probably adding resistance. I tried tapping the studs lightly to remove them but they didn’t seem to budge and Ididn’t want to force it. Am I missing something here?
 
OP
OP
Allen_B
Joined
Jun 13, 2020
Messages
14
Location
Maryland
Bike
2010 Met Red NT700V
I have a question about the 4th step. I tried to unbolt the left lid hinges to effect a repair and found there was quite a bit of resistance when I tried to withdraw the studs after removing the acorn nuts. There are 2 small metal plates that sandwich the lid at that point to reinforce the plastic which are probably adding resistance. I tried tapping the studs lightly to remove them but they didn’t seem to budge and Ididn’t want to force it. Am I missing something here?
No, you're not missing anything. As I recall, there's a small metal plate the two threaded studs attach to and the studs come up from the bottom. There's nothing special holding them in place but I have to wonder if Honda used a small dab of glue to keep it in place.

Each one was a bugger to get out and did have to tap on each stud to get them to free up. Having it to do again, I would remove the acorn nuts, then thread them back on just a turn or two. Gives a cleaner surface to beat on and alternate each side so the part comes loose evenly...


Allen
 

DirtFlier

Site Supporter
Joined
Dec 13, 2010
Messages
3,341
Location
Troy, OH
Bike
2010 Silver NT700V/ABS
I've had both sides of the saddlebag body off more than once for various reasons. Without removing the saddlebag body, there is no clear way to clean all the crud off the latch mechanisms. With the saddlebag body removed, you can remove the latching mechanism and clean it thoroughly in solvent. And also check for damage of the plastic towers onto which the mechanism is attached.

Road grit mixed with dried grease is what causes it to stop working. Once clean, I lube the latch mechanism yearly with silicone spray because it lubes without attracting and holding all that road grit. Yup, I still have the original mechanisms and they work fine. :)

ps. ...and I did replace all the springs on both sides.
 
Joined
Oct 6, 2011
Messages
253
Location
New Mexico
Bike
KLR650, Red NT700V, YZFR3
The only real fix is to throw away the whole latching system and replace it with external latches.
That whole rubegold arrangement is almost guaranteed to fail.
 
Joined
Jan 23, 2011
Messages
1,293
Location
Arkansas
Bike
2020 Kawasaki Versys
Another thing that may make removing your hinge plate more difficult is there is a rubber "gasket" under that metal strap. When tightened the rubber squeezes into the void areas causing friction. You might take a thin blade or screwdriver to remove those plates and rubber cushions.

Brad
 
Joined
Jun 16, 2019
Messages
545
Bike
2010 NT700V
I have a question about the 4th step. I tried to unbolt the left lid hinges to effect a repair and found there was quite a bit of resistance when I tried to withdraw the studs after removing the acorn nuts. There are 2 small metal plates that sandwich the lid at that point to reinforce the plastic which are probably adding resistance. I tried tapping the studs lightly to remove them but they didn’t seem to budge and Ididn’t want to force it. Am I missing something here?
No, you're not missing anything. There can be a bit of resistance to getting the studs through the plates. As mentioned there is rubber gasket material under the plates that could be squeezing into the threads as they pass through the plate adding resistance. Spray a bit of your favorite break-free onto the studs (PB-blaster, liquid wrench, WD-40 etc.) just in case there is corrosion between the studs and plates. You don't want to be tapping directly on the studs (chance of messing up the threads) so thread the acorn nuts back on like 1-1/2 turns and tap on them instead.

Tap down evenly (gently) on both hinges, little bit on every stud. If you make to much progress on a stud or hinge, that brings the chance of binding the other.

When I did mine, instead of tapping I think I just pressed down on the studs with the butt end of the ratchet wrench and wiggled the hinge plate back and forth from underneath.
 
Last edited:
Joined
May 1, 2017
Messages
21
Location
SE Michigan
Bike
Silver NT700VA
Th
Another thing that may make removing your hinge plate more difficult is there is a rubber "gasket" under that metal strap. When tightened the rubber squeezes into the void areas causing friction. You might take a thin blade or screwdriver to remove those plates and rubber cushions.

Brad
Thanks much, I’ll give it a shot over the next couple days and let you know.
 
Joined
May 1, 2017
Messages
21
Location
SE Michigan
Bike
Silver NT700VA
No, you're not missing anything. There can be a bit of resistance to getting the studs through the plates. As mentioned there is rubber gasket material under the plates that could be squeezing into the threads as they pass through the plate adding resistance. Spray a bit of your favorite break-free onto the studs (PB-blaster, liquid wrench, WD-40 etc.) just in case there is corrosion between the studs and plates. You don't want to be tapping directly on the studs (chance of messing up the threads) so thread the acorn nuts back on like 1-1/2 turns and tap on them instead.

Tap down evenly (gently) on both hinges, little bit on every stud. If you make to much progress on a stud or hinge, that brings the chance of binding the other.

When I did mine, instead of tapping I think I just pressed down on the studs with the butt end of the ratchet wrench and wiggled the hinge plate back and forth from underneath.
Thanks! Good point about re-attaching the nuts first. Actually, I was tapping with a screwdriver handle but the tack hammer was next. I’ll give it a shot over the next couple of days and let you know. BTW, do you know if the lids are polystyrene or abs?
 
Top Bottom