spark plug caps and tupperware

Joined
Jun 14, 2012
Messages
1,425
Location
Richardson, TX
Bike
2010 Red NT700
I need someone to 'splain me this business about spark plug caps... Do you not change the whole spark plug wire??? It seems like the wire comes with coils and everything so I am totally confused.
Do I purchase caps only and change them out? If so, how?

Also, how much tupperware do I absolutely have to remove to change plugs and caps?
 

Phil Tarman

Site Supporter
Moderator
Joined
Dec 12, 2010
Messages
9,369
Age
81
Location
Greeley, CO
Bike
2010 Silver NT700VA (ABS)
The cap is the part that attaches to the plug top. The wire from the coil goes into the plug cap. I haven't changed the plugs and caps myself, but I think you need to remove quite a bit of plastic and lift the tank.
 

DirtFlier

Site Supporter
Joined
Dec 13, 2010
Messages
3,341
Location
Troy, OH
Bike
2010 Silver NT700V/ABS
The right side only needs to have the air vent piece removed (1 screw). The left side can be accessed once the seat is removed but it may be necessary to lift the tank to get more space for your fingers. I've done it without lifting the tank.
 
OP
OP
RedNigel
Joined
Jun 14, 2012
Messages
1,425
Location
Richardson, TX
Bike
2010 Red NT700
I'm still confused. I have changed a million spark plug wires on cars but you guys are acting like the cap is a separate thing from the wire. Can someone make it more clear?
 
Joined
Sep 5, 2019
Messages
26
Location
Houston, TX
Change them out when you get the chance because I just now fixed my 2010 Honda NT700V by changing them out and the bike hasn't been running for 6 months and I was starting to pull my hair out , I had already changed the most difficult to change sensor, thats the CPK, or Pulse Generator that is under the clutch cover forcing you to remove the exhaust and I beleive it was the plugs the whole time because I never got any MIL lights.

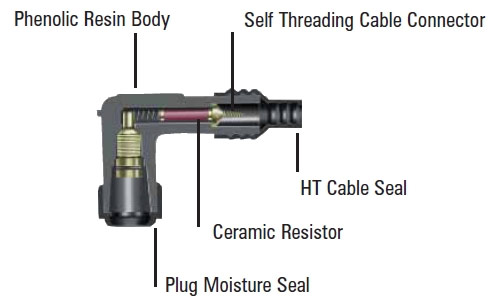
My bike only has 6800 miles on it and the plug ends went bad and started causing misfires and it dieing, but only once it heated up and only when I gunned it in traffic making it a very hard to spot and potentially dangerous problem if it happens to you at 60mph which it did with me. You know you will need them if you pull the rubber plug off the spark plug end and it doesn't say NGK on them. Its hard to read but its there. Mine say "TEL" TP05K02W, with some kind of Star Trek looking logo, and the TEL ones actually look better on the inside having a solid brass cap, and the new ones, NGK look identical but inside have a more traditional brass clamp style. The NGK part # is 30700-MEW-922, I got them from Partzilla.com, they were $10 each plus $10 for expedited shipping. $30 total, you will need two of them.

You pop your plug wire cap off the plugs, then twist them counterclockwise while holding the plug wire tight and they rotate off. Then remove the rubber shilding piece coupling the wire to the plug end and replace it with the NGK ones , and then screw the NGK plug on clockwise while pushing and it will get tight. Its pretty dummy proof and took me about 15 minutes once I got the tupperware off and I had my tank tilted up. That would also be a good time to change the air filter as its right there and is a pain also.


Half way down the page, DNKTNG posted the instructions with pictures. Bike ran perfect after replacing them, and was dieing allot before and missing some.


Here is the link:

 
Last edited:
Joined
Sep 5, 2019
Messages
26
Location
Houston, TX
They actually screw on the end of the wires. Yeh its pretty goofy setup but thats what it does and it actually fits pretty tight so it is what it is.
 
Joined
Sep 5, 2019
Messages
26
Location
Houston, TX
Oh one other thing. The Honda dealer has been totally useless this time around, telling me the VIN wasn't on their list of recalls for that, and said I would be charged even when I said, well they are not the NGK ones. I also had bought the extended 100k mile warranty from Honda back in 2010 and it doesn't cover the trunk lids or "panniers" as they call them overseas and the hinges broke. Just saying, the dealer here in Houston was completely useless. I ended up having to fix the hinges myself with JB weld.
 

Woodaddict

Site Supporter
Joined
Jan 2, 2012
Messages
895
Age
64
Location
Salisbury,NC
2024 Mileage
008308
Bike
Red NT700V & Spyder RTL
i have actually changed spark plugs WITHOUT the Tupperware or tank being dislodged! what helps if you have a plug socket that has a little rubber inside to hold plug, then you can slowly move it down into position
 

DirtFlier

Site Supporter
Joined
Dec 13, 2010
Messages
3,341
Location
Troy, OH
Bike
2010 Silver NT700V/ABS
[...I have actually changed spark plugs WITHOUT the Tupperware or tank being dislodged! what helps if you have a plug socket that has a little rubber inside to hold plug, then you can slowly move it down into position...Woodaddict]

I've also done it that way, using a proper spark plug socket/w rubber insert inside.

On the right side, there is a horizontal frame piece in the way so I first install the socket, then a short 3/8" extension to get past that piece, then finally my ratchet. The left side is just a straight shot down if you know where to look. :)
 

Woodaddict

Site Supporter
Joined
Jan 2, 2012
Messages
895
Age
64
Location
Salisbury,NC
2024 Mileage
008308
Bike
Red NT700V & Spyder RTL
should clarify some, Tupperware I call the painted silver/red/black parts.

as stated above...…….I do same...….Took off the 2 black side vents, the top storage pockets.
 
Joined
Sep 5, 2019
Messages
26
Location
Houston, TX
I got the bike all back together. Put new Shinko 741s on it because it still had original factory tires from almost 10 years ago, which still looked really good but they had started to get flat spots in them from sitting in the garage, almost 7k miles. Very little wear on the tires. Anyhow, bike still runs great! I zipped all up and down the neighborhood but I need to get it inspected and registered before I get out on the highway, but so far so good. Can't believe this whole time it was spark plug caps.
 
Joined
Sep 5, 2019
Messages
26
Location
Houston, TX
Speaking of tupperware. I used "Forever Black" black dye off Amazon. This is my 3rd bottle and this stuff has been amazing on all the black trim parts on all my vehicles. I usually put on two coats, but by the kit with the cleaner and follow the directions. Best black dye for rubber and plastic I have seen so far. Here the rear end in order dyeing it.
 

Attachments

Joined
Mar 19, 2014
Messages
18
Location
Shawnee, KS
The plug cap resistor is considered a 'collateral pawn' prone to failure at a subjective time or mileage. Kinda like how long do you go between oil changes. I always replaced my wire caps on all my bikes & 30k as part of a complete service.
 

Frosty

Site Supporter
Joined
May 25, 2011
Messages
603
Location
Spokane, WA
Bike
2020 Triumph 900GT
Speaking of tupperware. I used "Forever Black" black dye off Amazon. This is my 3rd bottle and this stuff has been amazing on all the black trim parts on all my vehicles. I usually put on two coats, but by the kit with the cleaner and follow the directions. Best black dye for rubber and plastic I have seen so far. Here the rear end in order dyeing it.
Does Forever Black leave any surface residue? I tried Solution Finish which seems to be a plastics dye. I did not put it on parts that contact riding gear. It worked ok but I am concerned that surface residue would stain riding gear.
 
Joined
Jun 24, 2019
Messages
336
Location
Kaslo, British Columbia
Bike
2010 silver NT700
Does Forever Black leave any surface residue? I tried Solution Finish which seems to be a plastics dye. I did not put it on parts that contact riding gear. It worked ok but I am concerned that surface residue would stain riding gear.
When I was doing my valves I had most of the plastic off, including the rad surround. The only other piece that had faded was the rear fender part with the license plate on it. The dash was OK as was black plastic that forms part of the saddlebags.
Two spray paints that work on plastic are Rustoleum that contains a plastic primer, and Krylon Fusion. I prefer the Krylon Fusion satin black. It goes on beautifully and dries fast, with just the right amount of shine. The Rustoleum did not spray as well, is enamel based and really slow to dry. It was also shinier than I wanted. Looks like new now, and I know from experience that Krylon holds up really well.
 

RedLdr1

Site Supporter
Moderator
Joined
Dec 12, 2010
Messages
2,583
Location
Woodstock, Georgia
My experience with Forever Black is several years old. But it did not leave any residue when I was using it on a bumper.
 
Top Bottom