Hi Folks,
My NT finally needed a new rear tire, so I looked over the youtube videos and the shop manual, but decided to use a new approach that really worked well. It does NOT require removing the exhaust, and DOES allow the use of a socket on the large 27MM right side axle nut and the extraction of the brake caliper stay nut.
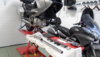
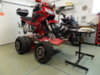
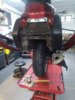
1) put the bike on the centerstand
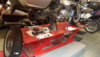
2) (optional) run a rope from the front wheel to the centerstand so the bike can't move forward off the stand
3) use a bottle jack or floor jack on the rear swingarm, either side, to relieve the stress on the rear center mounted shock
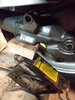
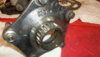
4) remove the hex head bolt and nut from the lower rear shock mounting bracket. It is easily accessible from the side of the bike, with no obstructions. It is a 17mm nut.
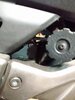
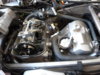
5) ease the wheel and swing arm downward by releasing the pressure in the jack, and the wheel will drop down enough to expose the axle nut and the caliper stay nut. It drops down enough to allow you to use a socket to remove the 27mm axle nut and the brake caliper stay nut. No exhaust removal needed!
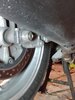
6) remove the rear wheel (optionally, remove the rear fender to gain more clearance and room... I did this and recommend doing so, as it is very easy to do).
After you put the wheel back on, insert the axle, torque down the axle nut (89 Nm) and brake caliper stay nut (89 Nm), and then use the bottle jack to move the swingarm back up into position to reinsert and torque down the rear shock attachment hex head bolt and nut (44 Nm).
Wow, this saved me a LOT of time and frustration compared to other methods I have seen. Perhaps this has already been posted somewhere, but most postings talk about removing the exhaust, and I didn't want to do so.
My NT finally needed a new rear tire, so I looked over the youtube videos and the shop manual, but decided to use a new approach that really worked well. It does NOT require removing the exhaust, and DOES allow the use of a socket on the large 27MM right side axle nut and the extraction of the brake caliper stay nut.
1) put the bike on the centerstand
2) (optional) run a rope from the front wheel to the centerstand so the bike can't move forward off the stand
3) use a bottle jack or floor jack on the rear swingarm, either side, to relieve the stress on the rear center mounted shock
4) remove the hex head bolt and nut from the lower rear shock mounting bracket. It is easily accessible from the side of the bike, with no obstructions. It is a 17mm nut.
5) ease the wheel and swing arm downward by releasing the pressure in the jack, and the wheel will drop down enough to expose the axle nut and the caliper stay nut. It drops down enough to allow you to use a socket to remove the 27mm axle nut and the brake caliper stay nut. No exhaust removal needed!
6) remove the rear wheel (optionally, remove the rear fender to gain more clearance and room... I did this and recommend doing so, as it is very easy to do).
After you put the wheel back on, insert the axle, torque down the axle nut (89 Nm) and brake caliper stay nut (89 Nm), and then use the bottle jack to move the swingarm back up into position to reinsert and torque down the rear shock attachment hex head bolt and nut (44 Nm).
Wow, this saved me a LOT of time and frustration compared to other methods I have seen. Perhaps this has already been posted somewhere, but most postings talk about removing the exhaust, and I didn't want to do so.
Last edited:

 )
)
")