Improved Pannier Latches

Joined
Jul 13, 2018
Messages
6
Location
Alexandria, VA
Hello, had the left latch opening up on the way to work and the right latch snapped off on the right side while removing my bag once I got home.

It was a bad day, but at least I found this solution and it doesn't seem too difficult. I ordered the same OWACH latches and I hope the installation won't be difficult.

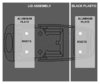
I saw some other youtube video where a guy discussed a special type of rivet that is used for softer plastic material (Wide Grip Blind Rivets for Soft Materials or bulb style). Here's a link to these types of rivets:


Would these be a good candidate for this application? Or is it better/simpler to use the metal backing plates? Perhaps not enough space for the petals to open along the edge?

Hopefully I can get this done sometimes this week. Been commuting to work on the NT700VA and it's been great!

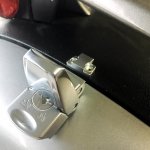
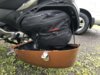
After several go-arounds with many other members regarding the external latches that I choose to install on my bike. I decided to replace them with a sleeker and motorcycle in appearance latches.

I settled on some latches made by OWACH Industrial Hardware available on Amazon, OWACH - CL-307-2L. The locks on these have 3 tumbler plates in the insert and the provided key fits loosely. Security is better than the ones that these replaced.

Here are several pictures of one of these that I installed last night.

13346, 13347, 13348, 13349

These were installed using 1/8" Pop Revits with a 1/16" thick backing plate for rigidity.

I hope that these are more to everyone's liking. I got ripped on the last one that I used.

Let me know what you all think.
 
OP
OP
Brillot2000
Joined
Nov 7, 2017
Messages
1,300
Age
50
Location
Sun Valley, CA
Bike
NT700V, NC700X, XL600R
Would these be a good candidate for this application? Or is it better/simpler to use the metal backing plates? Perhaps not enough space for the petals to open along the edge?

Hopefully I can get this done sometimes this week. Been commuting to work on the NT700VA and it's been great!
I used a small piece of 1/16" flat aluminum plates behind the plastic panels as a backing plate with long enough 1/8" countersink rivets to pass through everything. The rivets squeeze the backing plating and sandwich the plastic between the latch and/or catch plate. I found this method to be strong and sturdy.

I am not too sure of the rivets that you have shown. Plastic tends to be soft and that could work against what you are trying to accomplish here.

I used this very same method for another member on this forum that I did the install for him. He was pleased with the results.

Let us know if decide to use these rivets and how these worked out for you.
 
Joined
Jul 13, 2018
Messages
6
Location
Alexandria, VA
It looked like you used 1/8" rivets. They don't appear to carry these bulb or tri-fold rivets in that small a size. They did have some slightly larger than that that (3/16") which even had a rubber washer, making it waterproof. But I'll go with your method since I'll need 1/8". I don't have aluminum plates laying around though...

I used a small piece of 1/16" flat aluminum plates behind the plastic panels as a backing plate with long enough 1/8" countersink rivets to pass through everything. The rivets squeeze the backing plating and sandwich the plastic between the latch and/or catch plate. I found this method to be strong and sturdy.

I am not too sure of the rivets that you have shown. Plastic tends to be soft and that could work against what you are trying to accomplish here.

I used this very same method for another member on this forum that I did the install for him. He was pleased with the results.

Let us know if decide to use these rivets and how these worked out for you.
 
Joined
Jul 13, 2018
Messages
6
Location
Alexandria, VA
I was going to tackle this external latch installation and thought it'd be a simple job that could be done while the saddlebag was attached to the bike. However, I wasn't sure as to how to go about drilling into the side that is connected to the bike. The lid appears easy enough, (use painter's tape, lift the latch and position the mounting holes and draw the holes onto the painter's tape, drill using 1/8" drill, place aluminum backing under the lid and draw onto the aluminum through the newly drilled holes, then drill the aluminum 1/8", line up and rivet). But what did you do on the bike side? Did you use a backing plate on that side too? I figure that would require removing the saddlebags from the bike (if that permits access behind the plastic).

I'm guessing a photo step by step is unavailable but a text step by step might be very helpful in dealing with installing these on the bike side.

After installing these (which is priority over actually using the saddlebags right now), my hope was that it would not be difficult to figure out how to remove the saddlebag locking function and leave the seat lock functional. I haven't looked into it yet but was thinking remove all the latch parts from the lids and look up what others did with the latch/rod system on this forum. Otherwise, perhaps the easiest would be to remove the latch parts from the lids and use a tool to engage the lock so the key can be retrieved and the seat is locked, while the external latch secures the saddlebags?

A trip to your local hardware store could remedy that I am sure.
 

DirtFlier

Site Supporter
Joined
Dec 13, 2010
Messages
3,342
Location
Troy, OH
Bike
2010 Silver NT700V/ABS
Drilling into the saddlebag is easy but accessing that area with your fingers and tools is nearly impossible without removing the saddlebag from the bike.

I can't recall exactly but I seem to recall that the leftside latching mechanism and one cable has to stay in place to operate the latching mechanism for the seat. You could probably make something to serve that function but why?
 
Joined
Oct 22, 2015
Messages
180
Location
Mechanicsburg, Pa. USA
Bike
2010 NT700V
I did not remove the bike side of the panniers, I used a small plate on the inside to backup the rivet. I was able to slip my fingers in under and hold the plate until the rivet got a hold. (I used aluminum rivets) As far as the locking mechanism, I only removed the latch on the lid and left all the hardware in tact under the seat, the seat lock still works. BB
 
OP
OP
Brillot2000
Joined
Nov 7, 2017
Messages
1,300
Age
50
Location
Sun Valley, CA
Bike
NT700V, NC700X, XL600R
I was going to tackle this external latch installation and thought it'd be a simple job that could be done while the saddlebag was attached to the bike. However, I wasn't sure as to how to go about drilling into the side that is connected to the bike. The lid appears easy enough, (use painter's tape, lift the latch and position the mounting holes and draw the holes onto the painter's tape, drill using 1/8" drill, place aluminum backing under the lid and draw onto the aluminum through the newly drilled holes, then drill the aluminum 1/8", line up and rivet). But what did you do on the bike side? Did you use a backing plate on that side too? I figure that would require removing the saddlebags from the bike (if that permits access behind the plastic).

I'm guessing a photo step by step is unavailable but a text step by step might be very helpful in dealing with installing these on the bike side.

After installing these (which is priority over actually using the saddlebags right now), my hope was that it would not be difficult to figure out how to remove the saddlebag locking function and leave the seat lock functional. I haven't looked into it yet but was thinking remove all the latch parts from the lids and look up what others did with the latch/rod system on this forum. Otherwise, perhaps the easiest would be to remove the latch parts from the lids and use a tool to engage the lock so the key can be retrieved and the seat is locked, while the external latch secures the saddlebags?
Try this template that I made.

I will post a link to my online album later on this morning.
 

Attachments

OP
OP
Brillot2000
Joined
Nov 7, 2017
Messages
1,300
Age
50
Location
Sun Valley, CA
Bike
NT700V, NC700X, XL600R
Here's the link to my consolidated on-line album that has both latch types that I installed on my bike. All these pictures should help you understand the process to install these. Brillot2000 - Pannier Latches Album

I installed a 1/16" think piece of aluminum behind pannier cases. I did the installation while the cases were still attached to the bike. The spacing is tight and will take some time to accomplish this task. Then I used 1/8" countersink rivets to sandwich everything together. This adds structural to the catch. The PDF in my previous post is an installation template and should help you with drilling the holes and approximate placement for the holes on the lid. Drill the holes on the cases first and then the lids. You will also need to remove the latches from the lids too.

I do not recommend that you drill all the holes using the template right away. Drill only one hole for the catch on the case side first. Then install the latch and the rivet into the drilled hole. Then line up the catch to check the alignment of holes between the catch and the template. If the holes do line up, then drill the second hole for the catch. Secure the catch into place before proceeding with the latch installation. Because the lid is curved the placement of the holes for the latch may not line up perfectly. I'd recommend that you place the latch on the lid fully compressed closed. Then check to see how the template holes line up the actual latch's hole and then mark them before drilling any holes for the latches.

Let me know if you any further questions on this matter.
 
Last edited:
Joined
Jul 13, 2018
Messages
6
Location
Alexandria, VA
Thanks everyone, the thought of drilling holes is a bit intimidating.

So when you put the aluminum behind the black plastic, you are sliding the aluminum through the opening of the OEM latch and holding it underneath with a finger?

Would the safe process be:
  1. Use template to drill one hole (preferably the hole farther from the OEM latch opening) into the black plastic
  2. Slide an aluminum backing through the OEM latch area and hold it there
  3. Use a marker to place a dot at the center of the aluminum visible through the drilled hole
  4. Remove aluminum backing and drill 1/8" using the marker dot
  5. Place aluminum backing through the OEM latch area again and align the holes, then place the rivet through and have it pop off
  6. Blindly align the aluminum backing and hole while using your finger
  7. Double check the second hole for the black plastic side and drill the second black plastic and aluminum backing all at once
  8. Rivet
  9. Repeat on the other side black plastic

Then I noticed that you used screws for the silver lid side, so I'm guessing:
  1. Use template to help figure out where to drill 1/8"
  2. Drill one hole
  3. Screw and use a nut on the underside to secure
  4. Align and drill second hole
  5. Screw and use a nut on the underside to secure
  6. Test latching ability
  7. Once satisfied, unscrew both nuts and apply something that will prevent the screw and nut from loosening
  8. Screw again and repeat for the other silver lid side

I think very step by step, it gives me more confidence.


Here's the link to my consolidated on-line album that has both latch types that I installed on my bike. All these pictures should help you understand the process to install these. Brillot2000 - Pannier Latches Album

I installed a 1/16" think piece of aluminum behind pannier cases. I did the installation while the cases were still attached to the bike. The spacing is tight and will take some time to accomplish this task. Then I used 1/8" countersink rivets to sandwich everything together. This adds structural to the catch. The PDF in my previous post is an installation template and should help you with drilling the holes and approximate placement for the holes on the lid. Drill the holes on the cases first and then the lids. You will also need to remove the latches from the lids too.

I do not recommend that you drill all the holes using the template right away. Drill only one hole for the catch on the case side first. Then install the latch and the rivet into the drilled hole. Then line up the catch to check the alignment of holes between the catch and the template. If the holes do line up, then drill the second hole for the catch. Secure the catch into place before proceeding with the latch installation. Because the lid is curved the placement of the holes for the latch may not line up perfectly. I'd recommend that you place the latch on the lid fully compressed closed. Then check to see how the template holes line up the actual latch's hole and then mark them before drilling any holes for the latches.

Let me know if you any further questions on this matter.
 
OP
OP
Brillot2000
Joined
Nov 7, 2017
Messages
1,300
Age
50
Location
Sun Valley, CA
Bike
NT700V, NC700X, XL600R
Thanks everyone, the thought of drilling holes is a bit intimidating.

Then I noticed that you used screws for the silver lid side, so I'm guessing:
  1. Use template to help figure out where to drill 1/8"
  2. Drill one hole
  3. Screw and use a nut on the underside to secure
  4. Align and drill second hole
  5. Screw and use a nut on the underside to secure
  6. Test latching ability
  7. Once satisfied, unscrew both nuts and apply something that will prevent the screw and nut from loosening
  8. Screw again and repeat for the other silver lid side
Would the safe process be:
  1. Use the template to drill one hole (preferably the hole farther from the OEM latch opening) into the black plastic
  2. Slide an aluminum backing through the OEM latch area and hold it there
  3. Use a marker to place a dot at the center of the aluminum visible through the drilled hole
  4. Remove aluminum backing and drill 1/8" using the marker dot
  5. Place aluminum backing through the OEM latch area again and align the holes, then place the rivet through and have it pop off
  6. Blindly align the aluminum backing and hole while using your finger
  7. Double check the second hole for the black plastic side and drill the second black plastic and aluminum backing all at once
  8. Rivet
  9. Repeat on the other side black plastic
The screws that you see in the images are sheet metal screws, so there are no nuts behind them.

You have the basic procedure. However, I would recommend that you drill the catch holes on the black plastic portion first. The latch mounting will slightly vary and will be dependant on the placement of the catch. Also, be sure to close the lid and compress it when trying to determine the latch hole placements.
 
Last edited:

Coyote Chris

Site Supporter
Joined
Aug 25, 2011
Messages
4,435
Location
Spokane
Bike
10 Red NT 14 FJR, 17 XT
Here's the link to my consolidated on-line album that has both latch types that I installed on my bike. All these pictures should help you understand the process to install these. Brillot2000 - Pannier Latches Album

I installed a 1/16" think piece of aluminum behind pannier cases. I did the installation while the cases were still attached to the bike. The spacing is tight and will take some time to accomplish this task. Then I used 1/8" countersink rivets to sandwich everything together. This adds structural to the catch. The PDF in my previous post is an installation template and should help you with drilling the holes and approximate placement for the holes on the lid. Drill the holes on the cases first and then the lids. You will also need to remove the latches from the lids too.

I do not recommend that you drill all the holes using the template right away. Drill only one hole for the catch on the case side first. Then install the latch and the rivet into the drilled hole. Then line up the catch to check the alignment of holes between the catch and the template. If the holes do line up, then drill the second hole for the catch. Secure the catch into place before proceeding with the latch installation. Because the lid is curved the placement of the holes for the latch may not line up perfectly. I'd recommend that you place the latch on the lid fully compressed closed. Then check to see how the template holes line up the actual latch's hole and then mark them before drilling any holes for the latches.

Let me know if you any further questions on this matter.
Thanks! If I replace my OEM latches, I would use these. IMHO the Kawasaki Concours C10 case latches are the gold standard, but they are very expensive. You flip them up, and the case opens an inch. then stops. Push in with your knee or hand an the latches pop up out of battery.
 
Joined
Jan 25, 2012
Messages
709
Age
62
Location
NSW, Australia
Bike
2013 DL650/A & CX500 Euro
Try this template that I made.

I will post a link to my online album later on this morning.
Brillot2000 do you happen to have a template for the Owach latches you used?

I have just received my Owach latches (I had to get a friend in the US to order them and send them to me here in Australia) and plan to install them soon and a template would be very handy.

Thanks Seagrass
 
Joined
Jan 25, 2012
Messages
709
Age
62
Location
NSW, Australia
Bike
2013 DL650/A & CX500 Euro
I found the measurement information I needed to fit the Owach latches and they are now installed on my NT700.

I had previously removed the rear panniers and repaired the screw posts using epoxy resin and I was quite surprised at how many of them had failed.

I decided the external latches were the most sensible option for long term peace of mind.

Seagrass
 
OP
OP
Brillot2000
Joined
Nov 7, 2017
Messages
1,300
Age
50
Location
Sun Valley, CA
Bike
NT700V, NC700X, XL600R
Brillot2000 do you happen to have a template for the Owach latches you used?
I will need to review my CAD files to verify that I do. If I do, I will post it for you all to download and print it locally. It may be a day or two before I can get to this.
 
Joined
Jul 13, 2018
Messages
6
Location
Alexandria, VA
I think you guys are probably more handy than I am. My dad and I looked at the photos and couldn't figure out how to stick the aluminum backing under the black plastic. We attempted to position the lock where the opening of the top locking mechanism was, but even putting an aluminum backing in that opening was difficult. After dropping one in the opening and having the second attempt not fit, we just tried riveting without the backing. We didn't rivet until it popped, for fear of cracking the plastic, and used a Dremel tool to cut the rivet off once it appeared fastened. Upon examining it, the black plastic cracked anyway. The holes don't match up and I'm sure that even if the latch is installed and becomes functional, it will look misaligned (at an angle). So all I currently have is the little catch riveted onto the black plastic, at an angle, and a crack in the black plastic. This was after like 1-2 hours of finding parts, going to purchase the 1/8 drill bit, etc. I've learned that I can do things with a Haines Manual and a YouTube video, but we're not at the level of being handy just going off photos of the finished product. The frustration of it all has got me wanting to just bungee cord/tape up the sidebags permanently so I can get back to riding.

And while I was unscrewing the other locking parts from the lids, I discovered that 3/4 had cracks and broke apart as I unscrewed them from the lids.
 
OP
OP
Brillot2000
Joined
Nov 7, 2017
Messages
1,300
Age
50
Location
Sun Valley, CA
Bike
NT700V, NC700X, XL600R
I have prepared the attached image taken from the perspective behind everything once installed. Forgive the crudeness of the model.

For best results, it was mentioned to use the provided template and to only drill the holes for the catch first. Then to place the aluminum plate behind the plastic housing and mark the holes. Try to line up the hole as close as possible to the center of the backing plate. Once they are, drill the hole in the plate and then install it behind the plastic housing. Line up the holes and install the rivets. Draw them carefully to prevent overstressing the stack up.


14309

The latch holes may not line up perfectly with the template holes. Tape the template firmly to lid and place the latch over the catch to check the alignment. Try to mark their locations as close as possible with the lid closed and the gasket compressed firmly. This may take several attempts, please be patient and take your time. Once you have the locations marked, drill the holes into the lid. After that has been completed, place the aluminum backing plate and then mark the holes onto the plate as previously described earlier.

Good Luck... 🤞
 
Joined
Apr 26, 2021
Messages
3
Location
Melbourne
Bike
2006 Beige NT700V
Hi @Brillot2000 - great thread, I really appreciate all the resources you've shared. Sorry to resurrect the thread but I wanted to check if you're still satisfied with the latches, or if there's anything you'd change? I'm planning to order a set in the next day or two - haven't decided yet whether to buy 2 or 4.

Also I'm wondering if there's anyone in Australia who knows of a local source? I'm hoping to avoid the ~1 month shipping estimate, I'll be selling the bike soon (leaving the country!) and want to do these repairs first. @seagrass, you don't happen to have any spares lying around from when you ordered yours?

Thanks everyone. I'm looking forward to installing these latches, the saddlebags have been a weak link on an otherwise excellent bike since I bought it!
 
Top Bottom