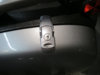
I finally got my latches! I ended up going with the original SouthCo V7 latches (V7-20-111-20) that the OWACH latches are based on:
Draw Latch, Key Locking, Large Size, Zinc Alloy, Chrome Plated, Satin

shop.southco.com
I'm pretty sure the dimensions match exactly to the OWACH ones. Just trying to get up to speed on installing now - can I ask you a few questions
@Brillot2000?
1. Using the template and measuring things out on the pannier lid, it looks like the front set of holes (closer to the lip, which use #6 sheet metal screws) fall very close to the ridge of plastic that runs around the lid. Is that right, and which side of that ridge will the screws actually go into?
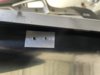
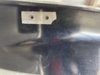
2. Approx what dimensions were your aluminum backing plates?
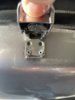
3. I haven't worked with rivets before; I saw you used 1/8" steel rivets, do you know what length or does it matter? And any particular issue using aluminum vs steel rivets?
4. Do you have any photos of what the inside of the lid looks like, with the backing plates and screws+rivets? I saw some internal photos
here but only of your older set of latches.
Thanks, I really appreciate all the info and guidance you've shared already!