Hi Seagrass, have appreciated your input in the CX forums. Both my wife and I have NT700s and both have problems with pannier catches and brittle plastic. What has been your experience with the Owach latches? Did you use one or two per pannier? Have you any advice about where to source them from in the US? (I have contacts in US who can on-post them). Also, any advice about fitting the latches (over and above that contained in this post) would be appreciated.
Barocca interesting how we move to a new machine and run into old friends, Kathy is also on this forum as KathyL.
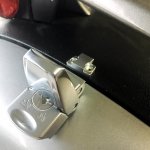
The latches have worked out to be a good option and although I purchased four I only used two of them. I purchased two with locks and two without locks and used the two with locks.
I fitted them following the good instructions on this site and I did not have to disassemble anything although holding the backing plate with one finger while aligning the catch and inserting the pop rivet was quite a balancing act. I got Victor (VC3 on the CX forum) to purchase them from Amazon US and then post them on to me. Not sure if Victor is still happy to help out like this as he was quite sick for a while and could not easily get out to post things.
The mistake I made was that I used stainless steel pop rivets (so they would not corode) BUT they applied far more pressure to the pannier lid and case which has resulted in cracks in the lids and cases. My NT700 is now patiently sitting in the garage under a motorcycle cover waiting for me to pull the panniers apart and fix the damage.
I purchased a 2013 Suzuki DL650 V-Strom with ABS earlier this year and I am enjoying riding that at the moment so I am in no hurry to fix the NT700.
I have recently been working on my CX500 Euro replacing Fork seals and bushes, rebuilding the front brake calipers and improving the mounting brackets for the aftermarket front fairing.
Seagrass
,
,
,